👋 We're here to help!
Our team can help get everything set up on your Shopify store. You can book a call here and we'll walk you through the process! If you'd prefer, you can also use our guide below to try setting things up yourself.
Introduction
SparkLayer enables B2B functionality on your existing Shopify store, allowing your B2B customers to login, place orders, manage their account, and much more.
To familiarise yourself with SparkLayer, we also recommend reviewing the following guides:
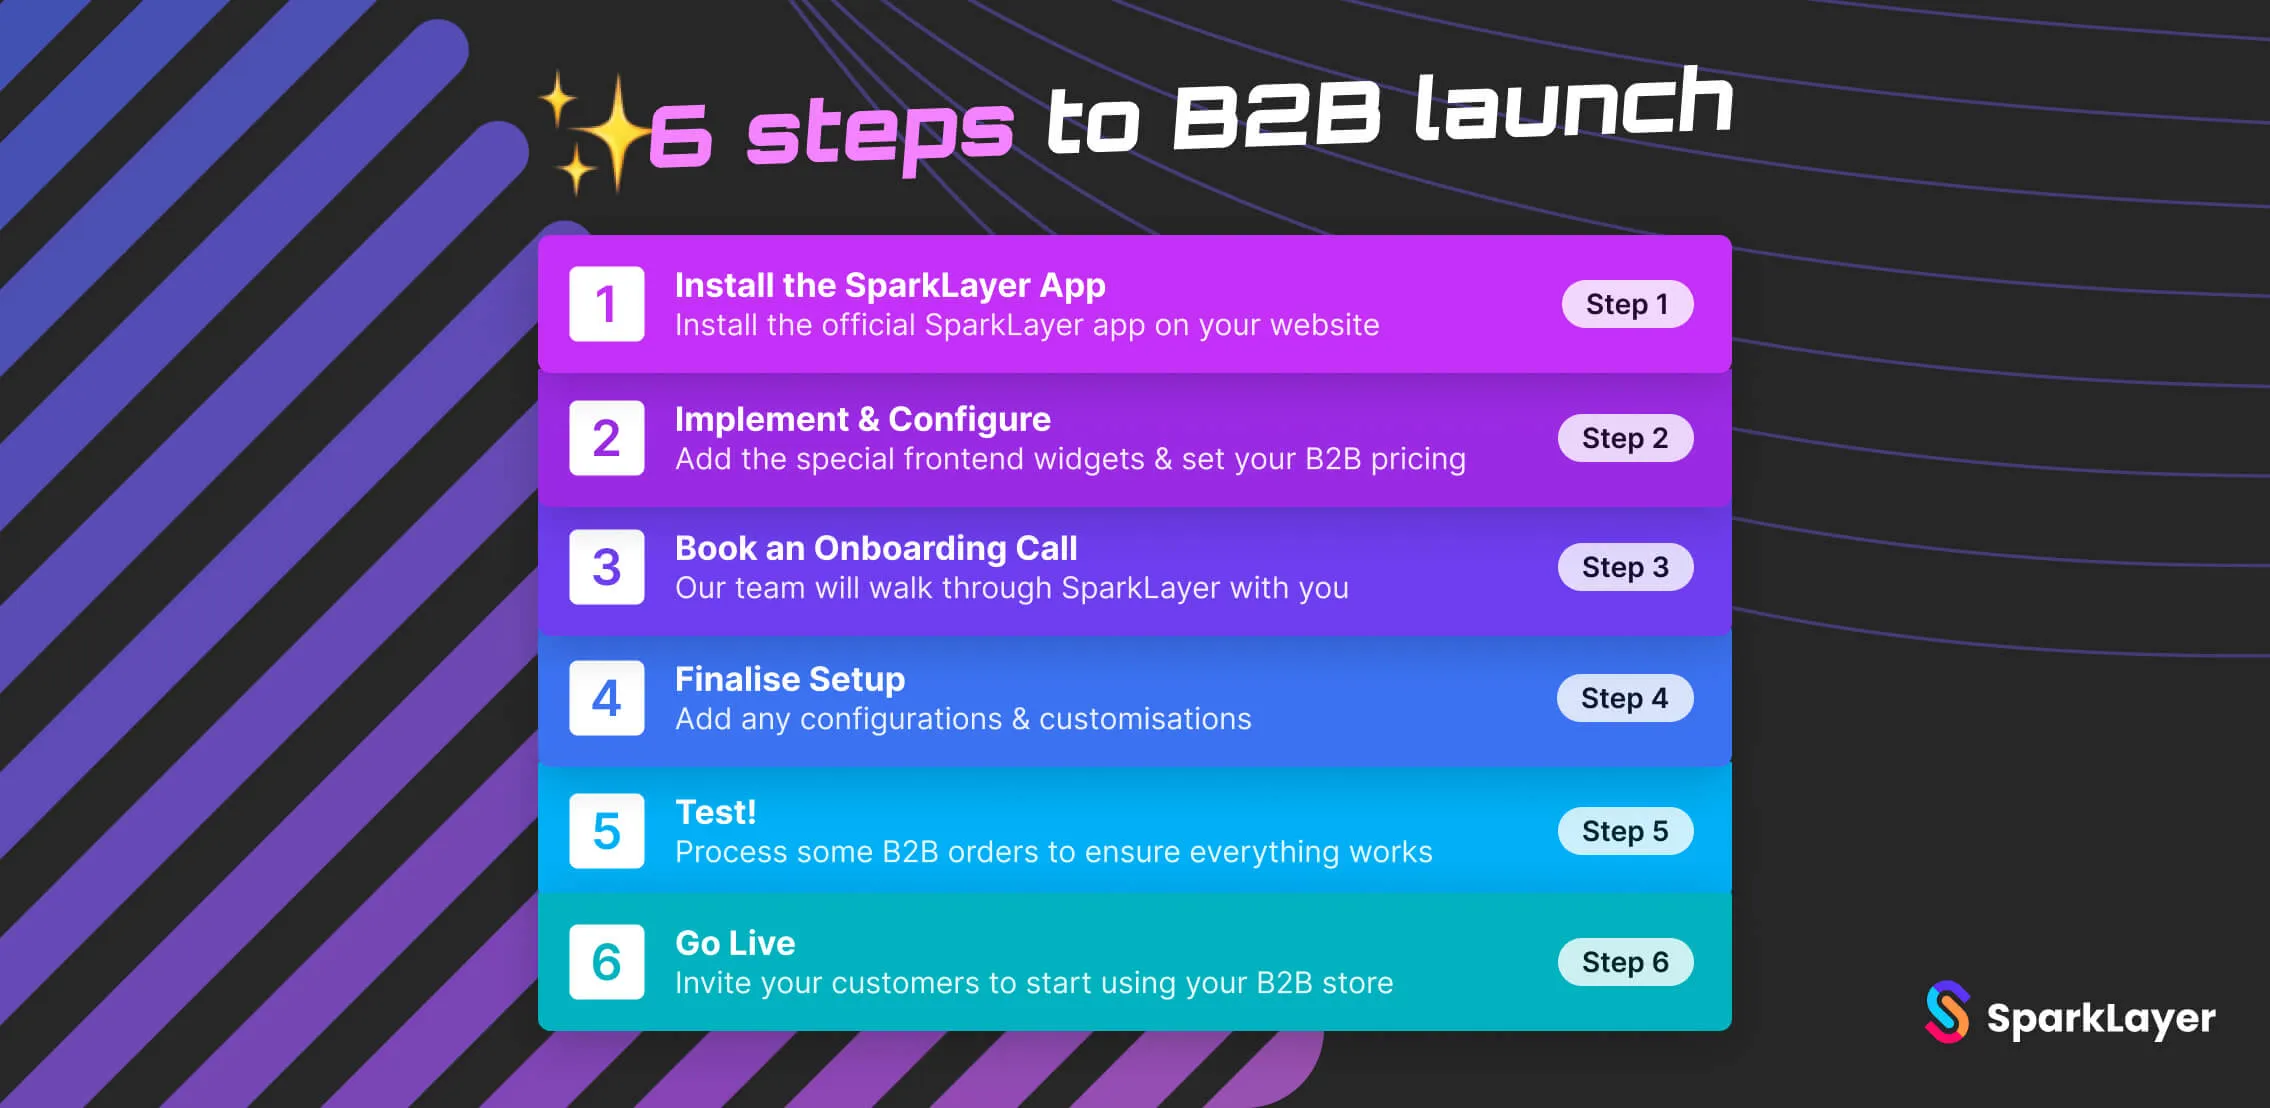
Our customers typically get up and running in a matter of days and the process works as follows:
Our team is available to help support you during the process, from helping set up the special Frontend Interfaces, walking you through how to set up Pricing and Customers, as well as recommending the best ways to go live with our Launching SparkLayer.
⚠️ Requirements
Before installing SparkLayer on your Shopify store, please ensure the following:
Item
Details
Customer Accounts
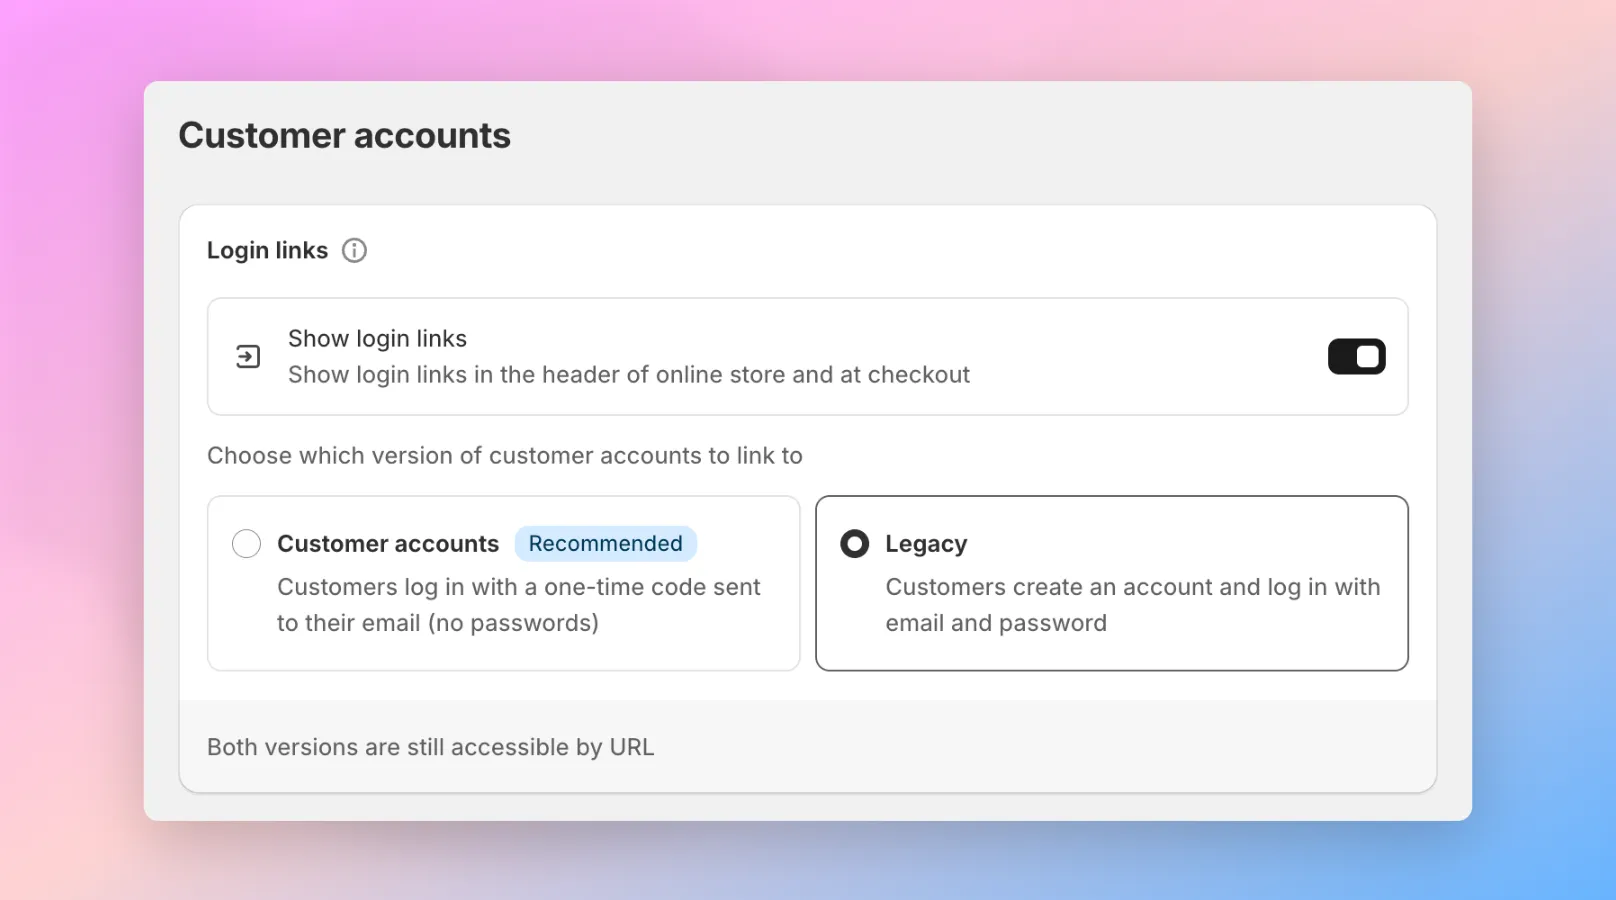
Customer accounts must be enabled on your storefront so customers can sign in. Within your Shopify admin, go to Customer accounts and choose the version you'd like to use. SparkLayer is compatible with both Legacy (Classic) and New customer accounts - see Shopify customer accounts below.
Product SKUs
All products must have SKUs assigned so SparkLayer can save B2B prices against them. See Shopify's SKU guide if you need to add them.
Customers
B2B customers must have a b2b tag on their customer record and at least one address assigned.
Payment Processor
If you’re installing SparkLayer on a test store, please ensure you have an example payment method enabled.
👤 Shopify customer accounts
When setting up your Shopify store, it's possible to choose from two types of 'Customer Accounts' within Shopify:
Legacy customer accounts (formerly "Classic"): this is how most Shopify stores are set up and allows compatibility with third-party apps and the ability to customise the look and feel
New customer accounts: this uses a 'password-less login' and has a locked down account area that uses Shopify's 'out of the box' functionality (very similar to the checkout)
Setting up customer accounts
To check which version you're using, within your Shopify admin, click Settings and go to Customer Accounts. Under 'Customer accounts', simply click the Edit button to change the version.
If you're using Legacy customer accounts, there's no further action to take and SparkLayer is fully compatible.
If you're using New customer accounts, there are some minor configurations to apply to your Shopify store to ensure compatability with SparkLayer (see our guide below).
Which version should I use?
SparkLayer is compatible with both options and there are some advantages and disadvantages with both.
Version
Advantages
Disadvantages
Legacy (Classic)
Smoother customer experience
No configurations required
Funcionality is specific to your Shopify store
Not fully supported by Shopify
Customer accounts (New)
Works on all Shopify stores
Actively maintained by Shopify
Limited customisations (e.g. you cannot customise the look and feel)
Relies on 6-digit code rather than password
Need assistance?
Please speak to our suppor team if you require any help setting this up.
To ensure new customer accounts are compatible with SparkLayer, there are 2 actions to take:
First, enable the SparkLayer "customer account extension" within your Shopify settings (see below)
Secondly, you can then optionally update your theme with a special code snippet that makes the login process a little smoother
Adding an automatic redirect to the customer account area
The first step is to enable the special SparkLayer customer account extension within your Shopify store. Once setup, if a B2B customer accesses the Shopify customer account area, they will automatically be redirected and taken back to your online store.
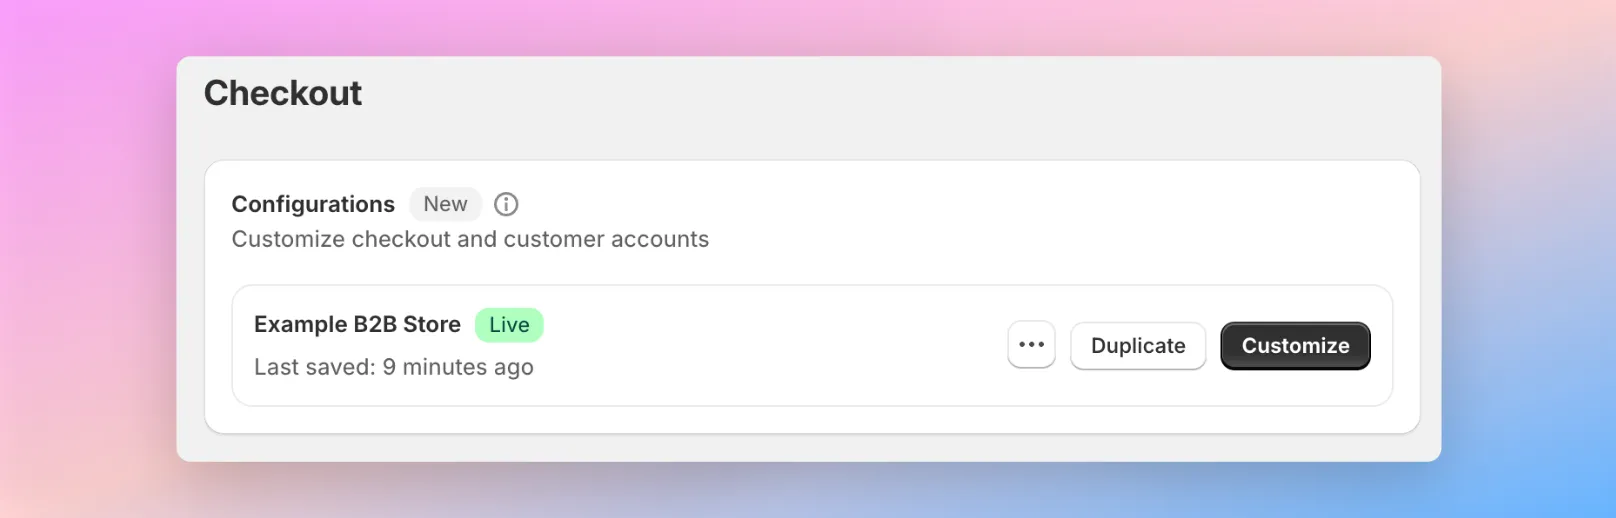
In your Shopify admin, go to Settings, Checkout, and within Configurations, click "Customize".
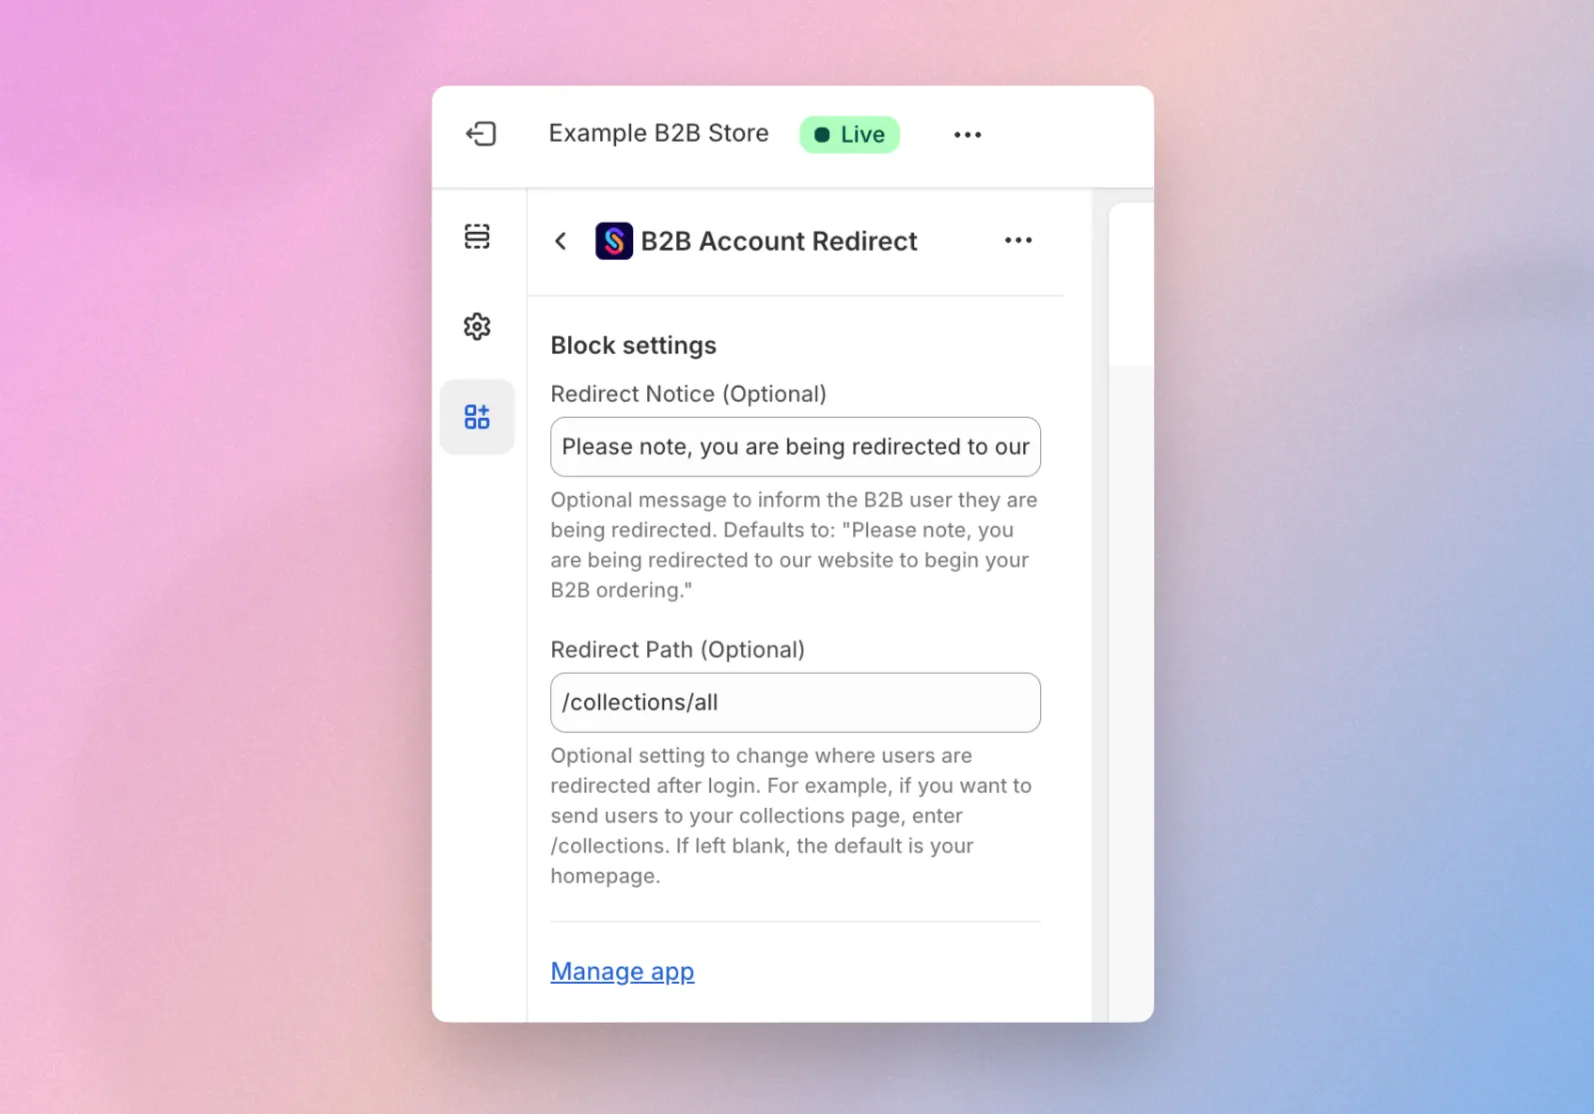
From the top, navigate to the "Orders" page, click "Apps" on the left, and then enable the "B2B Account Redirect" extension. You can also include:
Some optional placeholder text that shows before the customer is redirected should you wish to inform them that they are being redirected.
A specific destination URL to take the customer to once they are redirected. For example, you may want to take them to a specific collection page or a landing page.
Finally, click "Save" and that will complete the process. You only need to apply this once and it'll take effect on all pages within the Shopify Customer Account area
In additional to the automatic redirect detailed above, you can also add some minor customisations to your Shopify theme to make the process a little smoother.
With the addition of some minor code, you can redirect a customer back to the page they were viewing prior to logging in.
Once set up, when a customer signs in, they'll be taken back to your store and can proceeed to use SparkLayer. To get started, you'll need to locate the Shopify liquid code that controls the My Account link.
In our sample code below, we've modified the link destination with the correct syntax.
When you create an account on SparkLayer, you'll get access to the SparkLayer dashboard, which guides you through the steps needed to get up and running.
The onboarding process has the following phases:
1. Test how SparkLayer works
Before installing anything on your theme, you'll first experience SparkLayer as a B2B buyer would. The dashboard walks you through three quick steps:
Step
What happens
Create a price list
Set up your first B2B price list - either as an automatic discount on your Shopify prices, or by uploading a CSV. Learn more about pricing.
Set up a customer
The dashboard creates a test customer for you, automatically tagged b2b and assigned to the price list you just created.
Place an order
Sign in as your test customer, browse your store, and place a test order to see SparkLayer's full B2B experience. The order appears as a Shopify draft order and won't affect inventory.
This phase is fully guided in the dashboard and takes only a few minutes.
2. Finish theme setup
Once you've placed a test order, you'll move on to installing SparkLayer's frontend widgets on your theme. You can either let our team do this for you (recommended) or install yourself - see Installing the frontend widgets below.
While theme setup is in progress, you can continue configuring your B2B pricing and customer groups in the dashboard.
3. Launch
The final step is to run through some launch checks (such as logging in as a real B2B customer and placing an order) and then go live. See our Launching SparkLayer guide for the full launch checklist.
🛠️ Installing the frontend widgets
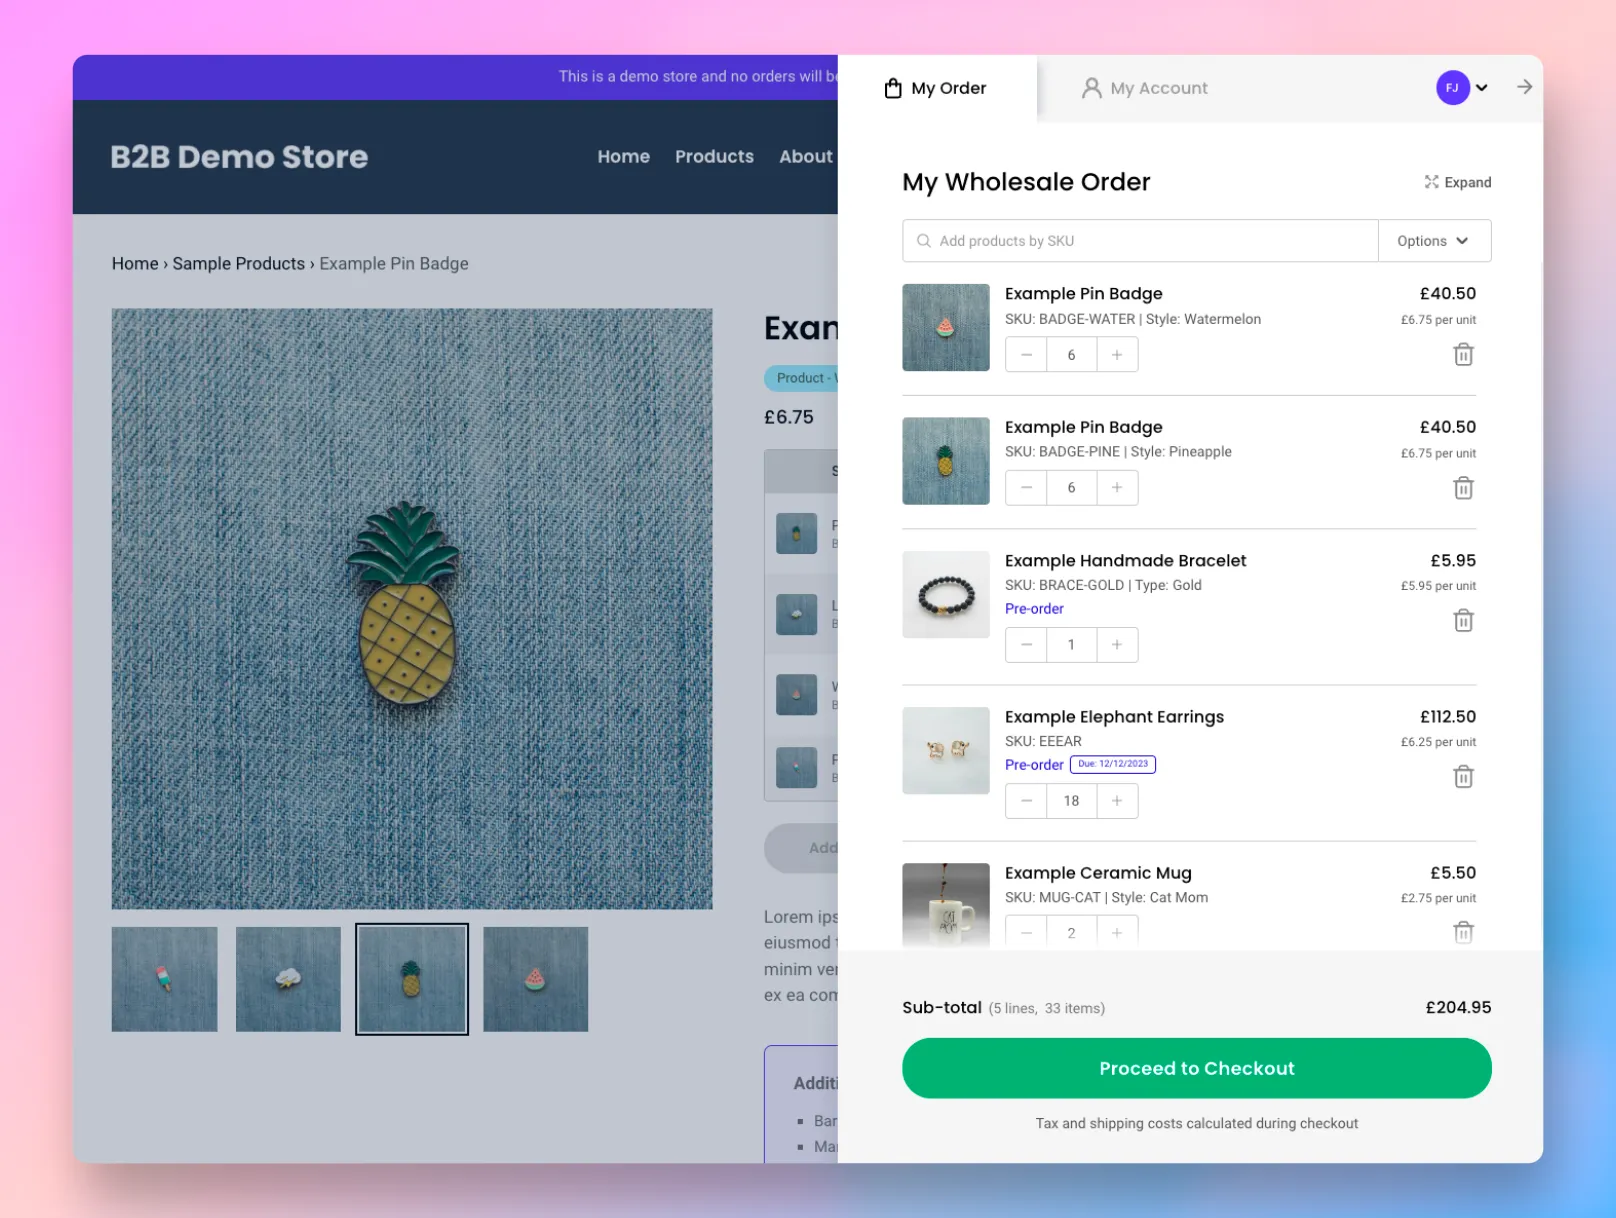
SparkLayer comes with ready-made B2B-optimised "widgets" that we collectively call the SparkLayer Frontend. These overlay sections of your existing Shopify store and enable our powerful B2B features for logged-in B2B customers - leaving your regular DTC experience untouched.
You can install the widgets in one of two ways:
Option
Best for
Time
Install SparkLayer for me (recommended)
Most merchants - no coding required
Typically within 1 working day, free of charge
I'll install SparkLayer myself
Merchants comfortable making theme changes and basic Shopify coding
Variable, depending on your theme
Both options are managed from the Theme setup page in the SparkLayer dashboard.
Option 1: Install SparkLayer for me (recommended)
Our team will install SparkLayer on your theme for you, free of charge. Once you click Install SparkLayer for me, the dashboard will guide you through a four-stage process:
Requesting access - we'll request collaborator access to your Shopify store
Approve access - you approve our access request in your Shopify admin
In progress - our team installs the SparkLayer widgets on your theme
Complete - you're notified once everything is ready
As part of the install, we will:
Add the required storefront elements (product page and product card widgets)
Match your store's branding (colours and fonts)
Add a B2B login and application page
Run checks to make sure everything is set up correctly
Walk you through everything on a free onboarding call
This is the fastest and most reliable way to get SparkLayer installed - most merchants choose this option.
Option 2: Install SparkLayer myself
Please note
We recommend duplicating your live Shopify theme and making changes on the duplicate first. You can publish it once you're happy.
If you'd prefer to install SparkLayer yourself, there are three steps to follow.
The app embed loads SparkLayer's JavaScript on your storefront. From the dashboard, select your theme and click Enable app embed - this opens your theme editor in a new tab where you'll click Save to activate it.
The product detail interface replaces your standard product purchasing area with SparkLayer's B2B-specific pricing and quantity controls when a B2B customer is logged in.
Add the following snippet to the file that controls your product detail page (typically main-product.liquid or product-template.liquid in your theme's /sections/ directory):
If your theme includes the following block, we recommend adding the snippet directly beneath it:
{% when 'price' %}<spark-pdp parent-id="{{ product.id }}"></spark-pdp>
Important: if you're running SparkLayer on your existing DTC theme, you'll need to hide elements that B2B customers shouldn't see (prices, quantity selectors, product options, buy buttons, etc.). To hide an element, add data-spark="b2c-only" to it:
See our Frontend integration checklist for the full list of elements to hide.
The product card interface shows SparkLayer pricing and quantity controls on your collection pages, so customers can add items to their order from anywhere on your store.
Add the following snippet to the file that renders product cards on collection pages (typically card-product.liquid, product-grid-item.liquid, or similar in your theme's /snippets/ directory):
Please note: depending on your theme, the variable product.id may need to be card_product.id or similar. Check your theme's existing variable naming.
As with the product detail interface, hide any DTC elements with data-spark="b2c-only".
Adding CSS customisations
Once the widgets are installed, you can match SparkLayer's styling to your store's look and feel by adding the CSS snippet from here to theme.liquid or a standalone CSS file. This lets you control button colours, font sizes, spacing, and typefaces.
Seeing styling conflicts on a supported theme?
On supported themes, SparkLayer's auto-install applies a small amount of CSS to help the B2B widgets sit cleanly alongside your existing theme. If this is causing styling conflicts with your store, you can disable the auto-install and apply the SparkLayer interfaces manually instead - see Disabling the auto-install below.
App Blocks status
The dashboard shows the live status of each SparkLayer component on your theme:
Status
Meaning
Enabled
The app block is installed and active on your theme
Awaiting team
Our team will install this for you
Pending
The app block needs to be enabled - typically the app embed
Automatic install on supported themes
SparkLayer can be installed on any Shopify theme, but for a range of supported themes, the product detail and product card interfaces are installed automatically. Supported themes include:
If you're on one of these themes, the manual snippet steps above are handled automatically.
Disabling the auto-install
If you'd like to install the SparkLayer interfaces manually on a supported theme - for example, to control exactly where they appear, or to avoid the styling adjustments that auto-install applies - you can disable the auto-install behaviour.
Add the following to your theme's theme.liquid file, just before the closing </head> tag:
Once added, you can follow the manual install steps above to add the product detail and product card interfaces exactly where you'd like them.
B2B Dawn theme
If you'd prefer not to modify your existing theme, our B2B Dawn theme comes preloaded with all the SparkLayer widgets and can be installed in one click from your Shopify theme library.
Finished installing?
Once the widgets are in place, run through our Frontend integration checklist to make sure everything is configured correctly. You can also explore the full set of configurations and customisations available on your store.
📓 Setting up your B2B price lists
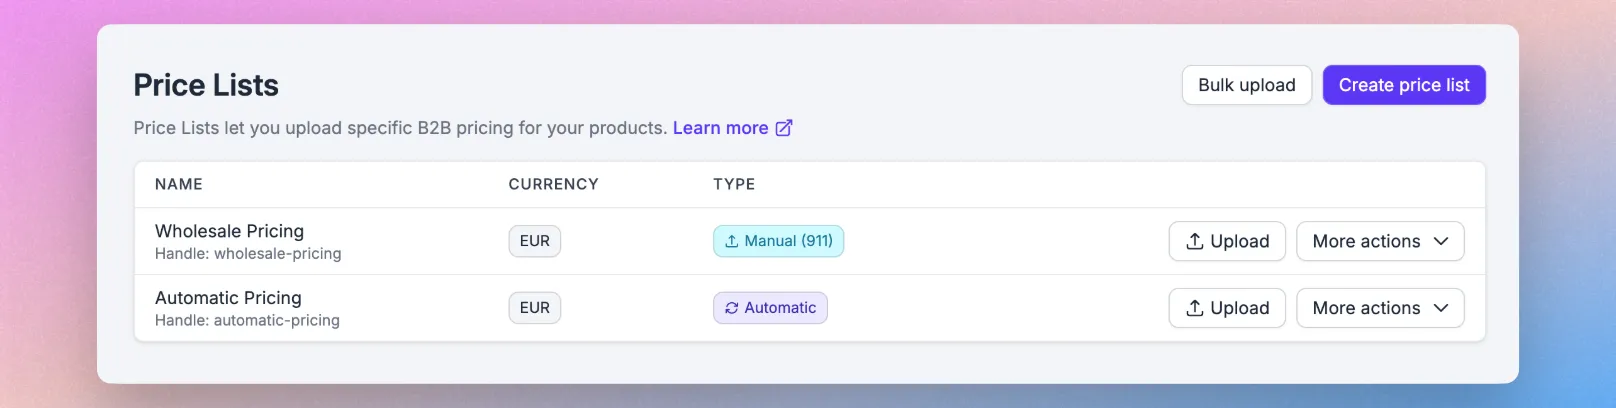
Within the Price Lists area of the SparkLayer Dashboard, you can create and manage your B2B pricing rules.
You can manage your price lists directly inside the SparkLayer B2B & Wholesale sales channel in your Shopify admin - go to Sales channels → SparkLayer B2B & Wholesale → Price lists for the same controls available in the dashboard.
SparkLayer allows you to set the following pricing types:
Type
Details
Automatic
You can use your Shopify prices and apply a discount, e.g. 50% off Shopify retail prices or 40% off your Comare-at Shopify price
Manual
You can manually upload a CSV file with specific prices and even enable quantity pricing
Ready to set your pricing?
To learn more about pricing, please see our full guide here.
👪 Setting up your B2B customer groups
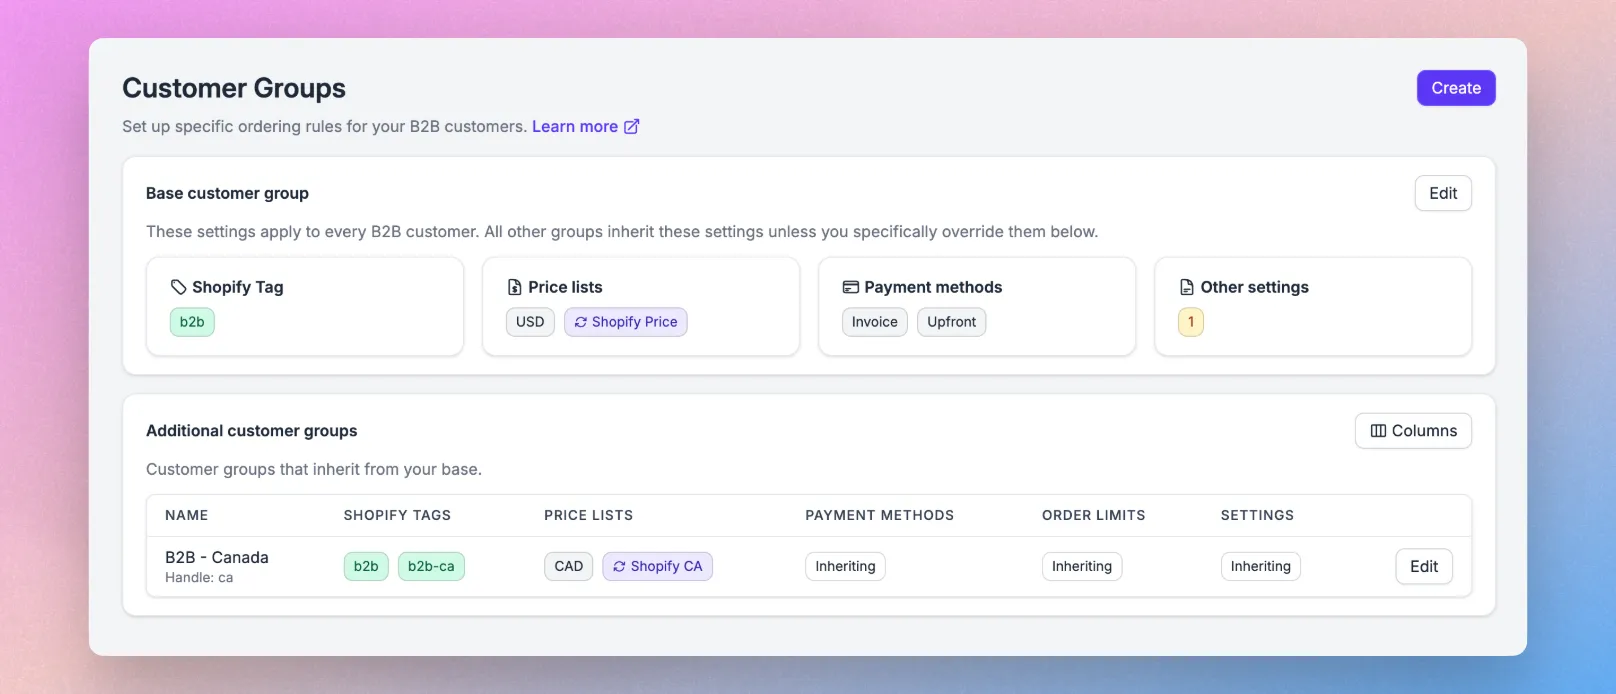
Customer Groups let you configure specific rules for your customers, from defining their minimum order values and which price lists they see, through to what payment methods they're allowed to use when checking out.
You can manage customer groups via the SparkLayer dashboard or directly inside the SparkLayer B2B & Wholesale sales channel in your Shopify admin (under Sales channels → SparkLayer B2B & Wholesale → Customer groups).
Much like with Price Lists, you can fully manage this via the SparkLayer Dashboard.
Please note
For any customers that you want to place B2B orders, they must have a tag of b2b assigned to them in Shopify within their customer record
If you intend to set up Customer Groups that apply different rules per customer, you'll also need to tag customers with additional tags (e.g. b2bb2b-group-2)
Customers cannot have more than two b2b related tags assigned to their customer record in Shopify. For example:
✅ This is correct b2bb2b-vip
❌ This is incorrect b2bb2b-vip b2b-user
If the tag doesn't already exist in your Shopify store, you can simply create it as a new one within Shopify by adding it to an existing customer record.
At least one valid and fully completed address must be assigned to their record in Shopify. This is to ensure the customer can go through the checkout process
Ready to set up your customer groups?
To learn more about customer groups, please see our full guide here.
Using Shopify Companies?
Please refer to our full guide on how Shopify Companies is compatible with SparkLayer.
✅ Testing & launching
The final step is to run some tests and checks to ensure SparkLayer is fully configured. Within the SparkLayer Dashboard, you'll see a number of Launch checks to perform, from logging in as a B2B customer, through to placing an order.
🚀 See our full launch check list
You can see our full launch checklist guide here which covers the key steps to testing and then launching SparkLayer to your B2B customers.
📁 Troubleshooting
To troubleshoot the most common issues (such as issues with pricing), please see our guide here. You can also contact our support team and we'll be happy to assist.
🚀 Best-practice configurations
Once you've completed the SparkLayer integration on your store, you may want to consider enhancing your B2B experience with the following.
SparkLayer works on all versions of Shopify, from Shopify Basic right through to Shopify Plus. All you need is an active Shopify store and you're good to go.
Shopify expanded native B2B features to all plan tiers, including company accounts, up to 3 pricing catalogs, net terms, PO numbers, and easy reorders. For merchants with a handful of wholesale accounts on simple terms, this covers the basics.
SparkLayer is designed for merchants who need more. Here are the key differences:
Pricing flexibility - Shopify's free B2B tier limits you to 3 pricing catalogs assigned to Markets (customer groupings). If you need more than 3 pricing tiers or per-customer pricing, you'd need Shopify Plus at $2,300/month. SparkLayer gives you unlimited price lists on all plans, assigned directly to customer groups.
Sales team ordering - Shopify offers staff accounts that can create draft orders in the admin. SparkLayer has a dedicated Sales Agent Portal where reps log in, switch between customer accounts, see customer-specific pricing, and place orders on behalf of buyers. It's a fundamentally different workflow.
B2B ordering features - Several capabilities are only available through SparkLayer and don't exist on any Shopify plan, including Plus: CSV and bulk order upload, AI Intelligent Cart (auto-builds carts from emailed POs), saved shopping lists, advanced discounts, a Quoting Engine for quote-to-order workflows, and self-service invoicing.
Works on any theme - SparkLayer overlays a B2B experience on top of your existing Shopify theme. Shopify's native B2B works best with their Trade theme.
Transaction fees - SparkLayer charges no transaction fees on any plan. Shopify charges variable platform fees on B2B orders across all plan tiers.
Shopify Companies compatibility - SparkLayer works alongside Shopify's Companies feature. Draft orders created through SparkLayer are automatically associated with the correct Shopify Company, Contact, and Location for accurate order attribution and reporting.
SparkLayer and Shopify's native B2B can't currently run side by side for the same customer session - it's one or the other for the ordering experience.
Yes! If you're setting up SparkLayer on a development store (e.g. a test account), we can enable a special developer-mode that lets you use SparkLayer until you're ready to activate a billing plan. Please contact us for more details.
Yes, It's possible to install SparkLayer onto your existing Shopify DTC store (i.e. retail), meaning you can run both DTC and B2B on the same store. We call this a 'hybrid setup' and we've a guide here that explains how works. When your B2B customers sign in, they simply see the special SparkLayer Frontend interface that allow them to see their prices and place orders.
If you want to see this in action, you can try our B2B/B2C demo store here
Sometimes it can be better to separate out your B2B store onto a secondary Shopify store and we've detailed some of the common reasons.
When setting up your Shopify store, it's possible to choose from two types of 'Customer Accounts' within Shopify:
Legacy (Classic) customer accounts: this is how most Shopify stores are set up and allows compatibility with third-party apps and the ability to customise the look and feel
New customer accounts: this uses a 'password-less login' and has a locked down account area that uses Shopify's 'out of the box' functionality (very similar to the checkout)
Compatibility with SparkLayer
SparkLayer works with both versions of accounts. You can learn more in Shopify Customisations under "Shopify customer accounts"
When a customer places an order via the Shopify Checkout, SparkLayer needs to know when the order is completed. By adding a special Shopify pixel, this then resets contents of the customer's order and allows them to place additional orders if they wish. Please note, this step is fully automated when you install SparkLayer and no action is typically required.
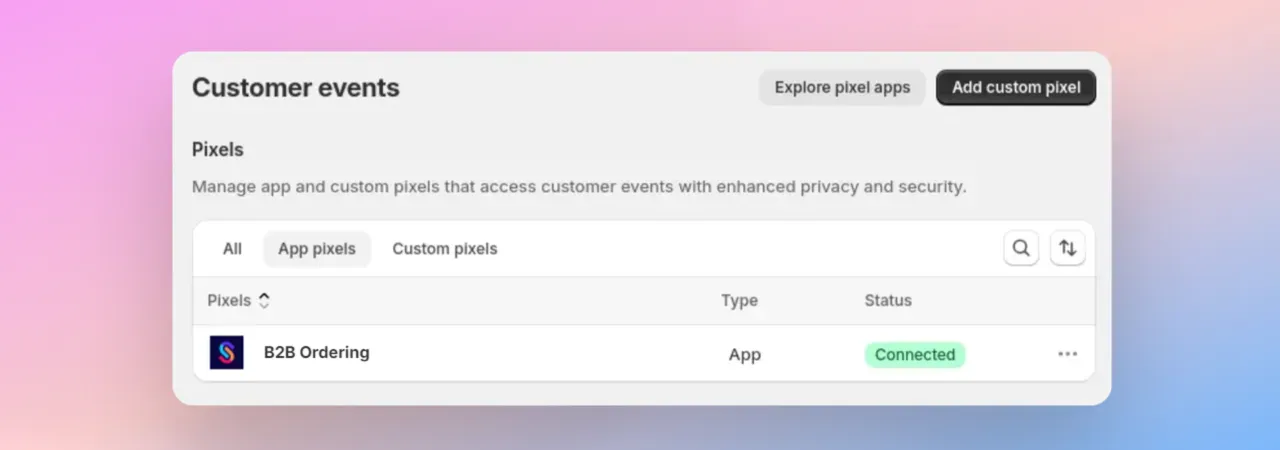
To check the SparkLayer pixel has been added to your Shopify store, go to Settings and click Customer events. You should see a pixel added by SparkLayer and this should be set to the Connected state. When you view the pixel, you will see it called "B2B Ordering" which corresponds to the Sales Channel used by SparkLayer.
If you don't see the SparkLayer "B2B Ordering" pixel, you will need to reconnect your Shopify store via the SparkLayer Dashboard. Simply click the "Save" button at the bottom, and this will activate the pixel for you.
Theme setup
Yes! Within the SparkLayer Dashboard, you'll see an option to request our team to install SparkLayer for you. Typically we can do this within 1-2 working days and you're then good to go. We then offer an onboarding session to walk you through how everything works.
Yes! SparkLayer is compatible with all Shopify themes, even fully customised. If you need help in the setup, our team can add all the code snippets for you. You can even try our Shopify B2B Dawn Theme
SparkLayer works by updating the product page templates with our special frontend widgets - these automatically pull in your variants, SKUs, and any associated product data that is required for your B2B customers. When they are loaded into your Shopify store, they essentially 'replace' the existing Shopify purchase area that your regular DTC (retail) customers see. Very often, we see Shopify themes that have functionality whereby changing variants will auto-update the main product imagery.
This itself is almost always very specific "custom coding" to the theme that is being used - on a technical level, it will be using Shopify theme specific JavaScript coding to do this and will be engineered in a particularly way for the theme. When our SparkLayer widgets are loaded in, they won't have any handling for this specific JavaScript that controls the imagery, so this functionality isn't compatible for logged in B2B customers. As a solution to this, we have released a guide (aimed at Shopify developers) to point them in the right direction to make SparkLayer compatible based on the specific theme they are using. Learn more
SparkLayer requires adding specific code to your Shopify store and normally involves updating 3 or 4 files within your theme. When you perform a theme update, it's likely that these changes will be removed and the SparkLayer code will need adding back in. We are always happy to perform this re-install for you, please get in touch and we'll be happy to help.
The SparkLayer B2B widgets, including B2B pricing, cart and my account area, are only loaded once a customer who has been tagged with b2b successfully signs in to your store.
For all other users, your store will remain completely unaffected.
This allows you to have full control over which customers are able to see your B2B pricing and place B2B orders.
If you already have a B2B / Wholesale app installed on your store, SparkLayer can work alongside this. It's a great way to test out SparkLayer and, once you're happy, you can simply uninstall any previous B2B apps you were using. If your previous B2B app has made code changes to your Shopify store, you may want to ask the app developer to remove these although this is optional.
No. For performance, the SparkLayer Frontend only loads when a valid B2B customer successfully logs into a website; for your standard (B2C) customers, no code is loaded at all. When a B2B customer logs in, all loading of the interfaces is asynchronous which means a negligible impact on page load times and performance even though SparkLayer is a hosted third-party solution. The result is the end customer will have a rapid experience browsing products and placing orders.
If you're looking to enable a wholesale/B2B registration form, we recommend the following options:
SparkLayer Forms (recommended) - Our built-in, no-code form builder lets you create and manage B2B registration forms directly within SparkLayer. Get started with the ready-made Customer Registration Form template which includes approval workflows, automatic customer tagging, and email notifications. No third-party apps needed. Learn more about SparkLayer Forms or get started in the SparkLayer Dashboard.
B2B Login and Registration Page - We offer a free, ready-made template that adds a dedicated B2B login and registration page to your Shopify store (e.g. yourstore.com/pages/b2b-login). It includes a login form for existing wholesale customers, a registration form for new applicants, and is fully customisable via the Shopify Customizer. Our team is happy to install this for you at no charge. Learn more in Shopify B2B Registration & Login
It's also worth noting that you can manually add customers via the Shopify Customers admin and from there you could moderate your wholesale applications.
By default, Google will almost certainly index your Shopify store to show on their search listings. A result of this is your Shopify prices (retail prices) may also show within Google.
It's very important to note that this is not related to SparkLayer and is in fact a built-in feature of Shopify. If you do not want your prices to show on Google this is a customisation that would need to be applied via your Shopify store (not via SparkLayer directly). The Shopify support team may be able to best advice here but there are a range of Shopify community articles that you can review.
Please note, making any changes to your Shopify store in this manner may effect your Google search results and we strongly advise speaking with a Shopify expert before making any changes.
Discounts
It's possible to set up discount codes that customers can use during the checkout process. For example, you could set up a discount coupon that gives them 10% off their order.
Within the SparkLayer Discounts , using the "Advanced requirements and rewards", you can setup discounts to apply to products with specific tags setup within your store (e.g. in Shopify). For example, you could set the discount to only apply if products within the cart have a tag of dog-toy applied, or match a broad term of dog. This allows you to setup discounts to apply to collections and product ranges easily.
There are also other workarounds without using discounts:
You could create a brand new product in Shopify and set up a range of variants within it (e.g. all the products you want to offer within the discount)
We have a special setting called minimum product quantity (See our guide here) which forces the customer to order at least X of the product (e.g. 3)
Using the Quantity Pricing & Settings, you can then set up your discounted rates (e.g. buy 3 and the price is 10% cheaper)
Within Shopify, you could make these products 'hidden' from standard B2C customers simply by not associating them to a collection
It's possible to set up discounts that apply based on a certain threshold, e.g. the order total or the number of items in a cart. To learn more about discounts, see our guide here
Payments
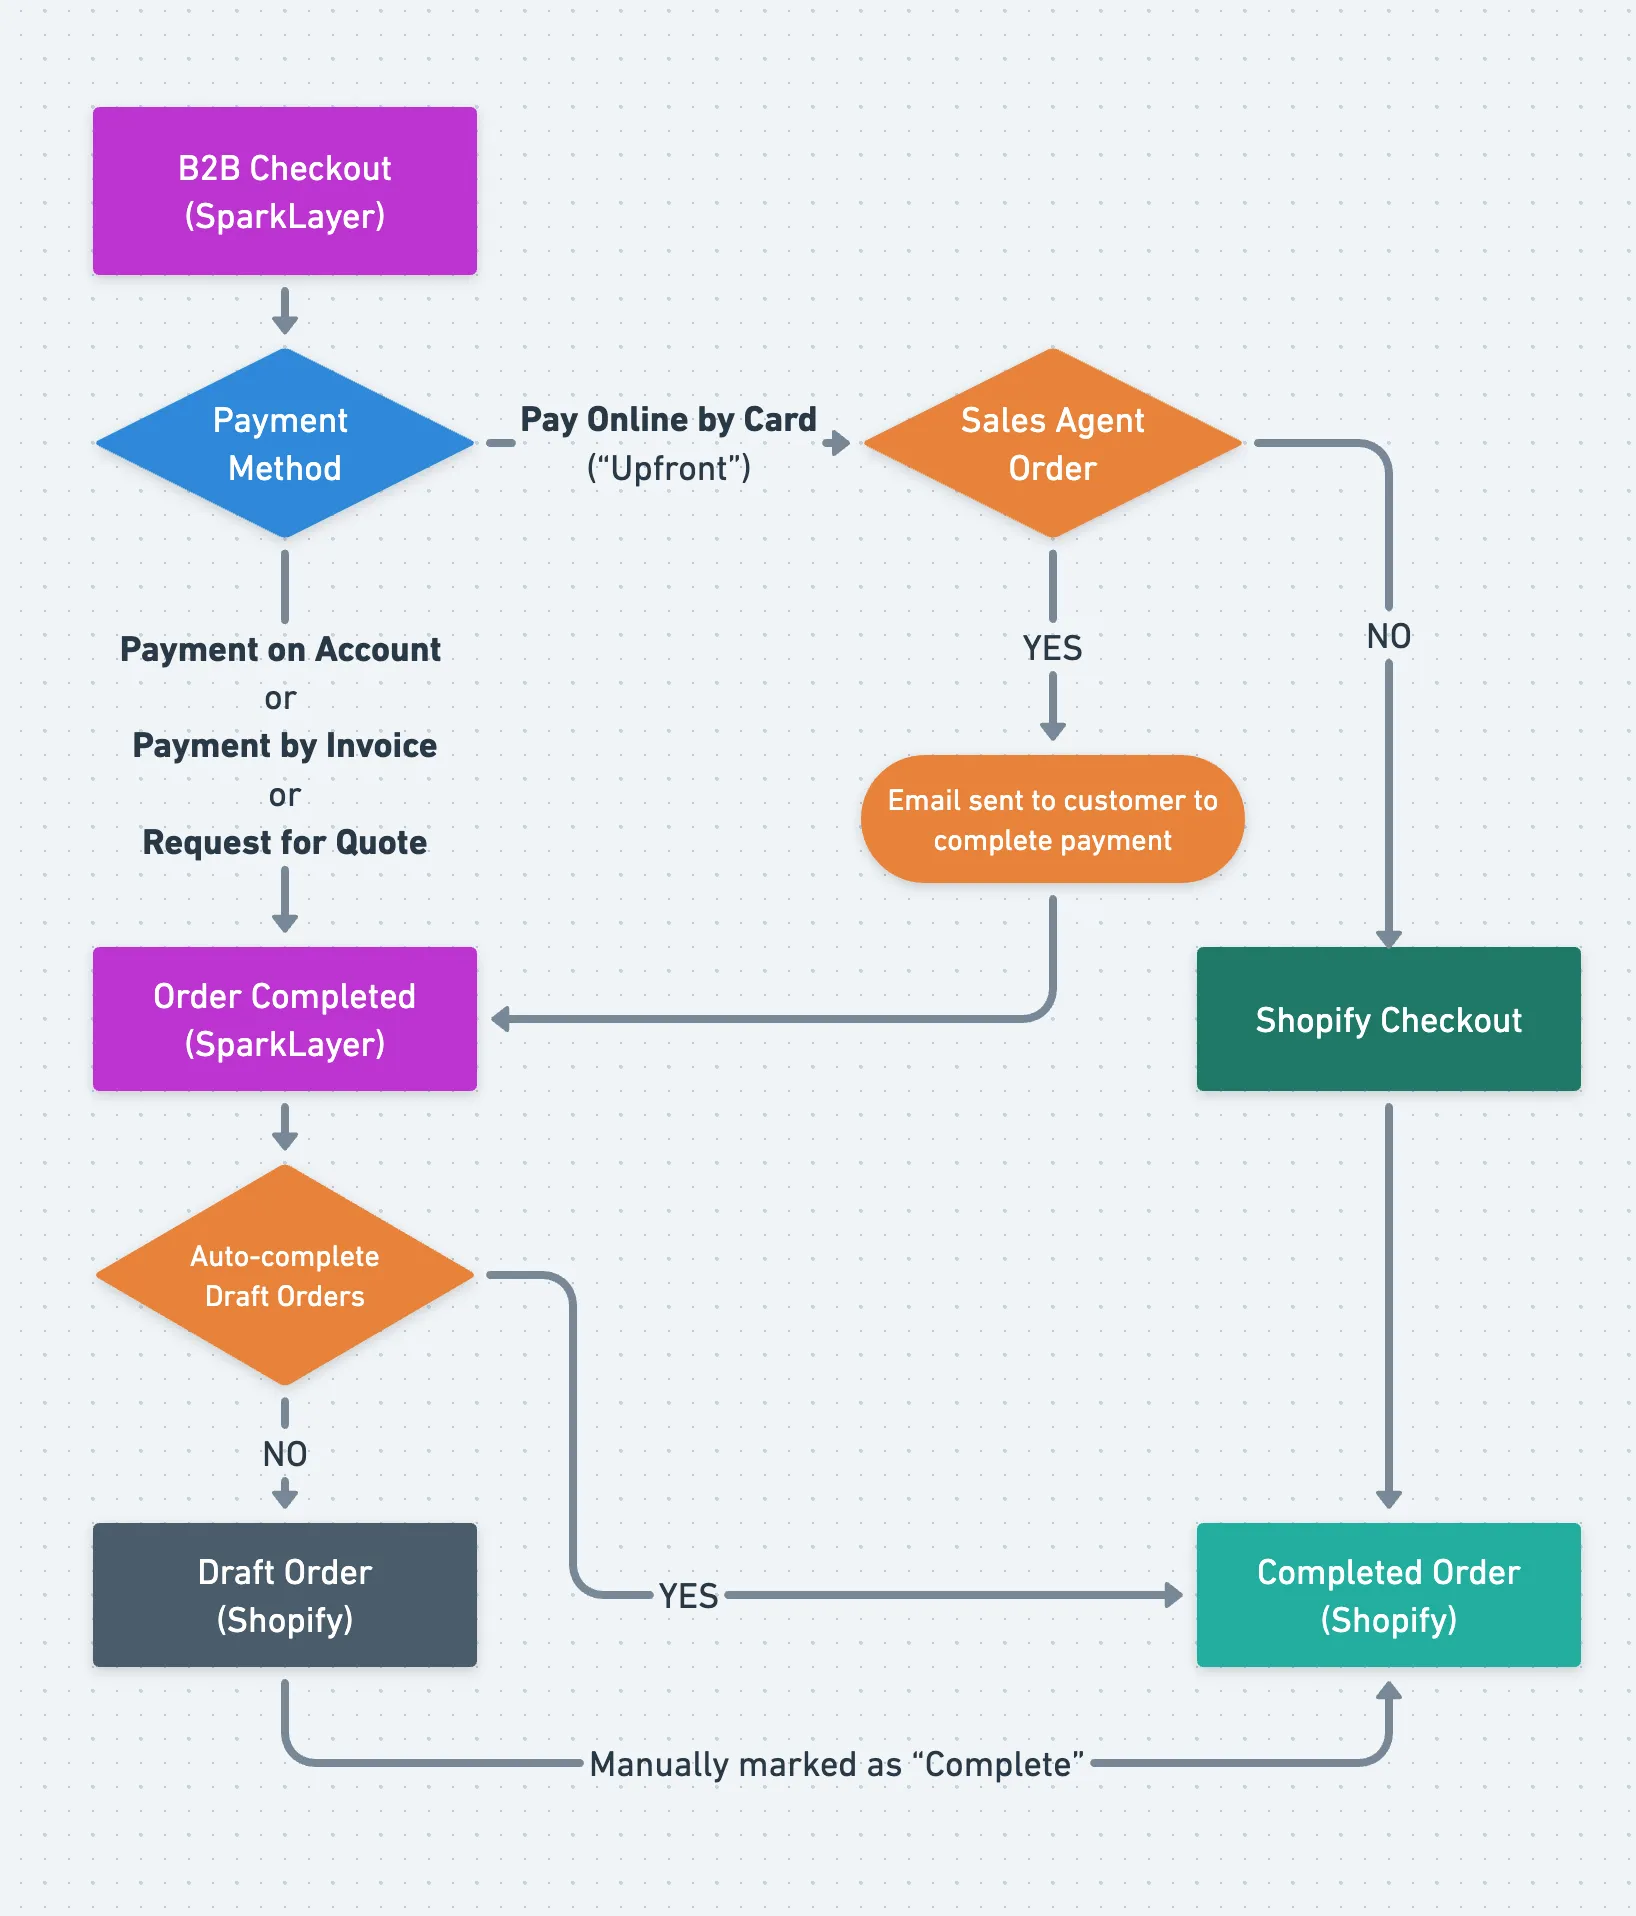
SparkLayer supports a range of B2B-specific payment methods that can be tailored on a per-customer basis. Our diagram below illustrates how they work in the context of SparkLayer and Shopify. To learn more, please see our full guide here.
Yes! Shopify's vaulted credit card feature is fully compatible with SparkLayer. For it to work, the customer placing the order must be assigned to a Shopify company (under Customers > Companies in the Shopify admin). Once a customer within that company location has saved a card - either during checkout or via their customer account - any other customer linked to the same company location can use it.
Vaulted cards appear as an option when a customer selects "Pay Online by Card" during the SparkLayer checkout process. They can also be charged against draft orders created by SparkLayer - for example, if a customer places an order using "Pay by Invoice", you can collect payment on the resulting draft order using a vaulted card directly from the Shopify admin.
To get started, you need Shopify Payments enabled and your B2B customers linked to company records in Shopify. No additional SparkLayer configuration is required. You can learn more in our Shopify Companies guide.
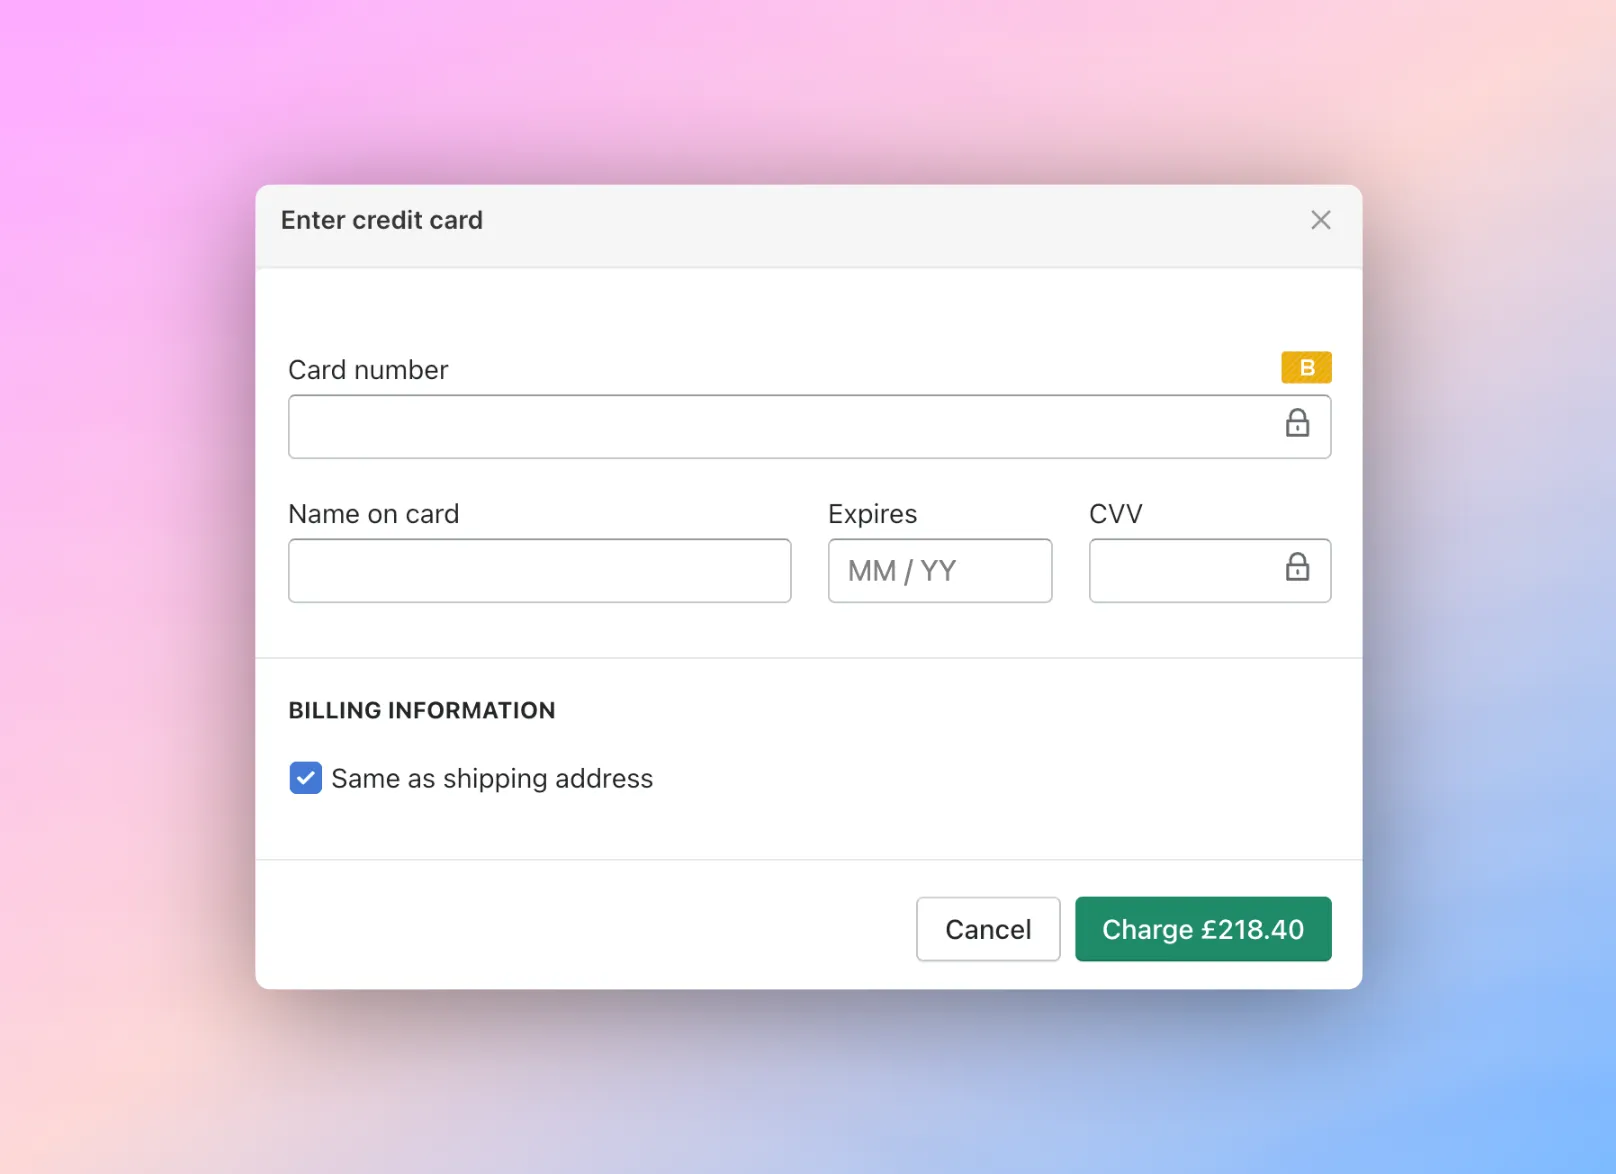
In terms of payment methods supported by SparkLayer and Shopify. If your customers choose "Pay Online by Card" during the SparkLayer checkout process, they will simply be taken to the Shopify checkout. From there, any payment methods you have set up in Shopify (e.g. Paypal, Shop Pay, Affirm Pay) will show up, allowing the customers to pay by this method. We've attached a screenshot to illustrate this.
In short, if Shopify support this payment method, your B2B customers could select it during the checkout providing they choose "Pay Online by Card".
There may be scenarios where you want to add an additional charge on an order based on the payment type used (e.g. if the customer is paying by credit card, you may want to charge an additional 2%).
Currently, there is no way to do this directly via SparkLayer. One potential option is to allow the customer to place an order via a manual payment method (e.g. Pay by Invoice), and when the order arrives into Shopify as a draft order, adjust the order totals accordingly. From the draft order within Shopify, you can then use their "Collect payment" functionality to take the card payment.
Products
B2B Catalogs is a free SparkLayer app that lets you control which products are visible to different types of customers on your Shopify store. Hide products from B2C customers, restrict items to B2B-only, or show different product ranges to different customer groups - all using simple tags, no code required.
Hiding variants
Looking to hide variants for specific B2B customer groups?
Yes! SparkLayer allows you to automatically synchronise your Shopify prices (e.g. your main Shopify price, Compare-at price), making it really easy to set up B2B pricing for your customers. For example, you could set your B2B prices to be 20% off your Shopify prices and we can even make provisions for your tax set up in Shopify (e.g. exclusive or inclusive of tax).
In terms of pre-ordering, SparkLayer has full support for different stock status messages and it's possible to set up products as pre-order/back-order easily - it does rely on some configuration within Shopify, but it's relatively easy to do!
We've full information here on how it works and you can even set up "due in" dates to give your customers visibility.
In terms of product SKUs, SparkLayer relies on these being added to your products within Shopify so that we can display the correct B2B pricing when your customers log in. Without a unique SKU, there's no way for SparkLayer to do this.
If you don't already have SKUs in Shopify, it's relatively quick to do. You can either edit individual products and add them manually, or you can use Shopify's 'Import' or 'Edit products' feature to do this in bulk.
If you're installing SparkLayer on a single website and you are looking to run both DTC and B2B at the same time, it will be necessary to use the same stock pool behind the scenes. From an inventory point of view, this essentially means that both DTC and B2B customers will be ordering from the same stock source which can pose challenges.
SparkLayer has a way to "reserve" stock for your DTC customers, essentially blocking B2B customers from ordering too much inventory for a specific product. Learn more
Important
It is not possible to block DTC customers from ordering from your inventory and there is no mechanism in Shopify to do this. If you are wanting to implement this, you will need to consider:
Creating B2B-specific products on your store (e.g. you could use an app such as Locksmith to do this)
Creating a separate store just for your B2B customers, effectively separating out your inventory completely. Learn more in our guide here
Customers
To enable a customer as B2B, this works by adding a special tag in Shopify against their customer record. This tag by default is always b2b and you can add additional tags based on the rules you've set for the customer in the SparkLayer Customers admin.
To learn more about setting up customers as B2B, see our guide here.
For non-card payment orders (e.g. Payment by Invoice), the order is saved as a "Draft order".
You can view these in Shopify within Orders and then click Draft Orders
You can then convert these into approved orders by marking them as paid or marking them with payment terms (please see this guide for more details).
It's also possible to automatically convert Draft Orders into Completed Orders with our feature here "Auto-complete Shopify Draft orders"
By default Shopify will not send an email for Draft orders but we have a guide here that explains how to do this.
When a customer places an order via non-card payment methods, it will show with a status of "Awaiting Merchant" until the order ("Draft" order) is converted into a Completed order.
Firstly, it is possible to edit orders within Shopify when an order is placed via SparkLayer. If you have it configured to create orders as 'Draft orders' you can go into the order and make changes. If you subsequently then manually complete the order (i.e. Mark as paid), you can still edit the order up until the point of fulfilment.
The issue arises in one scenario we know about which is a limitation of Shopify. If you have 'Auto-complete Shopify Draft orders' turned on within the SparkLayer Dashboard > Settings this will skip the ability to make subsequent orders. This is why, when you try and edit a 'Completed order', you are seeing the "Unable to edit order" message. At this point in time, we don't have a solution to this, other than switching 'off' the SparkLayer setting that automatically completes a draft order.
Yes! By default, prices from SparkLayer into Shopify will show exactly as you've set them up in the SparkLayer Price Lists.
If you'd prefer to show the original Shopify price, please contact our team.
You can change the wording of "Custom discount" by editing the languages within your Shopify store.
Go to Themes and click the 3 dots next to the theme name. Select "Edit default theme content"
Search for "Custom discount" and then edit as required.
Within SparkLayer, we do have support for minimum (and maximum) quantities, but you're only able to set these at a product or product-variant level. It's not possible to currently set minimum order-level quantities but it's something we are considering as part of a future update!
There is a potential workaround for product-variant requirements and we've included our recommend approach
You could create a brand new product in Shopify and set up a range of variants within it (e.g. all the products you want to offer within the discount)
We have a special setting called Minimum product quantity which forces the customer to order at least X of the product (e.g. 3)
Using the Quantity Pricing & Settings, you can then set up your discounted rates (e.g. buy 3 and the price is 10% cheaper)
At the moment, Shopify doesn't have a built-in 'notification' for when a draft order is placed so it does require workarounds for now. There are a few options:
Receive notifications as store owner:
if you are a merchant on the Shopify, Advanced or Shopify Plus plans, you can use Shopify Flow to do this. We've an example you can download here
It's also possible to automatically convert Draft Orders into Completed Orders with our feature here
Receive notifications as a customer:
If you want your customers to receive a notification, there are a few ways to do this. As above, you could activate the auto-complete orders feature above.
We also recommend a really good one called Mechanic that lets you set rules/flows based on criteria. We have some ready-made templates you can use here
Yes, there are methods to do this. Please refer to our guide here
Due to current limitations in Shopify, there is currently no way to differentiate the Shopify Order Number (e.g. #123456) between regular (DTC) and B2B orders. In terms of filtering and segmenting orders between retail and B2B, SparkLayer will by default add a tag to an order b2b. Within Shopify, or systems you may have integrated (e.g. shipping, 3PLs), this can then be used as a way to separate out workflows to allow you to differentiate between the customers who are placing orders.
Need assistance?
We'd be happy to help guide you through this process. Please refer to our guide here.