Installing SparkLayer on WooCommerce
Introduction
SparkLayer enables B2B functionality on your existing WooCommerce store, allowing your B2B customers to login, place orders, manage their account, and much more.
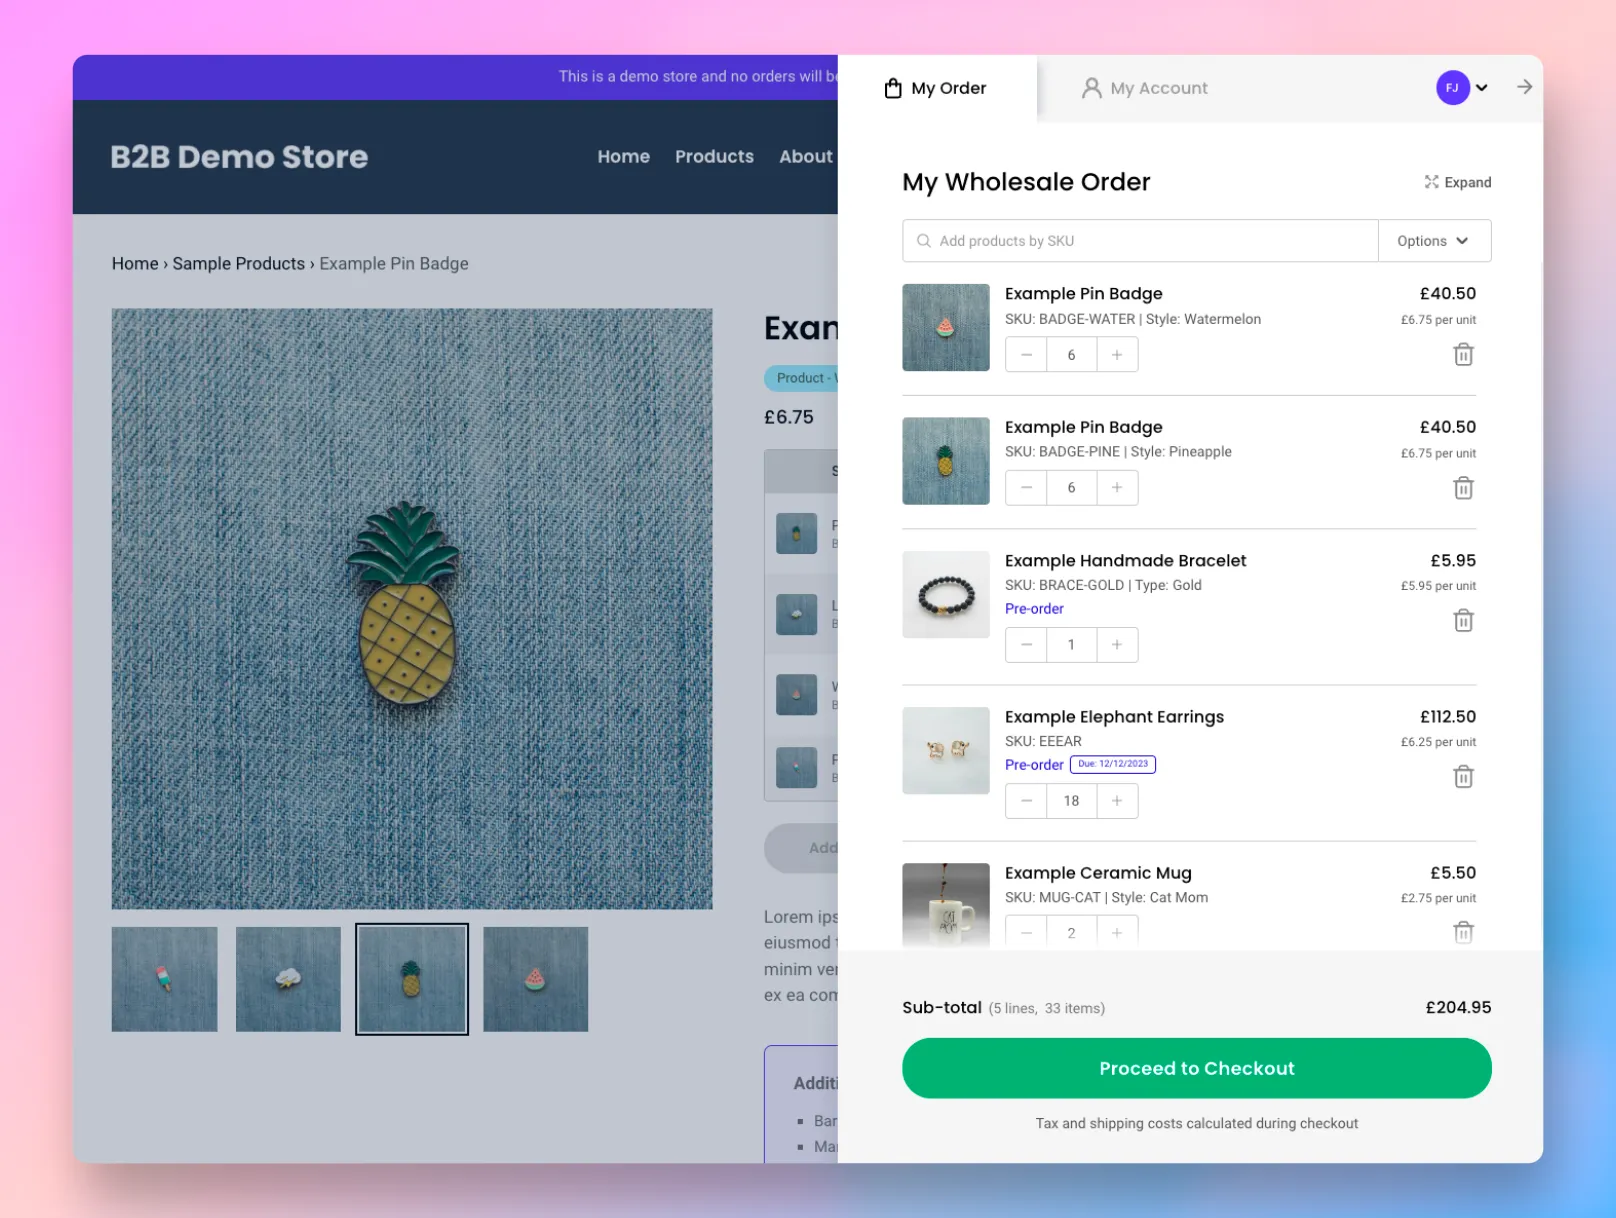
To familiarise yourself with SparkLayer, we also recommend reviewing the following guides:
⚠️ Requirements - important!
Before installing SparkLayer on your WooCommerce store, please ensure the following:
Item | Details |
|---|---|
WooCommerce | You must already have WooCommerce installed on your Wordpress website
If you're using a "Block theme", SparkLayer can be automatically installed (otherwise this is a manual installation process). |
Product SKUs | In order for SparkLayer to save B2B prices for your products, all products must have SKUs. |
Customers | For your B2B customers to see the SparkLayer Frontend Interfaces, they must be assigned an appropriate B2B "Role" within Wordpress > users |
Payment Processor | If you’re installing SparkLayer on a test store, please ensure you have an example payment method enabled. You can manage this within WooCommerce > Settings > Payments |
Shipping | In order to place an order via the My Cart Interface, please ensure you have shipping rules set up. You can manage this within WooCommerce under Settings > Shipping or via SparkLayer's own Shipping solution |
Areas of Wordpress/WooCommerce you'll be using
As part of setting up SparkLayer, you'll primarily be using the following areas:
Area | Details |
|---|---|
Products | This will be used to setup which products you want to make available to B2B customers. See "Setting up your B2B pricing" below. In Wordpress/WooCommerce, go to Products |
Users | This will be used to setup your B2B customers. See "Setting up your B2B customers" below In Wordpress/WooCommerce, go to Users |
Orders | This will be used to review and process and orders that are placed by your B2B customers. See "Placing a B2B order" below. In Wordpress/WooCommerce, go to Orders |
🔗 Connecting your WooCommerce store
Please note Setting up SparkLayer will require generating API keys within your WooCommerce store. If you're unsure how to do this, our team is happy to assist. To get in touch, please click here.
To get started with SparkLayer on your WooCommerce store, there are a number of steps to follow. Once you've completed this step, you can then begin the process of configuring SparkLayer such as pricing and customer rules.
Install the SparkLayer plugin First, you'll need to install the SparkLayer for WooCommerce plugin on your Wordpress store. This works just like any other manually installed plugin and you can see full details here.
Register with SparkLayer Next, you'll need to create a SparkLayer account by registering here
Connect your WooCommerce Store Once registered, go to Integrations > Platform Connection and select WooCommerce. You'll then be prompted to enter your store URL (this should be the URL of the website you are installing SparkLayer on, e.g. www.mystore.com)
Generate API credentials Next, you'll need to generate REST API credentials within WooCommerce. From your WordPress dashboard, you can find this within WooCommerce > Settings > Advanced > REST API
Create the REST API key with a username easily identifiable as linked to SparkLayer, such as “SparkLayer API” with Read/Write permissions.
Enter the API credentials in SparkLayer From with the SparkLayer Dashboard Integrations > Platform Connection paste the provided key and secret into the “WooCommerce API Key” and “WooCommerce API Secret” fields.
Press save and wait a few seconds whilst SparkLayer connects to the WooCommerce store and performs the SparkLayer plugin initialisation.
Store connected This completes the process of connecting your WooCommerce store to SparkLayer! You can view all associated settings in WooCommerce by going to WooCommerce > Settings > Integrations > SparkLayer B2B.
🚢 The Onboarding process
Important When setting up SparkLayer, some activities take place via the SparkLayer Dashboard alongside WooCommerce. You'll use the SparkLayer Dashboard primarily for setting up your B2B pricing and B2B customer rules.
When you create an account on SparkLayer, you'll get access to the SparkLayer Dashboard. The Dashboard has a customised onboarding process that gently guides you through all the necessary steps before you're ready to start inviting your B2B customers and taking orders on your website.
📓 Setting up your B2B price lists You'll then set up the B2B price lists that you want your customers to see when they login. These can be automated or you can manually upload specific pricing. ➡️ View in dashboard
👪 Setting up your B2B customers You'll then set the ordering rules for your customers such as minimum order values, available payment methods and price lists they are assigned to. ➡️ View in dashboard
🛠️ Installing the frontend widgets You'll need to check the special code snippets ("widgets") are installed on your WooCommerce store in order to show the special SparkLayer B2B interfaces. ➡️ View in dashboard
✅ Testing & launching You'll then need to run through some final checks (such as placing a test order). Once you're happy, you can then launch SparkLayer and start taking orders! ➡️ View in dashboard
Let's now dive into each of them!
📓 Setting up your B2B pricing
Please note Setting up your B2B pricing happens within the SparkLayer Dashboard, not via your WooCommerce admin.
Within the Price Lists area of the SparkLayer Dashboard, you can create and manage your B2B pricing rules.
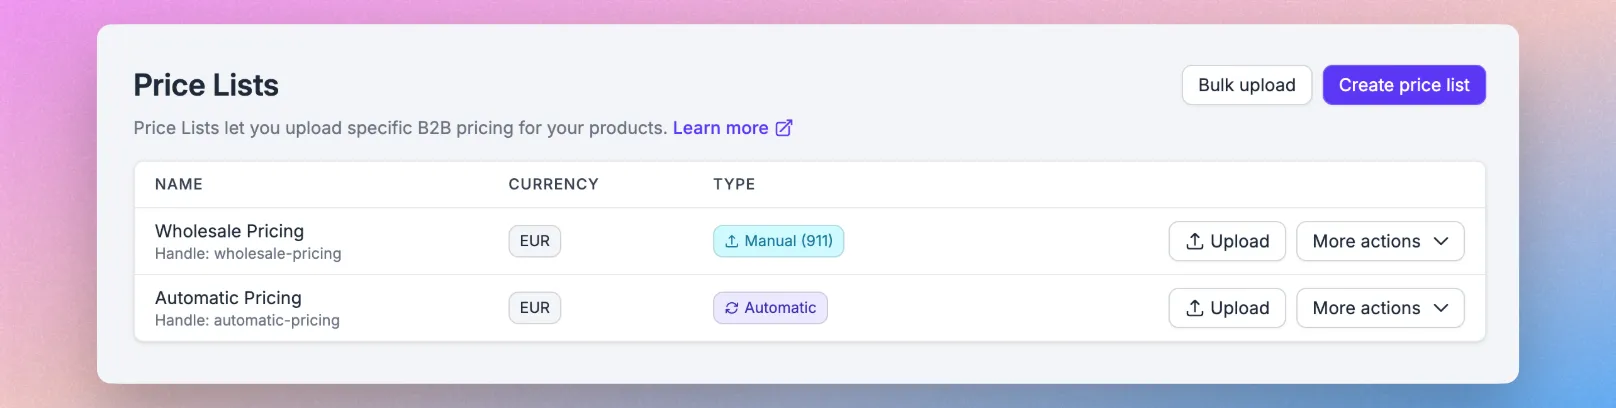
SparkLayer allows you to set the following pricing types:
Type | Details |
|---|---|
Manual | You can manually upload a CSV file with specific prices and even enable quantity pricing |
Automatic | You can use your WooCommerce prices and apply a discount. You can choose from your main WooCommerce price or the RRP price. |
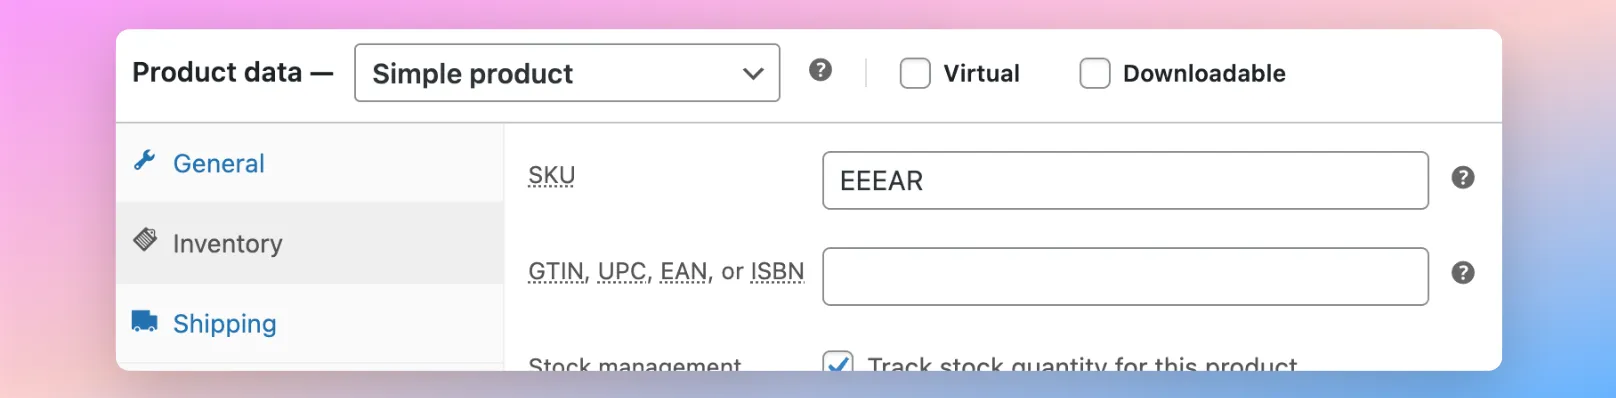
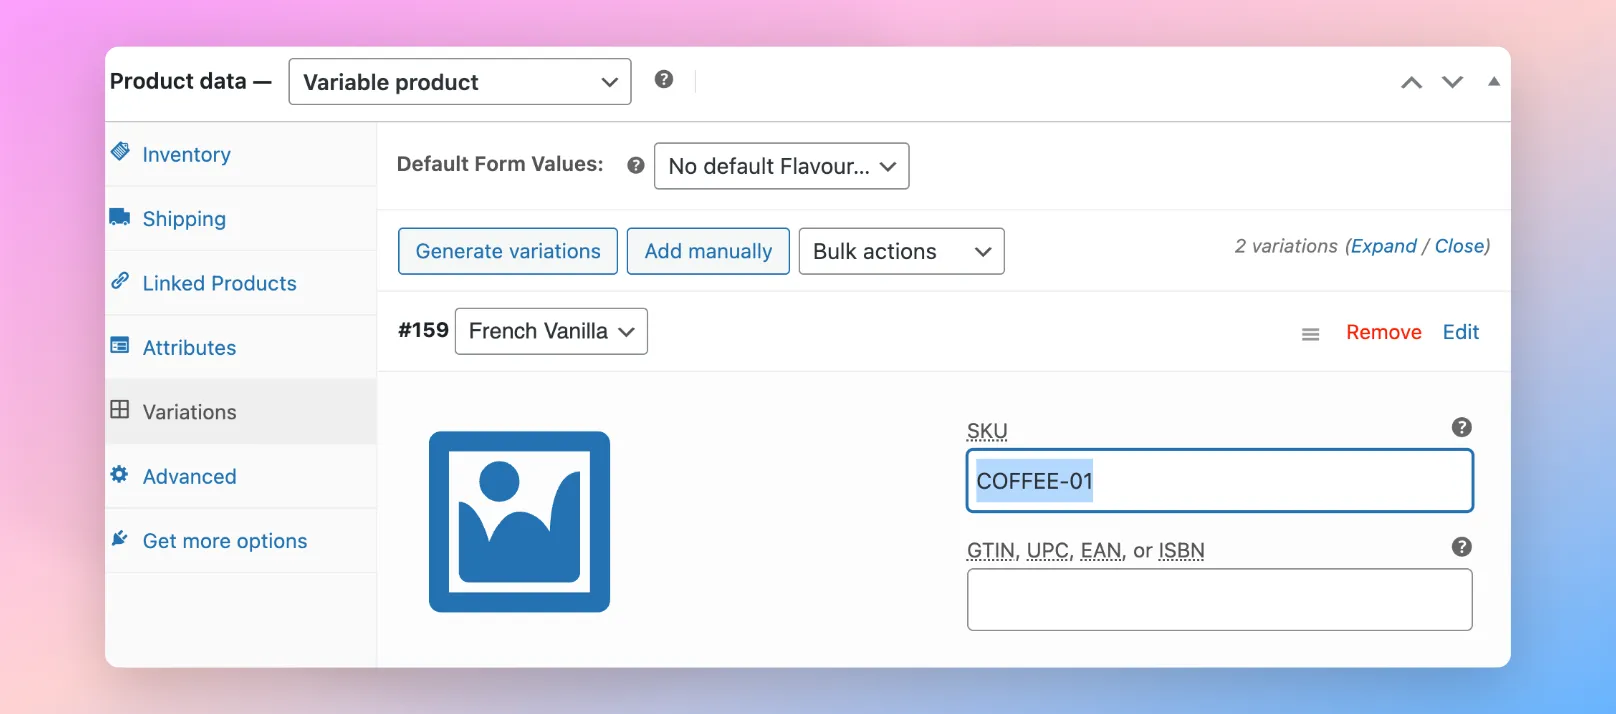
For any products that you want your B2B customers to be able to buy, these products must have unique SKUs assigned. In WooCommerce, you can check this by going to Products and editing a product.
If it's a single variant product, you'll see this under Product data > Inventory.
If the product has variants (or "Variations"), you'll see this under Product data > Variations.
Next, go to Price Lists within SparkLayer and click "Create Price List" to create your first B2B Price list. You can choose between an automatic or manual price list and configure how this works.
Ready to set your pricing? To learn more about pricing, please see our full guide here.
👪 Setting up your B2B customers
Please note Setting up your B2B customer rules happens within the SparkLayer Dashboard, not via your WooCommerce admin.
Customer Groups let you configure specific rules for your customers, from defining their minimum order values and which price lists they see, through to what payment methods they're allowed to use when checking out.
Much like with Price Lists, you can fully manage this via the SparkLayer Dashboard.
Within Wordpress/WooCommerce, go to Users and click Add User. You can either create a new customer or edit an existing one.
Please note Please ensure that a valid address is added and all address fields are populated. Make a note of the email address you’ve added as you will need to access this to login.
To synchronise to SparkLayer, under SparkLayer Role, the customer must be assigned to a Role that correlates to a SparkLayer Group. For example, if you're using the "Base" group in SparkLayer, you'll see a role called "SparkLayer B2B: Base". Once the customer signs in, they'll see the B2B rules you've configured within the customer group.
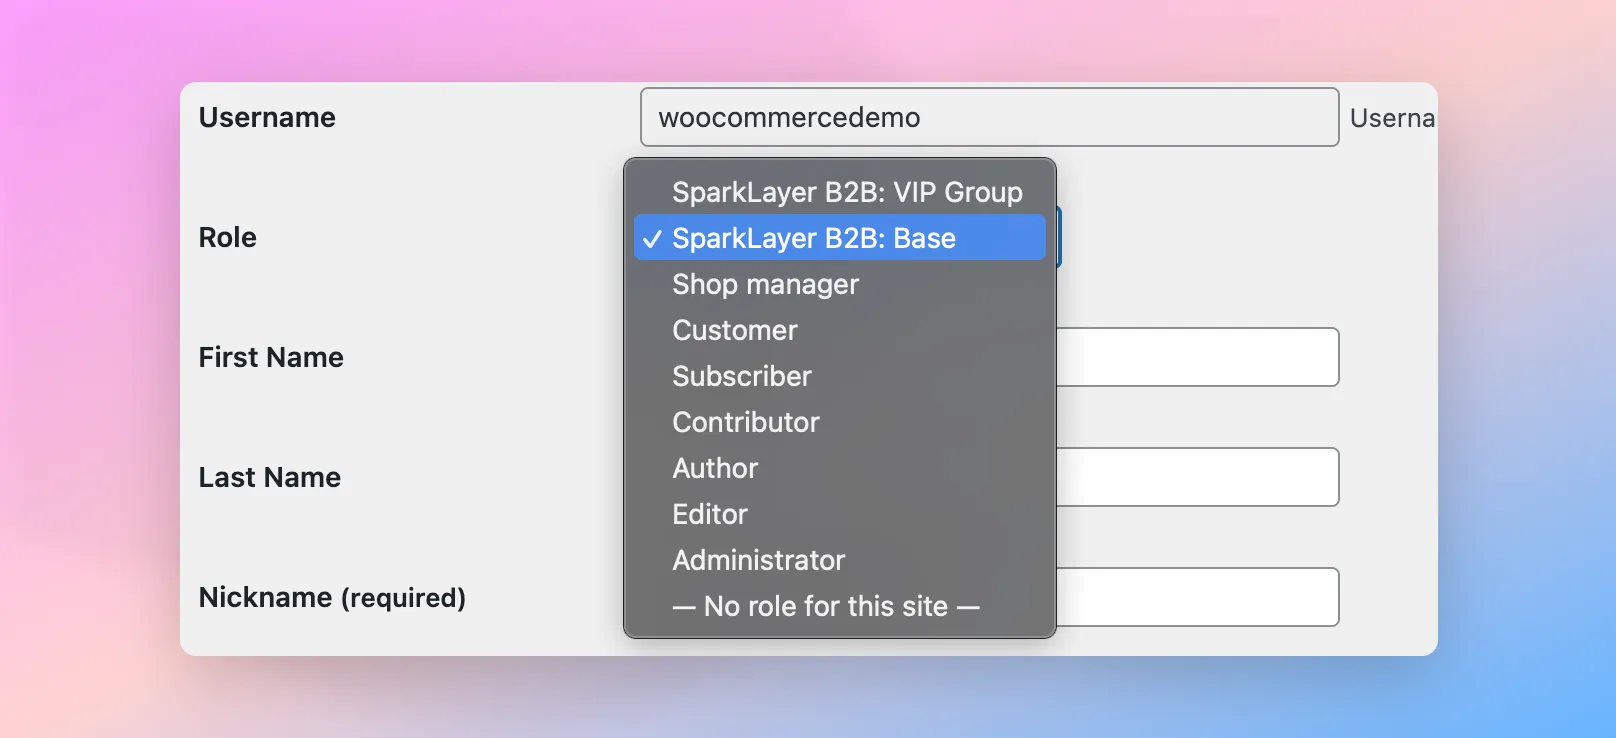
Please note the following on customer groups
- SparkLayer will only synchronise customers that have a role assigned that starts with SparkLayer B2B
Once your customers have been set up in Wordpress/WooCommerce (i.e. those with a role of "SparkLayer B2B" assigned), and you've assigned the customer group to at least one customer, you can then manage specific rules within the Customer groups area.
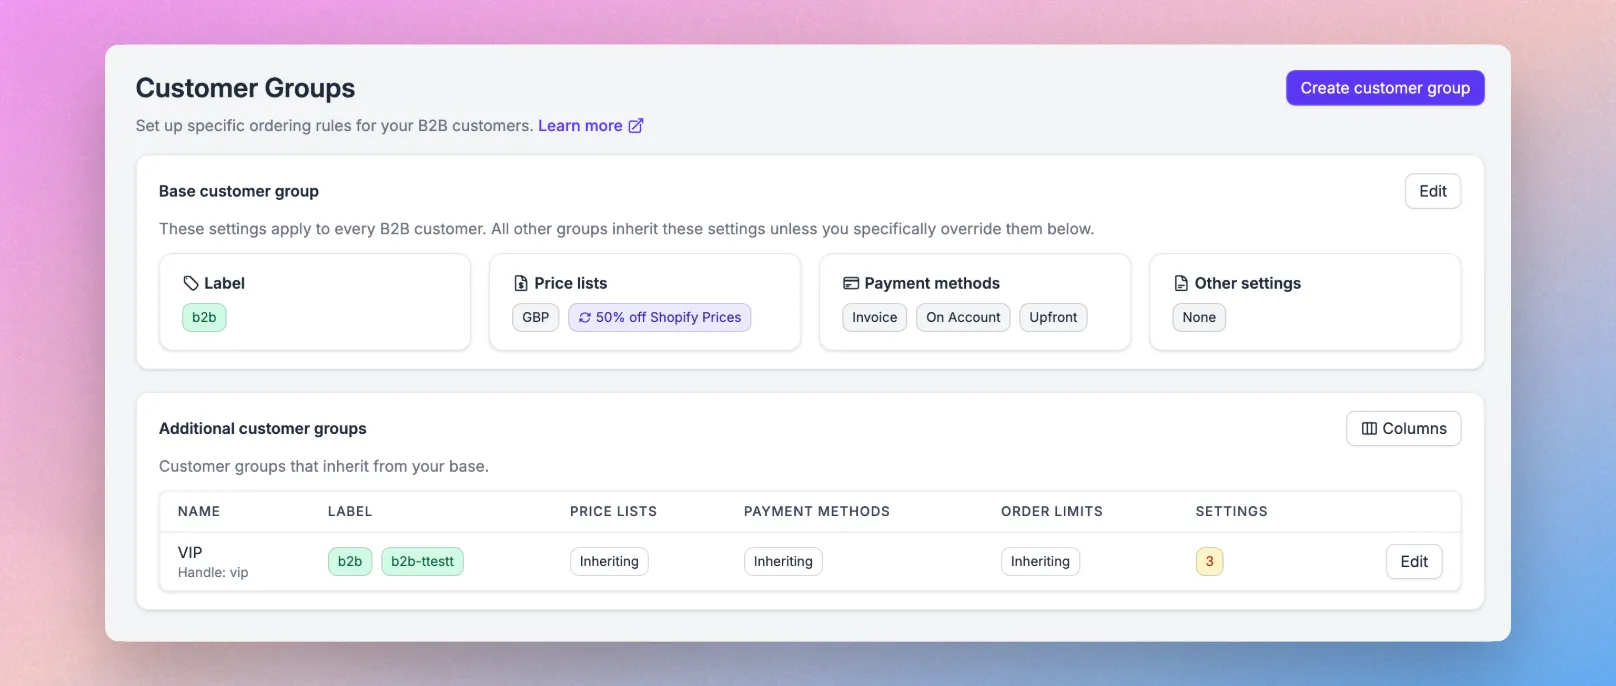
You'll see a default Base customer group that you can use for your B2B customers. If you want to set up additional rules, you can simply click Create Customer Group and configure accordingly. For any additional customer groups you create, you'll need to update the role on the customer record in Wordpress/WooCommerce to match.
To simulate logging in as a B2B customer, please see ✅ Testing & launching below.
You can also check if your customer record is syncing by using the Customer Sync area of SparkLayer. Within Wordpress/WooCommerce, navigate to a Contact record that has a label of b2b. Within the URL, you'll see a unique ID at the end of the URL, e.g. ?user_id=3
With this unique ID, you can then paste this into the Customer Sync area of SparkLayer. If the search results show the customer details, this confirms the customer is synchronising correctly.
Ready to configure your customer groups? To learn more about customer groups, please see our full guide here.
🛠️ Installing the frontend widgets
SparkLayer comes with ready-made B2B-optimised "widgets" that we collectively call the SparkLayer Frontend. The widgets simply overlay sections of your existing WooCommerce store and enable our powerful B2B features.
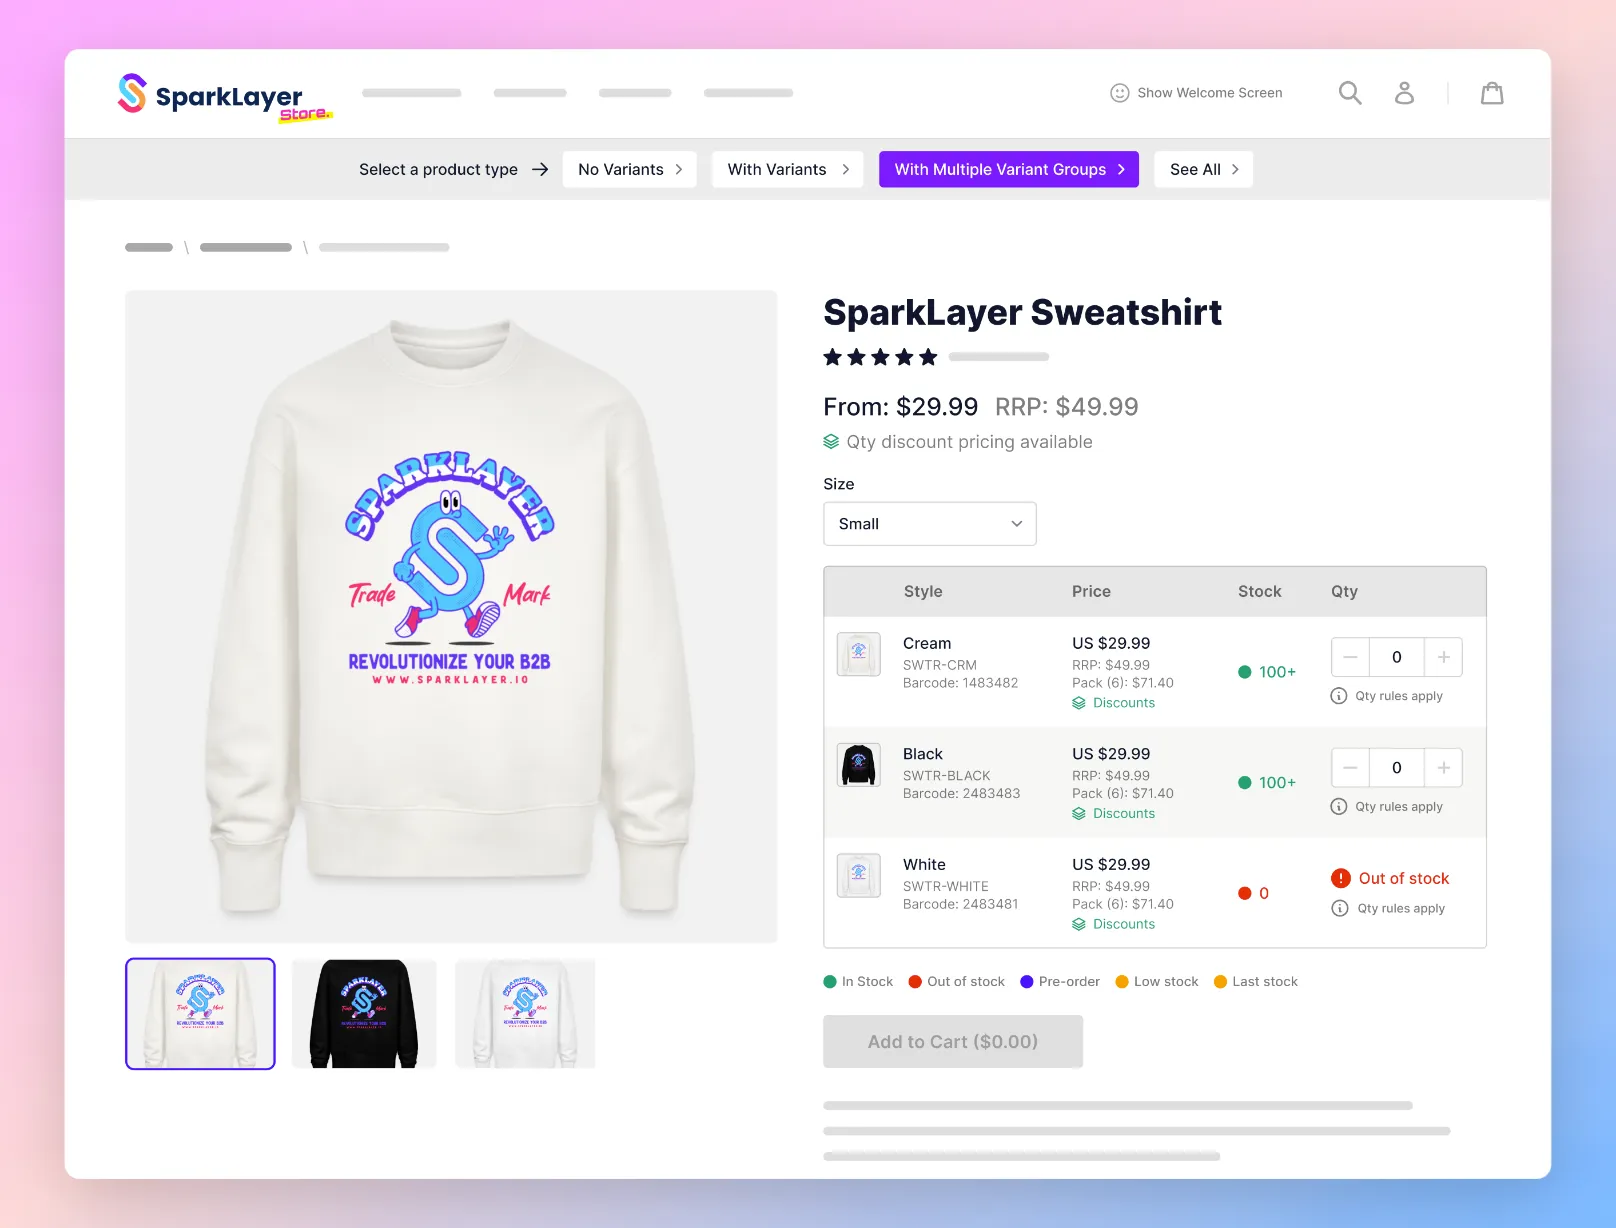
Once set up, your approved B2B customers (see above "Setting up your B2B customers") will then see your B2B pricing and can begin placing orders. You can learn more about how this works in our guide here.
Auto-installation with "Theme blocks" If your theme support blocks, when you install SparkLayer, it will by default add the special frontend widgets to your WooCommerce store. Depending on your WooCommerce theme, you may prefer to do this manually and you can follow our steps below.
Installing SparkLayer yourself
If you’re looking to install yourself, there are five steps to follow.
Install the SparkLayer Core Script Within your main website header you'll need to add the SparkLayer Core Script that activates the SparkLayer functionality.
Providing your stores theme outputs the wp_head() functional call in the <head> section of the template, then the SparkLayer core script should automatically be injected on your page.
Install the Product Detail Interface You'll need to update your storefront's product detail page with the SparkLayer Product Purchasing Interface. When a customer logs in and SparkLayer recognises them as being a B2B customer, this will load a special interface with their specific prices and a way to purchase.
Install the Product Card Interface When you install SparkLayer, the product card interface should automatically be added. If for any reason it isn't, you'll need to update your product collection pages to show the Product Card Interface. This allows your customers to see their unique pricing and add items to their order from anywhere on your website.
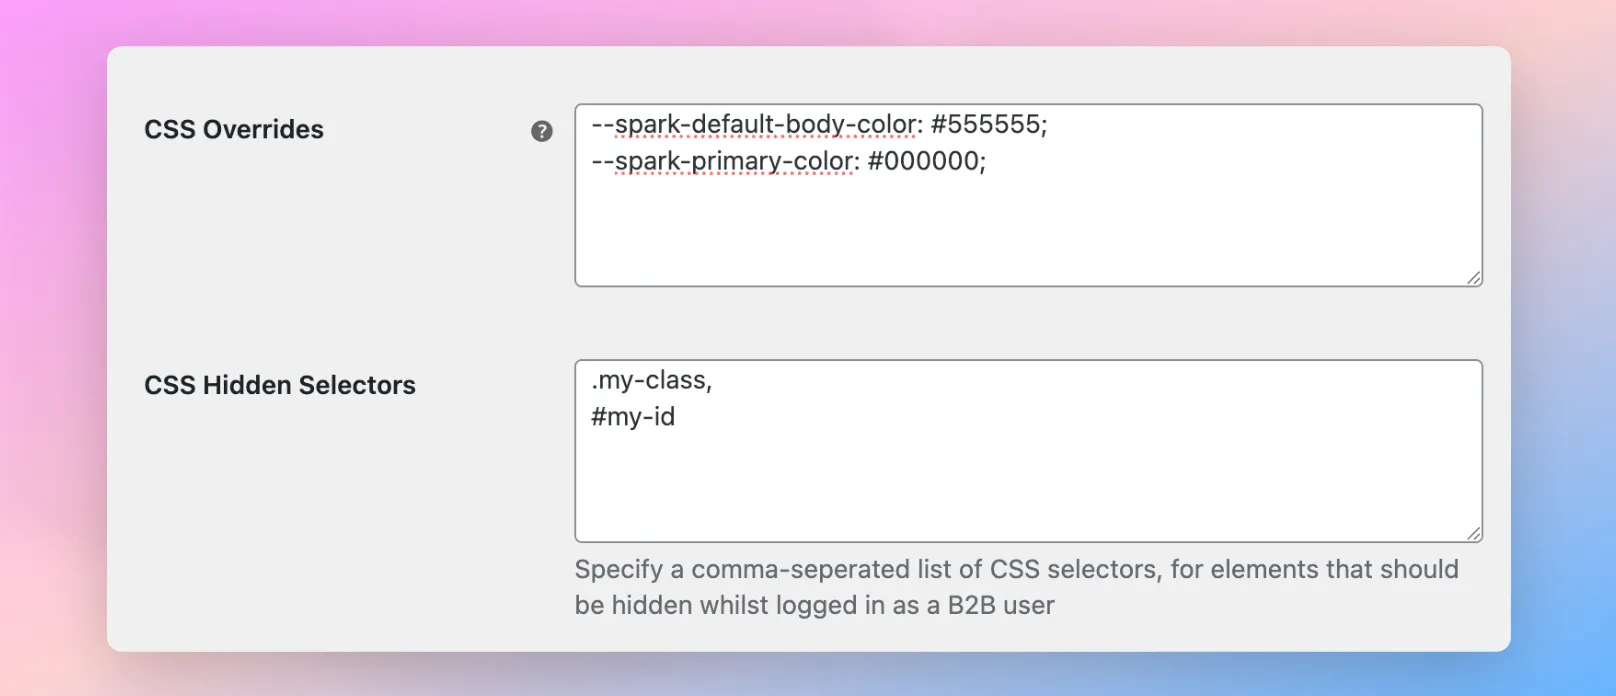
Add the CSS customisations You can customise the look and feel of SparkLayer by editing special CSS controls that overwrite the SparkLayer defaults. For example, you can change button colours, font sizes, spacing, even typefaces.
Finished adding the code widgets?
- Please review our Frontend Integration Checkout
- You can also explore all the configurations and customisations we have available that you may want to activate on your Shopify store! Learn more
🛒 Placing a B2B order
Once you've logged into your WooCommerce store as a B2B customer, you can then place an order by going to any product page and adding items to your order. When you add items, they will then appear in the My Cart Interface and you can then proceed to checkout to complete the order.
How payment methods work
When customers reach the payment step, they'll see a variety of available payment methods and can select their preference.
Payment method | Description |
|---|---|
Payment on Account | 👪 For the B2B customer: This will allow the customer to checkout without needing to enter any payment details. |
Payment by invoice | 👪 For the B2B customer: This will allow the customer to checkout without having to enter in payment details. |
Pay Online by Card | 👪 For the B2B customer: The customer will be directed to your standard checkout process and will be required to make payment right away (e.g. by card or via another payment processor). |
How orders arrive into WooCommerce
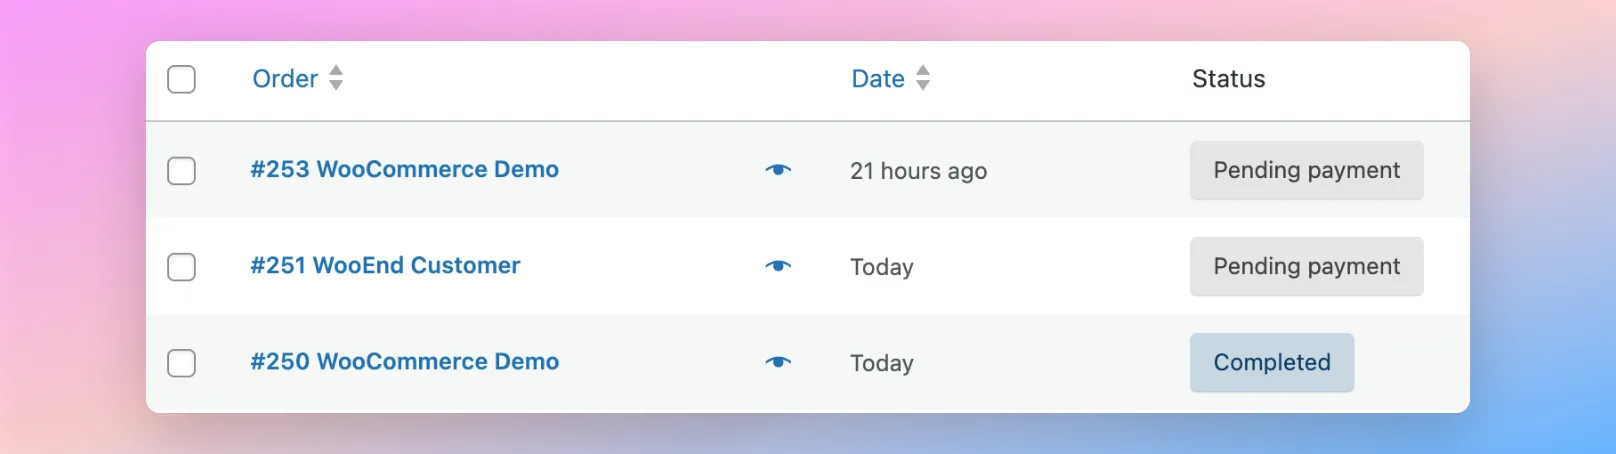
Depending on which payment method you've selected, orders will arrive into WooCommerce in the following ways:
Payment Method | Flow |
|---|---|
Pay by Invoice | The order will be created within WooCommerce > Orders with a payment status of "Pending Payment". You can then manually mark the order as paid once you have received payment (e.g. via offline means) |
Pay on Account | The order will be created within WooCommerce > Orders with a payment status of "Pending Payment". You can then manually mark the order as paid once you have received payment (e.g. via offline means) |
Pay Online by Card | The order will be created within WooCommerce > Orders with a payment status of "Completed" providing you have this already configured within WooCommerce. You can then proceed to fulfil the order. Note: this is termed "Upfront Payment" within the Customers area of the SparkLayer Dashboard |
"Unpaid" orders and "Paid" orders
By default all payment methods other than Upfront Payment will be generated as "Pending Payment" orders. You will need to capture payment either via your WooCommerce Admin or via offline methods (e.g. bank transfer)
WooCommerce checkout payment methods
If a customer selects "Pay Online by Card" (i.e. "Upfront payment"), they'll be directed to the WooCommerce checkout. By default, they will see all WooCommerce payment methods you have set up (e.g. card payment, Paypal, etc).
Additional order details
When an order is placed via SparkLayer, it will also include the following additional data:
Attribute | Notes |
|---|---|
Custom Fields | When viewing an order in WooCommerce, you'll see a section "SparkLayer Order Information" which will include the Payment Method used. |
✅ Testing & launching
The final step is to run some tests and checks to ensure SparkLayer is fully configured. Within the SparkLayer Dashboard, you'll see a number of Launch checks to perform, from logging in as a B2B customer, through to placing an order.
We recommend following the below steps:
Set up a customer record Within your Wordpress/WooCommerce admin, you'll need to ensure you have an example customer record set up (either a new one or an existing). Most importantly, a customer must be associated with an appropriate role.
Please see "Setting up your B2B customers" above for more details on how this works.
Place a test order Once you've logged in as a B2B customer, proceed to add items to your cart and complete the checkout.
Please see "Placing a B2B order" above for more details on how this works.
Invite your customers You could also think about sending a marketing newsletter to your customers to notify them of your new B2B store and to sign in. We also have some example messaging you can use when inviting your customers and you can explore more in our guide here.
⚙️ Advanced configurations
In addition to the above setup, there are a number of other configurations that are possible at this time.
If your Wix store is set up with a darker theme, it's possible to enable a special "Dark Mode" for SparkLayer, ensuring colours and fonts are easily readable.
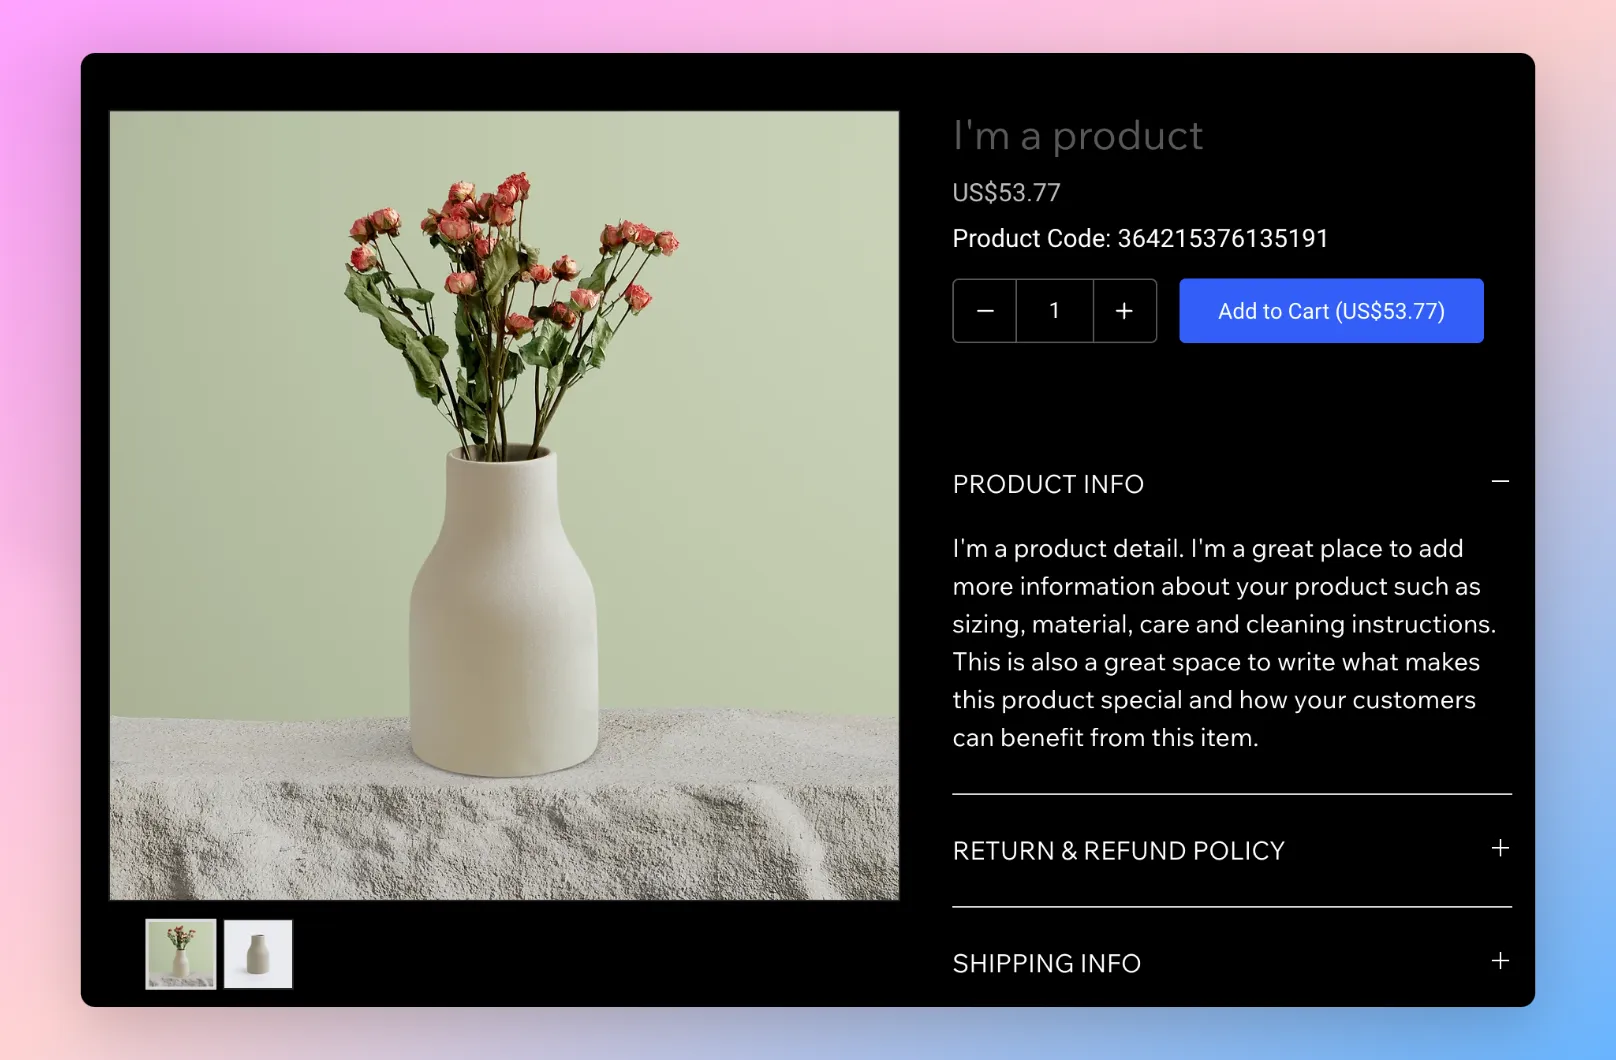
You can access this by going to WooCommerce > Settings > Integrations > SparkLayer B2B.
Under "Core Script Options" you can add the below code.
{
     display: {
         darkTheme: true,
      },
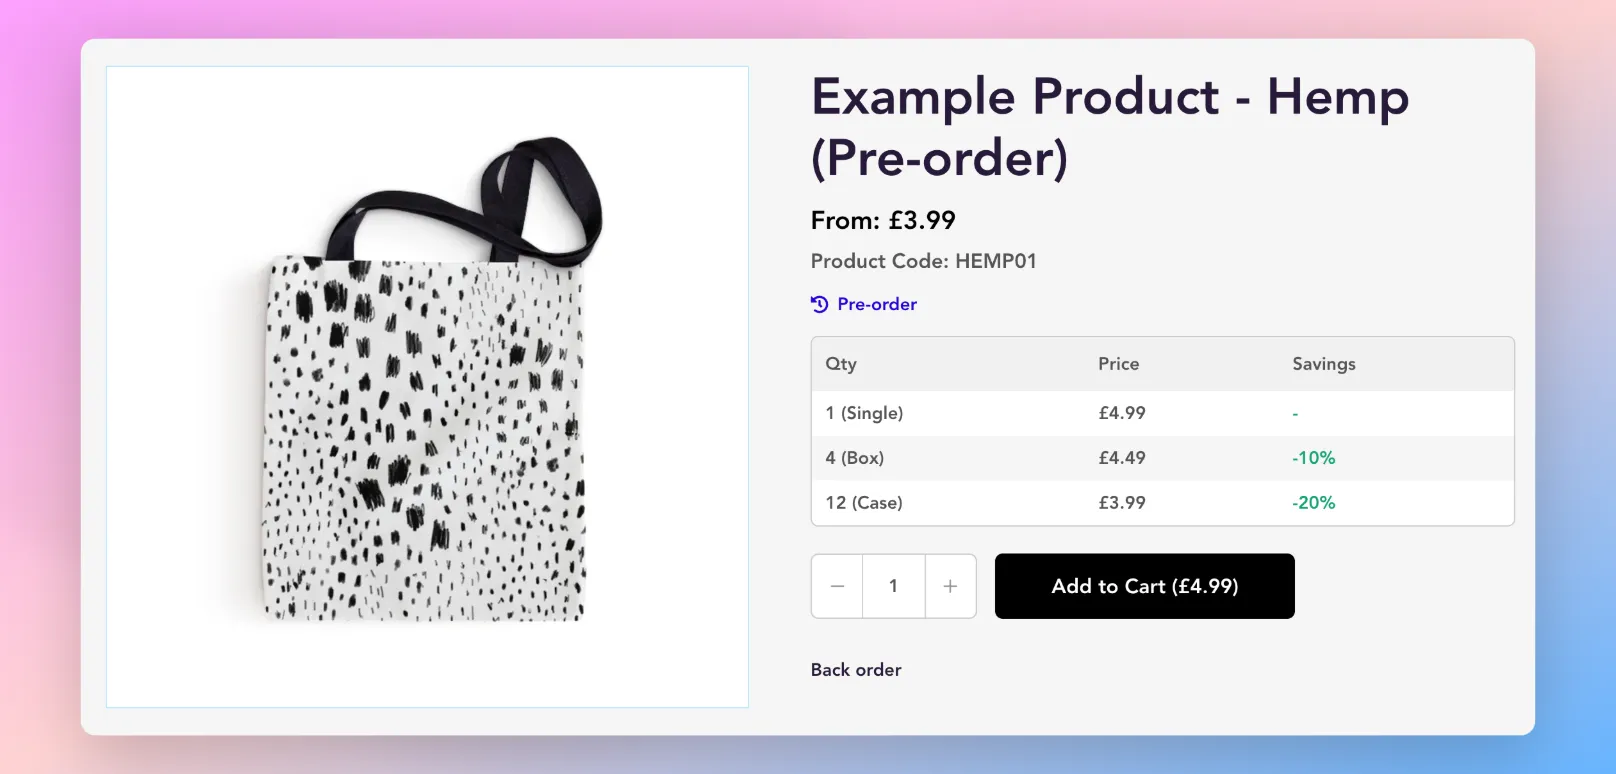
}SparkLayer has built-in support for pre-orders (someimtes referred to as "back orders").
Once enabled, this will then show a message to the B2B customer on the product page and allow purchasing.
📁 Troubleshooting
To troubleshoot the most common issues (such as issues with pricing), please see our guide here. You can also contact our support team and we'll be happy to assist.
ℹ️ Frequently Asked Questions
Plans and pricing
WooCommerce setup
Store setup
Payments
Products
User Experience
Orders