Sales Agent Ordering
Please note Sales Agent Ordering is available on the SparkLayer Starter, Growth, Pro, and Enterprise plan or as an addon for $39 per agent (per month) on any plan.You can change your plan here or learn more about our how pricing works.
Introduction
Sales Agent Ordering is a powerful feature of SparkLayer that lets certain users (Sales Agents) place orders and manage accounts on behalf of your B2B customers. Watch our video below to see how it works!
Sometimes referred to as Order Masquerading, it's a great way to integrate your sales team and centralise your B2B orders. Once enabled, Sales Agents are able to perform any of the following actions against an existing B2B customer account:
Action | Notes |
|---|---|
View products | The Sales Agent can view products on the website at the B2B prices assigned to the selected customer |
Add products | The Sales Agent can add products to an order |
Edit prices | The Sales Agent can edit product prices (if they have "Administrator" priveleges) |
Edit shipping costs | The Sales Agent can set a custom shipping price (if they have "Administrator" priveleges) |
Place an order | The Sales Agent can place an order using their available payment methods and request payment from the customer |
Shopping Lists | The Sales Agent can save and edit Shopping Lists |
Address Book | The Sales Agent Add/edit addresses (if enabled for the customer) |
Re-order | Re-order from an existing order by viewing the order details within the account |
Persistent cart | Products that are added to an order will remain in the customers My Order until they checkout or make edits. The order will also be saved for the Sales Agent if they come back later. |
In addition to performing actions against an existing B2B customer account, Sales Agents can also:
Action | Notes |
|---|---|
Add new customers | The Sales Agent can add new customers directly from the frontend, allowing them to then place an order on their behalf right away. Note: this requires assigning the Sales Agent a special "Sales Administrator" role, learn more. |
Want to test out Sales Agents? Head over to our B2B Demo store and give it a go!
Getting set up
Setting up sales agents is straightforward. The process works as follows:
- Go to Customers → Agents in the SparkLayer dashboard.
- Find the customer you want to make a sales agent and click View.
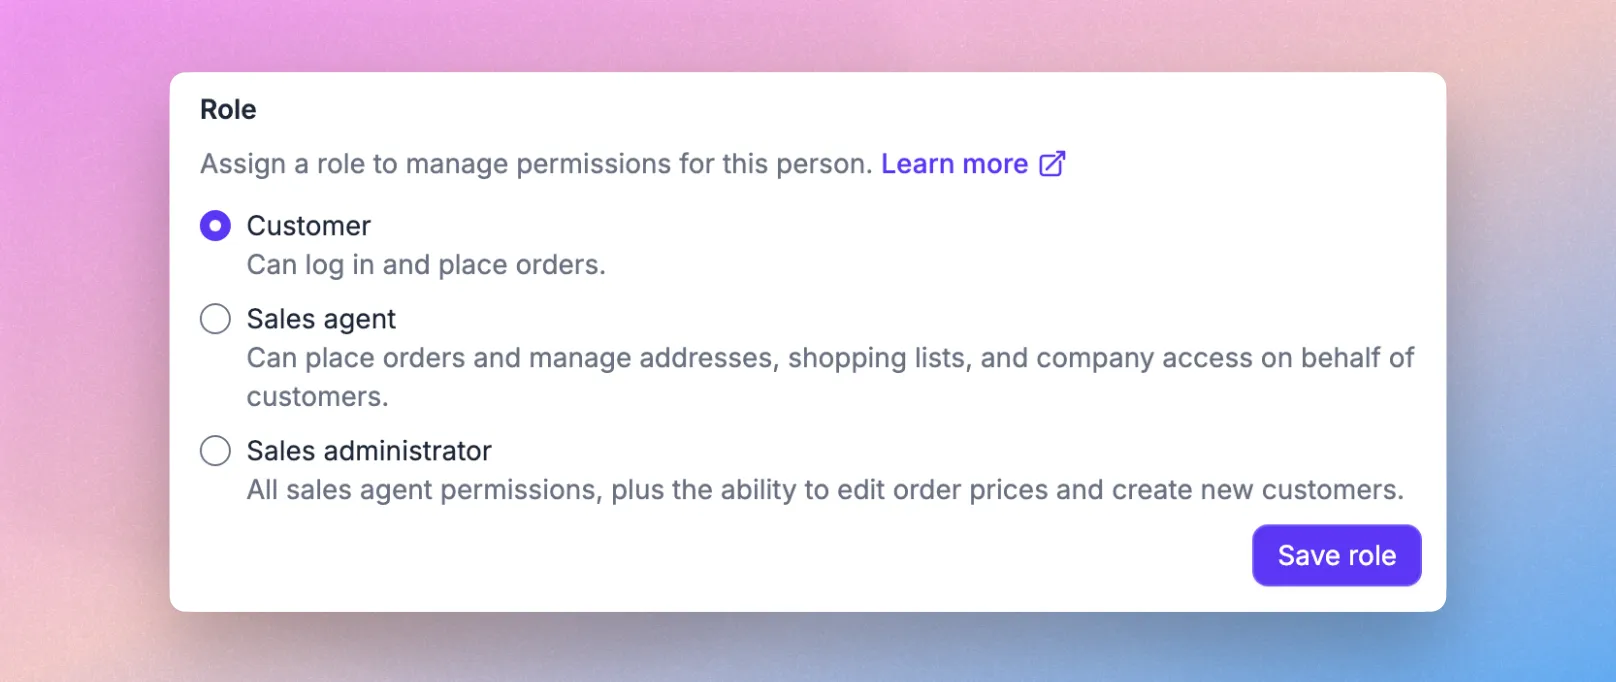
- Scroll to the Role section and select Sales agent or Sales administrator.
- Click Save role.
Once activated, the sales agent can log into your website and will be presented with the sales agent interface - where they can search for and select a customer, then place orders or manage accounts on their behalf.
Please note The customer must already have an active account in Shopify with a b2b tag before they can be assigned as a sales agent. For details on the difference between the Sales Agent and Sales Administrator roles, see the Roles section below.
Configuring Sales Agents
To assign a customer as a sales agent, go to Customers → Agents in the SparkLayer dashboard. You can also navigate to Customers, find the customer in the list, and click View to open their detail page.
Scroll to the Role section and select from the following options:
Option | Details |
|---|---|
Customer | This is the default role for a customer, allowing them to login and place B2B orders. This option means the customer is not a sales agent |
Sales Agent | This enables Sales Agent access with the ability to action the following on behalf of a customer: place orders, manage addresses, manage shopping lists, and manage company user access. This option means the customer is a sales agent |
Sales Administrator | This enables additional Sales Agent controls: the ability to update B2B prices on an order for a customer, the ability to add new customer records to subsequently place orders for. This option means the customer is a sales agent |
Custom | See "Sales Agent Roles" below for guidance on setting up custom roles. |
Once you've made your selection, click Save role to activate the sales agent.
Editing sales agents
To change a sales agent's role or remove their sales agent access, go to Customers → Agents in the SparkLayer dashboard, find the agent in the list, and click View.
From the Role section, you can:
- Change their role between Sales agent and Sales administrator
- Remove sales agent access entirely by selecting Customer
Click Save role to apply your changes.
Sales Agent Roles
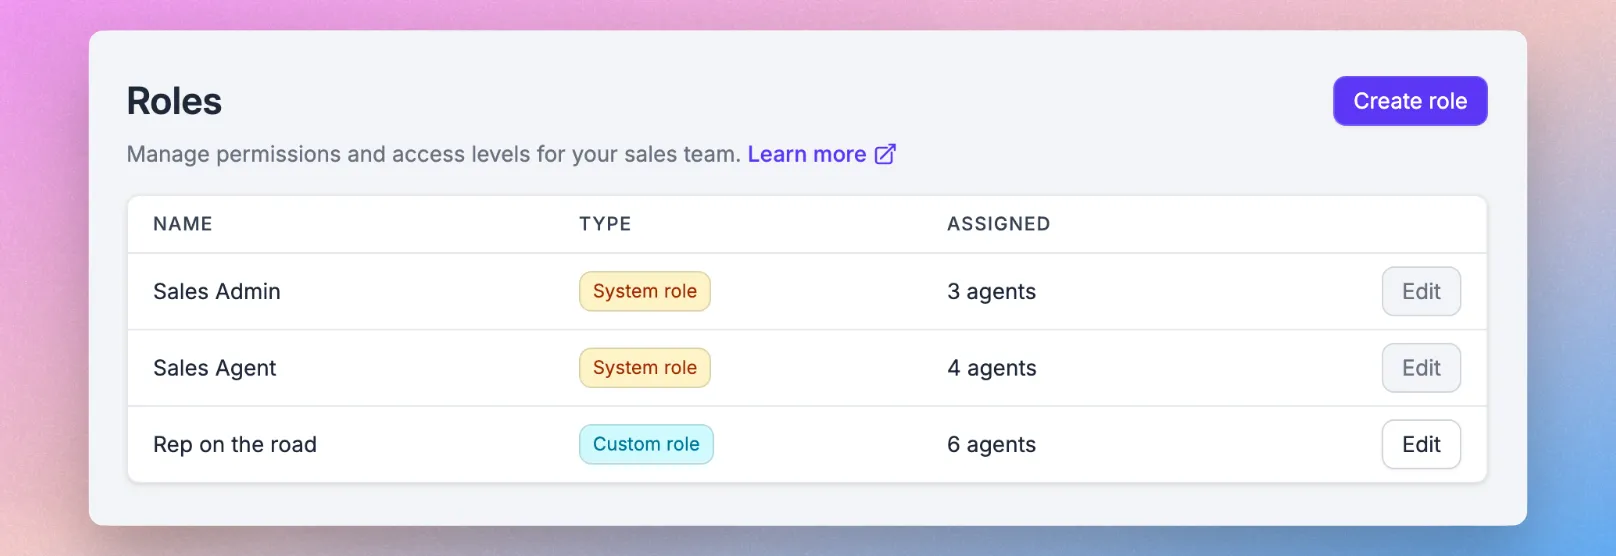
Sales agent roles let you control what each sales agent can see and do in SparkLayer - so the right people have the right level of access. Instead of managing permissions individually, you can create reusable roles and assign them across your team.
With roles, you can:
- Create custom roles with flexible permissions tailored to specific job functions
- Use built-in system roles for quick setup without any configuration
- Assign one role to multiple sales agents - keeping your team organised as you grow
- Update permissions from a single screen - changes apply automatically to all assigned users
Go to Customers → Roles in the SparkLayer dashboard. This is your central place to create, edit, and manage all roles.
SparkLayer includes two system roles out of the box, and you can create as many custom roles as you need.
Role type | Description |
|---|---|
Sales Agent (system role) | Standard access for day-to-day selling |
Sales Admin (system role) | Full access across the SparkLayer app |
Custom roles | Create your own roles with specific permissions |
Please note System roles cannot be edited or deleted.
Creating a custom role
- Go to Companies → Roles and click Create Role
- Enter a role name
- Check or edit the handle (this is auto-generated from the name)
- Select the permissions you want to allow - each permission is shown as a checkbox, so select it to grant access or leave it unchecked to restrict access
- Click Save
Editing a role
- Find the role in the list and click Edit
- Update the permissions as needed
- Click Save
Please note Changes apply immediately to all sales agents assigned to that role - there's no need to update each agent individually.
Assigning a role to a sales agent
- Go to Customers → Agents in the SparkLayer dashboard
- Find the sales agent in the list and click View
- Scroll to the Roles section
- Select a role using the radio buttons
- Click Save Role
Permissions you can set
It's possible to set any of the following permissions against a role.
- Change the price of items that have been quoted to a customer
- Add or modify custom line items on an order
- Override the shipping method or cost on an order
- Bypass product-level rules like minimum order quantities or increments
- Place orders via the normal checkout process
- Create quotes via the checkout
- Edit quotes once created
- Finalise quotes once approved
- Archive quotes when no longer required
- Manage the sales agent assigned to quotes
- Add new customer records to the platform
- Update shipping and billing addresses on a customer's account
- Change which address is set as the default for shipping or billing
The ordering experience
The key difference in the ordering experience for a Sales Agent versus a standard B2B customer is simply this: the Sales Agent isn't placing an order against their own personal account but instead against their selected B2B customer.
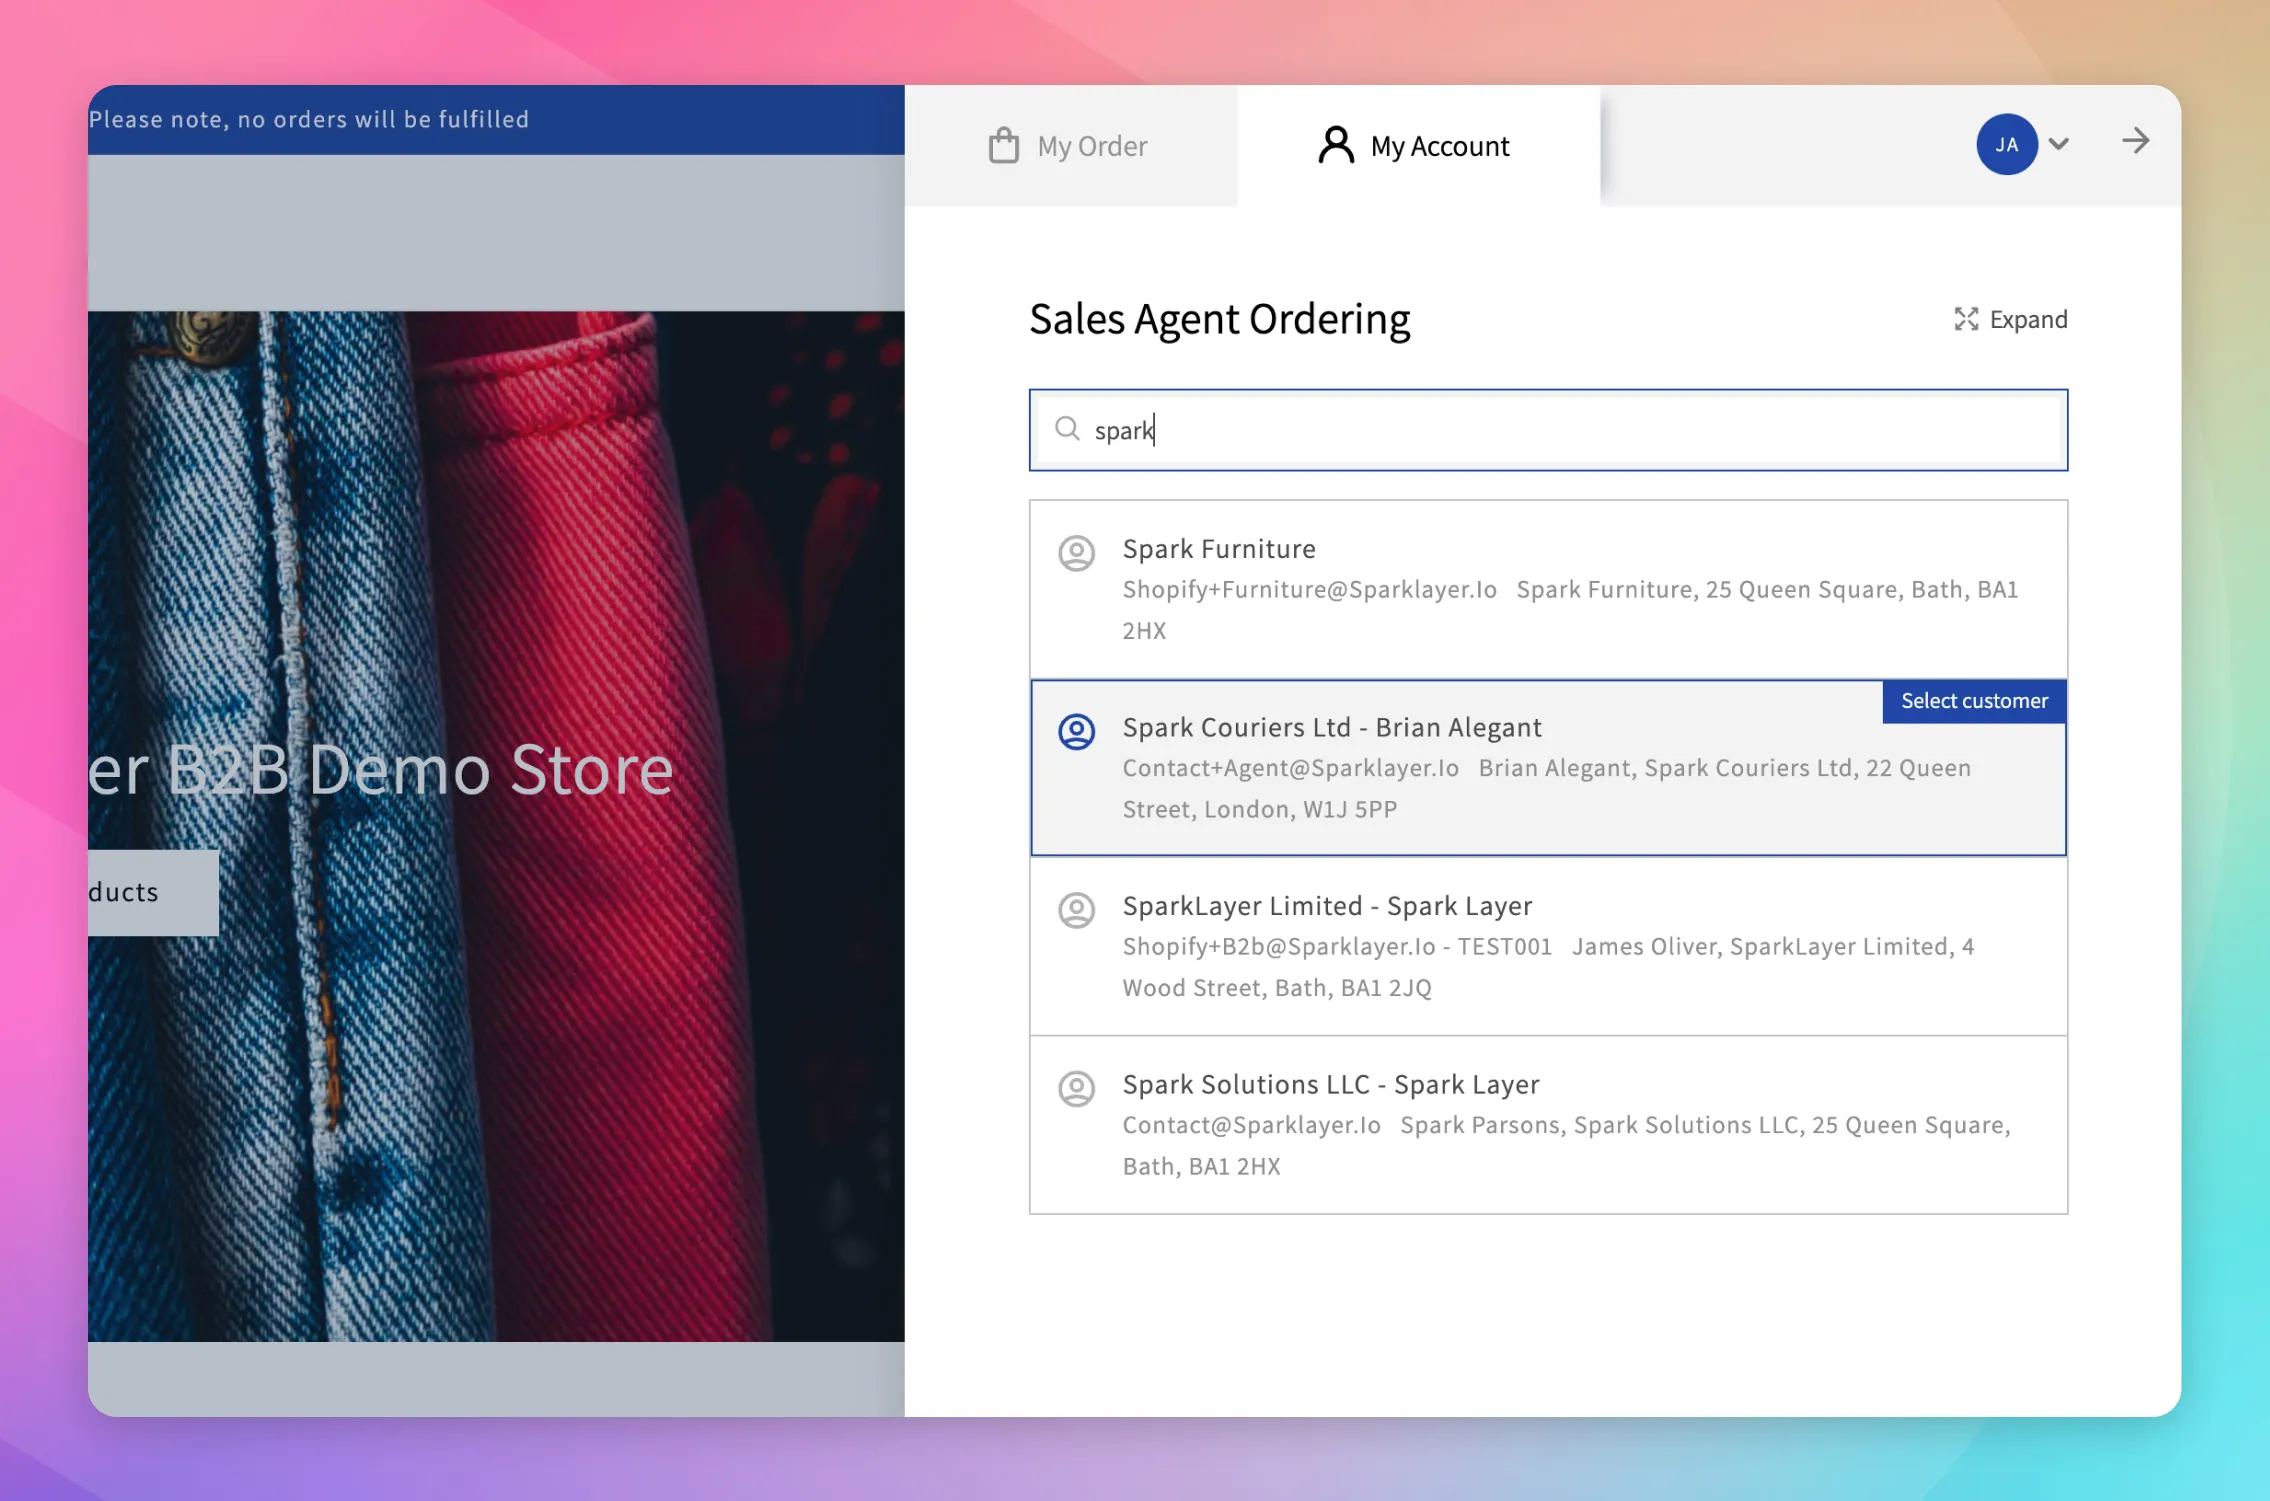
Once they login, they'll be prompted by a special Sales Agent Ordering search box within the My Account Interface that lets them easily search and select a customer. At this point, the Sales Agent will be able to search for any B2B customer within your store and place orders on their behalf.
You can also see how the order experience works in our video below.
Please note Only customers that have been tagged as B2B customers will show within the search results. Within Shopify, simply add a tag of b2b against any customer record. Customers must also always have an email assigned to their account in Shopify. If you don't have an email address, you could always use a test email such as [email protected]
The Sales Agent can search customers by:
- Company Name
- First and Last Name of the customer
- Postcode of their default address
- Accounting ID (if available)
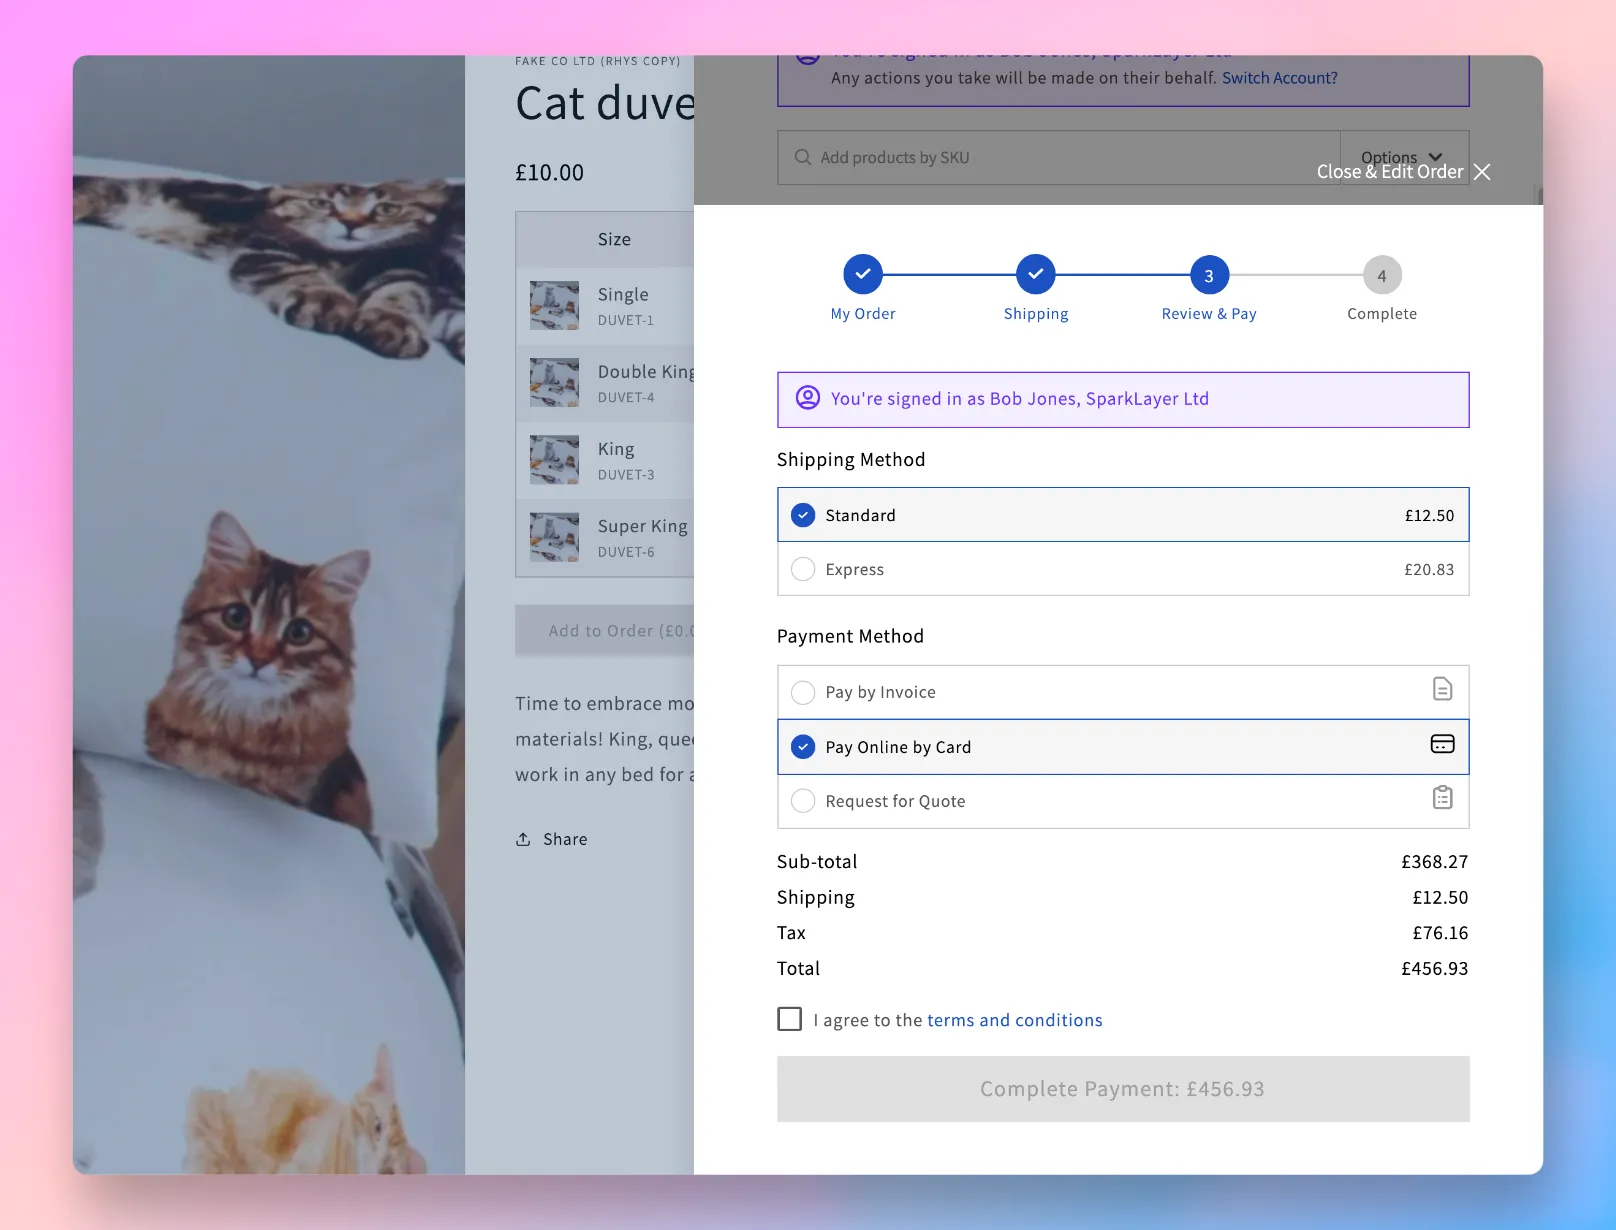
Once they've selected a customer, the Sales Agent is then in 'Sales Agent Mode' with a notification that will follow them around the ordering experience, notifying who they are logged in as.

Placing an order
Once logged in as a customer, the Sales Agent can then browse the website and begin adding items to an order. All prices shown will be the prices you've set up for the specific customer using the Pricing functionality of SparkLayer.
Once they've added products to an order, they can access the My Cart Interface at any point and begin the checkout process. Just as with the standard customer experience, they can select an address, shipping method, and see all available payment methods.
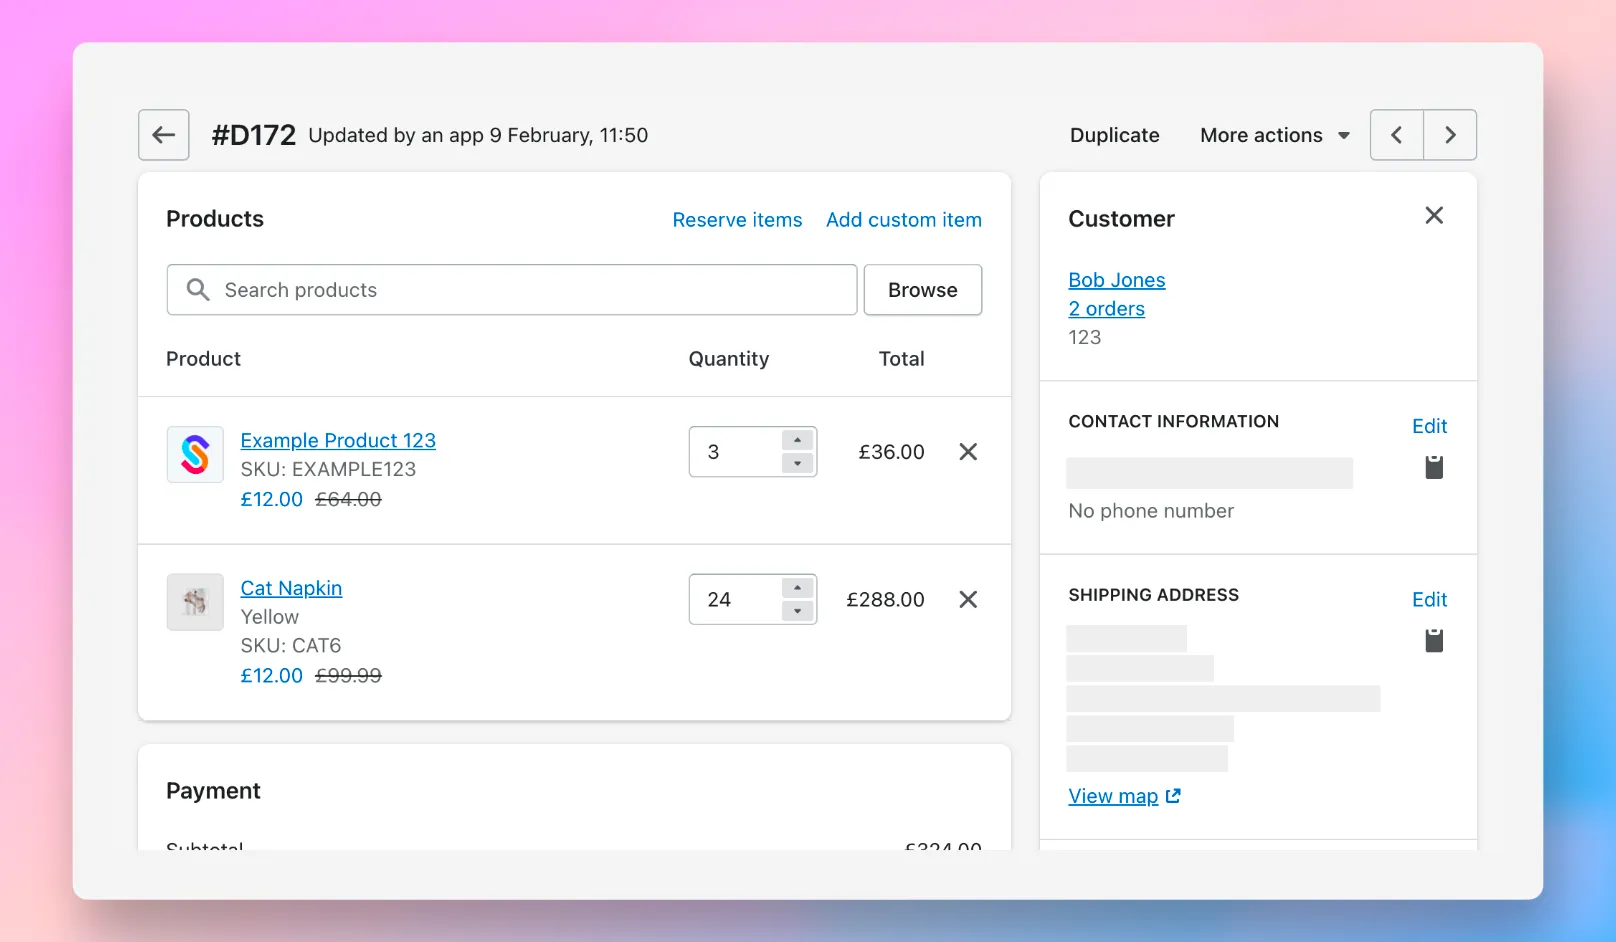
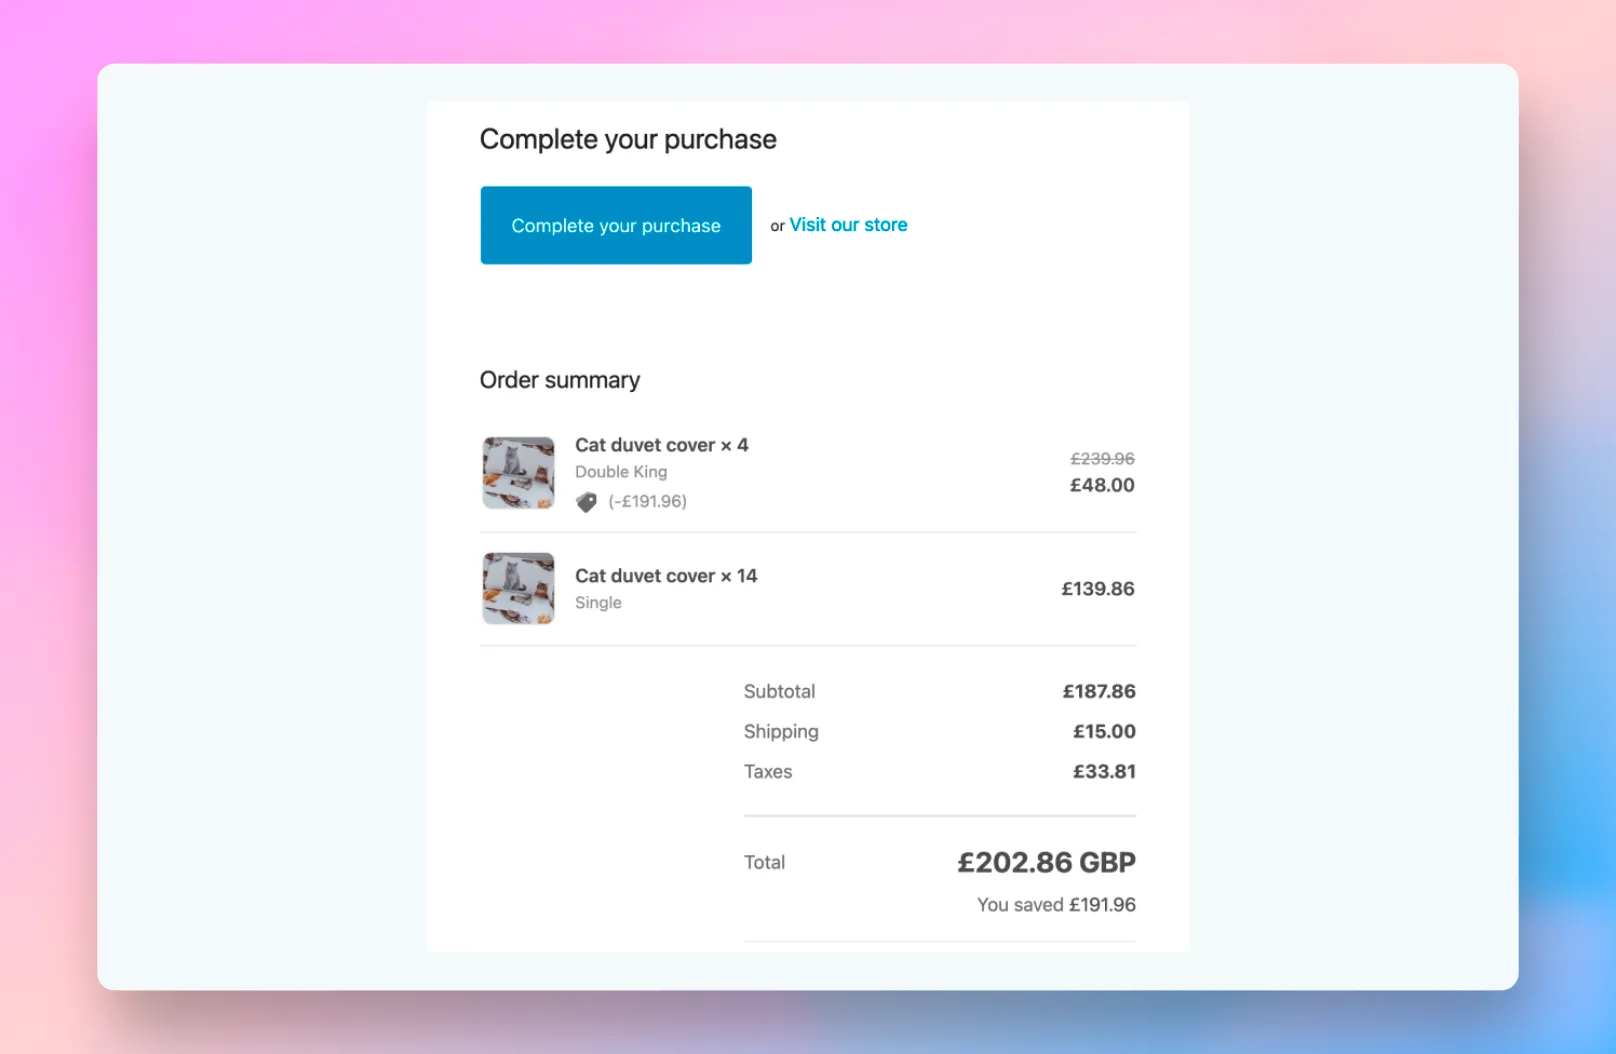
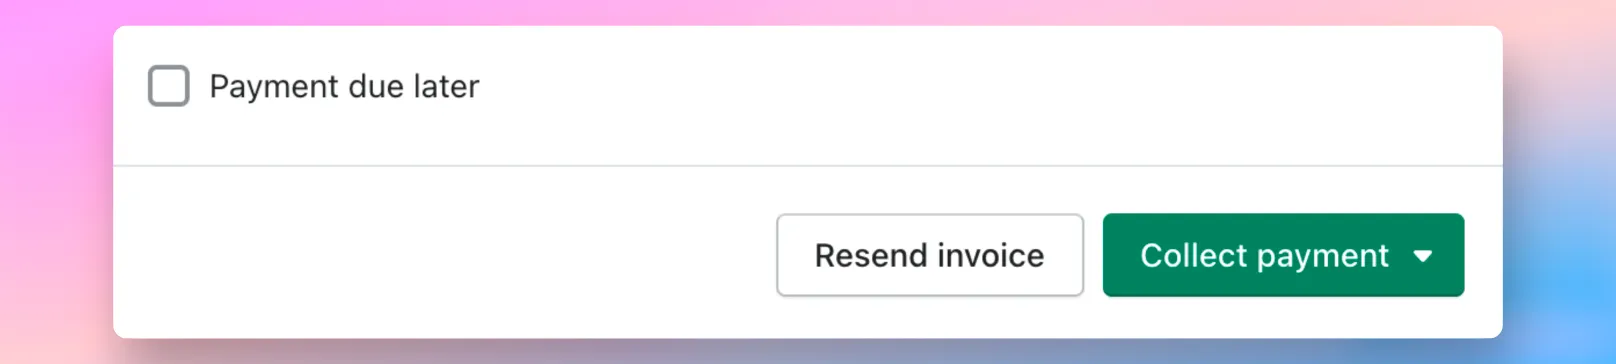
Please refer to the SparkLayer Technical Docs
Creating new customers
Sales Agents are also able to add new customers directly from the SparkLayer interface, making it easy for them to quickly place an order (versus having to manually set up a customer record within your website's admin area).
To get started, for your selected Sales Agent, you'll need to follow these steps. When selecting Customer Role, choose Sales Administrator from the list.
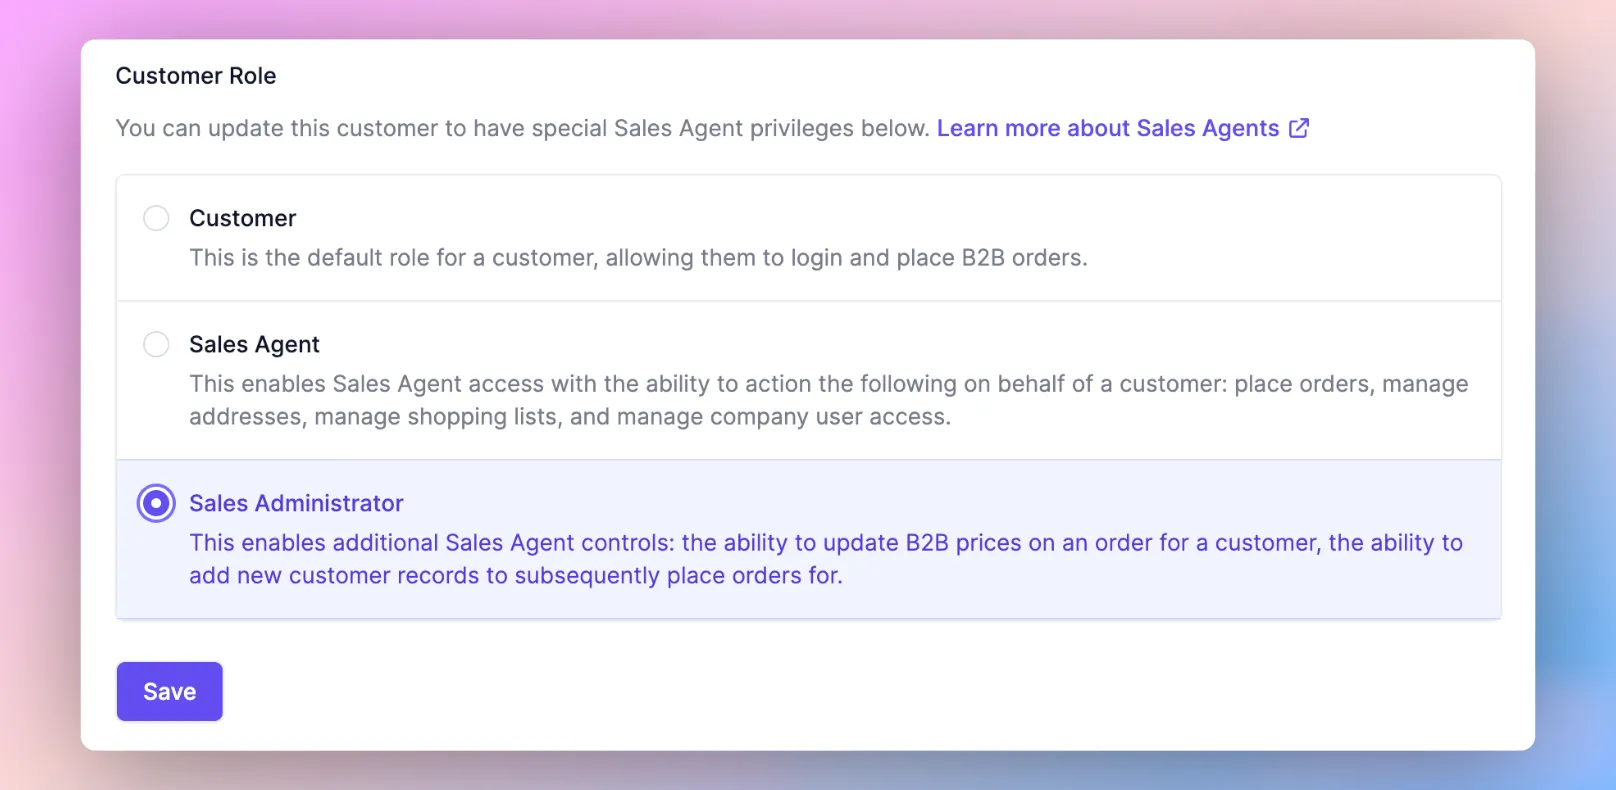
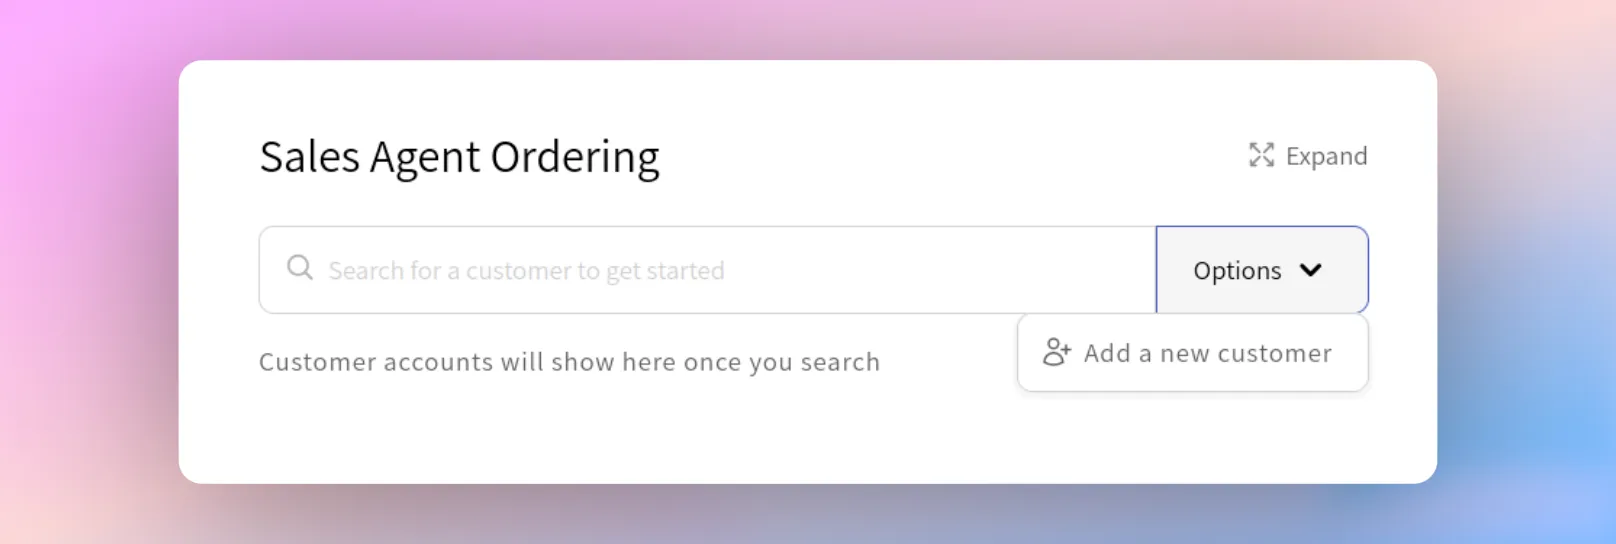
This will activate additional privileges for the Sales Agent, allowing them to create customers on-the-fly the next time they sign into your website. From the main Sales Agent overview page, they'll see the option to Add a new customer as shown below.
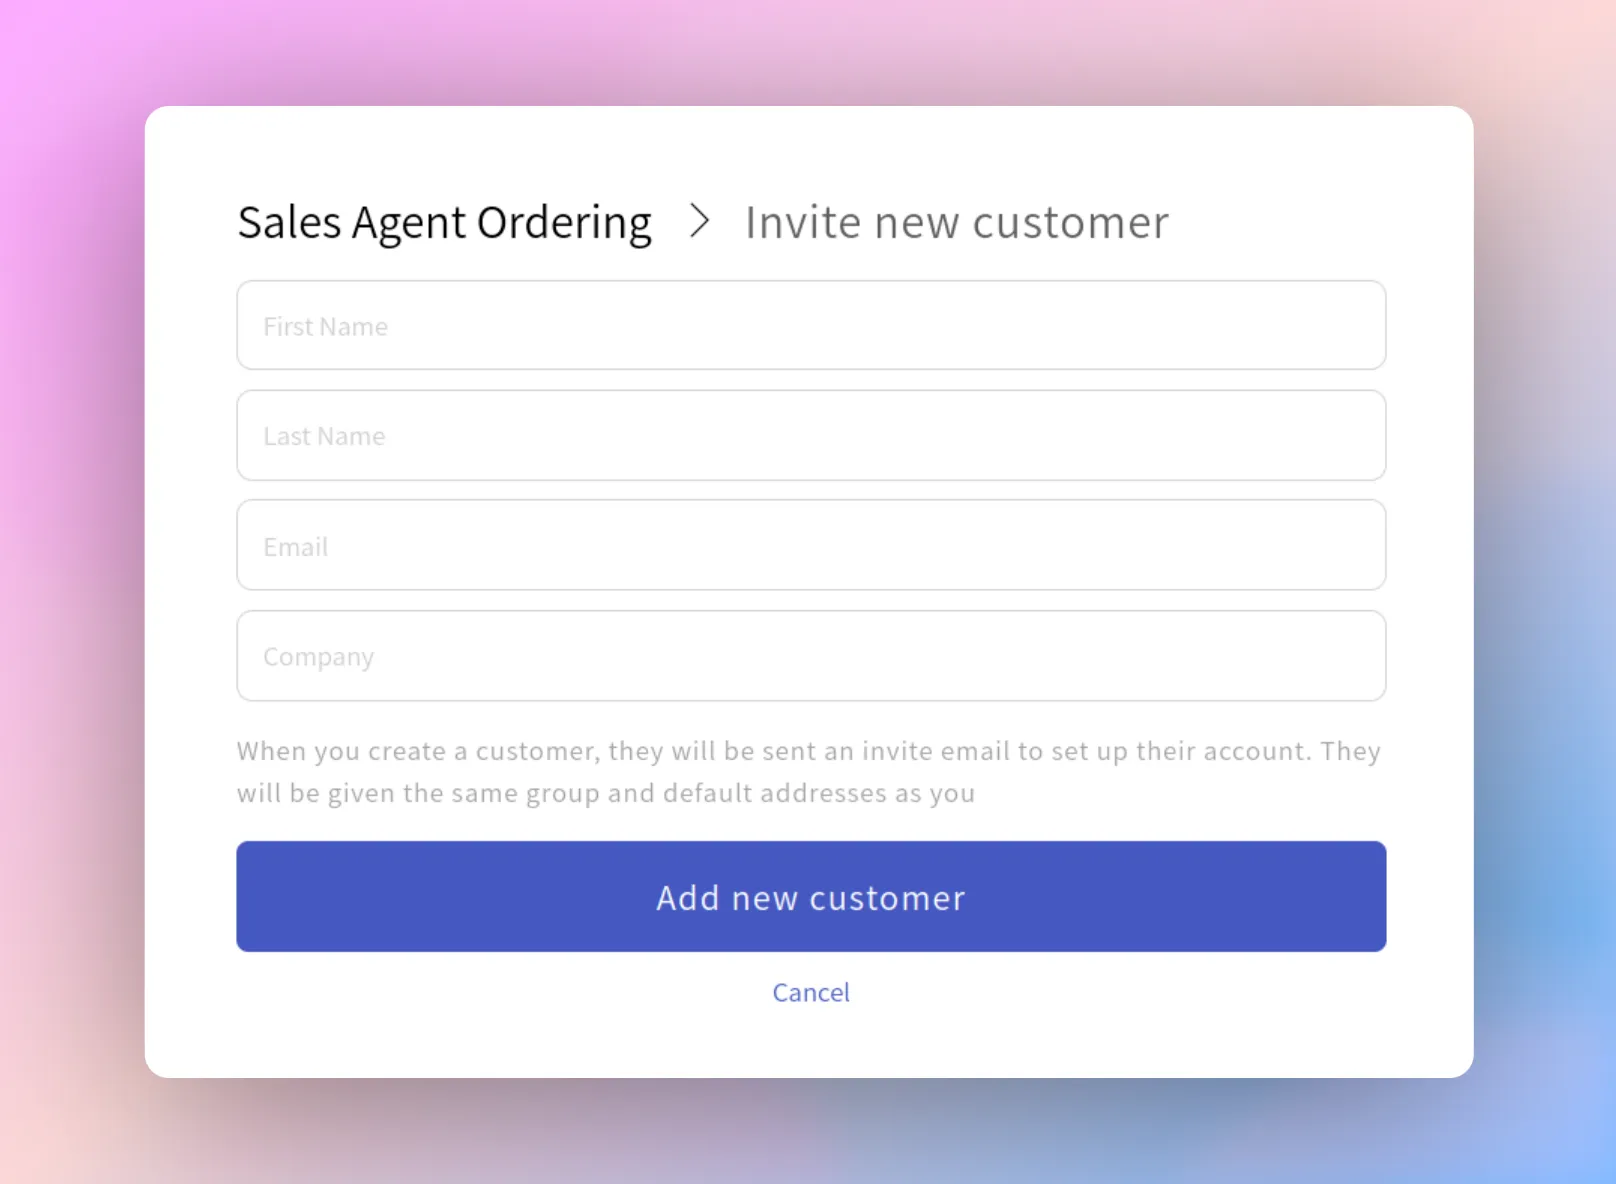
When Add a new customer is clicked, the Sales Agent will then need to complete the basic information for the customer including their First and Last Name, their Email, and their Company.
When the "Add new customer" button is clicked, this will then trigger the following actions:
Account status | Actions |
|---|---|
If the invitee does not already have an account on the website | This will send the invitee an email asking them to create a password to activate their account and join the company |
If the invitee already has an account on the website | The customer will be able to login with their existing login details to join the company. |
Preventing notifications being triggered If you'd prefer for notifications to not be sent when a new customer is created, you can manage this within the SparkLayer Dashboard under Integrations. Simply tick the "Disable new customer invite email" to prevent notifications being sent.
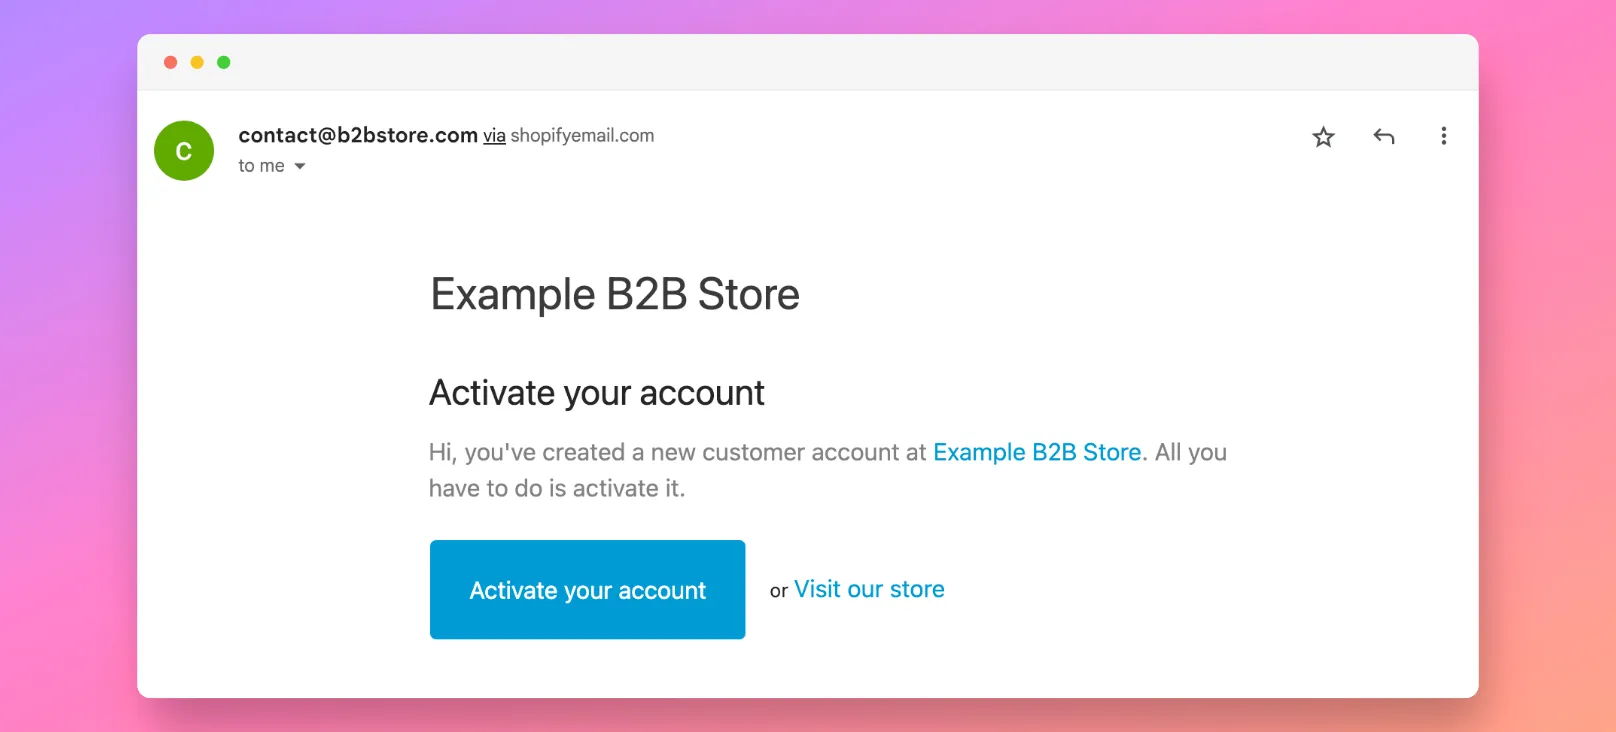
For new customers that do not already have an account, they'll receive an email that looks similar to the below. This is an email that is generated via Shopify and can be easily modified. Within Shopify, this uses the "Activate Account" email notification and can be modified within the Settings > Notifications area of your Shopify admin.
Please note the following As part of introducing new customers to your B2B customer base, we recommend informing them of the process detailed above to ensure they are familiar with the steps involved.
Please note the following When a new customer is added this way by a Sales Agent, the customer will automatically be assigned the same rules assigned to the Sales Agent. This includes the following:
- Price lists
- Discount percentage
- Customer Group
- Sales agent groups (if applicable)
For example, if the Sales Agent has been set up to use price list ABC, the new customer will automatically be assigned this same price list. This can be modified by subsequently going into the new customer's record and updating as required (e.g. by assigning them an updated customer group tag)
Editing prices on-the-fly
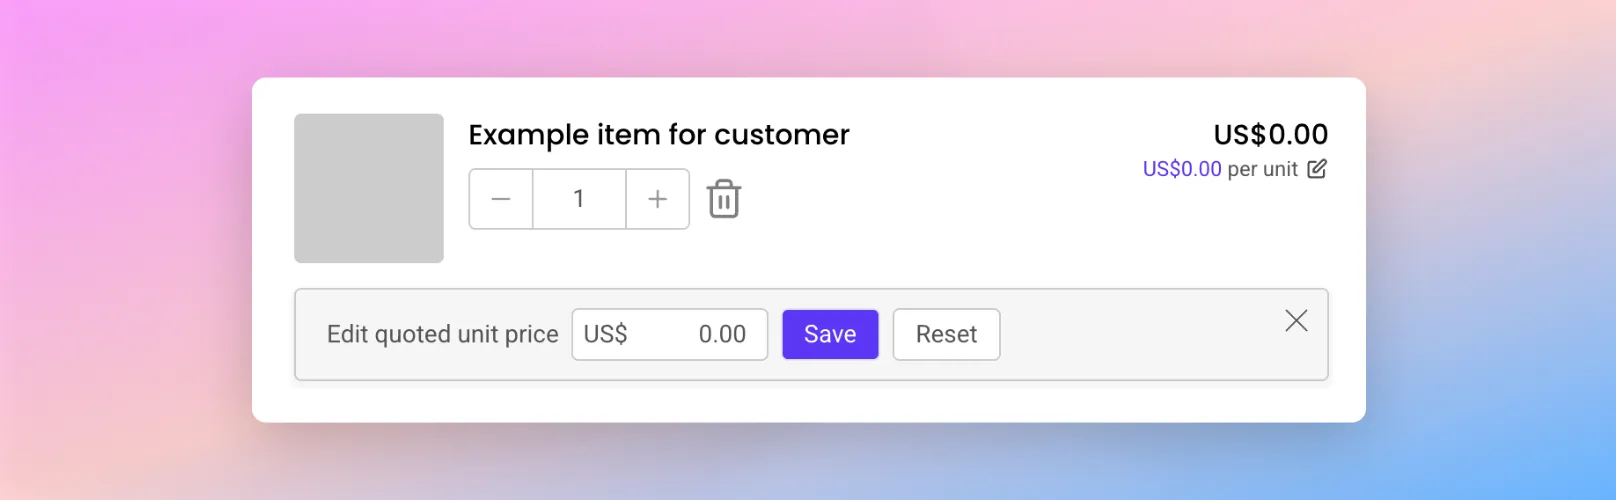
Sales Agents have the ability to edit prices "inline" for customers; it's a great way to make ad-hoc price changes or apply discounts without requiring adjustments to price lists.
To get started, for your selected Sales Agent, you'll need to follow these steps. When selecting Customer Role, choose Sales Administrator from the list.
This will activate additional privileges for the Sales Agent, allowing them to edit prices on-the-fly the next time they sign into your website. When they add items to a customer's order, they'll see an Edit button next to the Unit price to then make changes.
Please note It is only possible to lower the unit price when editing prices.
Adding custom items
Our new "Add custom item" feature lets your Sales Admins add additional items to a customer's order that sit outside of your general product catalogue.
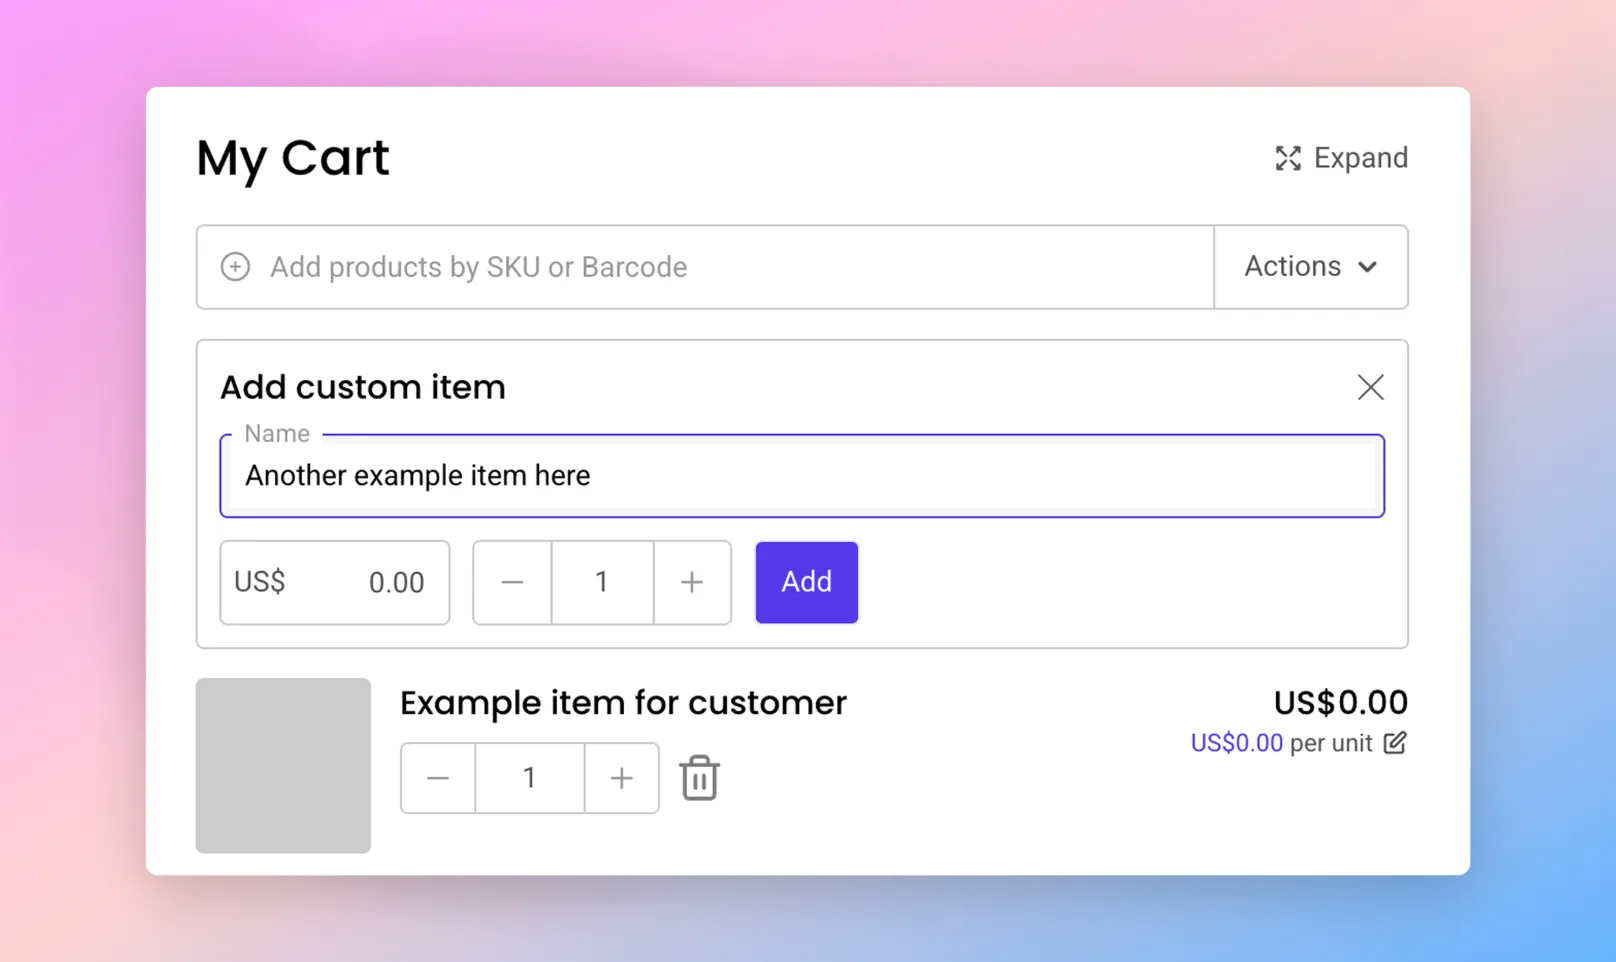
Use-cases could include adding custom instructions or details specific to an order, additional products (that don't have a specific SKU), or any custom item that needs to be associated with an order. Items can be added at a specific cost or at a zero cost value.
To get started, for your selected Sales Agent, you'll need to follow these steps. When selecting Customer Role, choose Sales Administrator from the list.
This will activate additional privileges for the Sales Admin, allowing them to add custom items the next time they sign into your website.
To add a custom item to an order, from the My Cart Interface, go to "Actions" and select "Add custom item". This will then allow the sales agent to enter the following details:
Item | Details |
|---|---|
Name | The name of the custom item |
Cost | The per unit cost of the custom item |
Quantity | The number of units |
When a custom item is added to the order, it is then possible to edit the unit cost, quantity, and fully remove the item if required.
Setting custom shipping costs
Sales Agents have the ability to set a custom shipping cost for customers; it's a great way to create a specific shipping costs without needing to edit shipping rules or costs behind the scenes.
To get started, for your selected Sales Agent, you'll need to follow these steps. When selecting Customer Role, choose Sales Administrator from the list.
This will activate additional privileges for the Sales Agent, allowing them to create a custom shipping cost on-the-fly the next time they sign into your website. When they add items to a customer's order and go through the checkout, they'll see an Edit button next to the shipping methods to then make changes.
It's also possible to set a custom message that shows when setting a custom shipping cost. If you'd like to make edits, please refer to the instructions below.
Updating language and text You can update the default text by adding code to your Core Script. Learn more about how to update text on SparkLayer.
/* Add the below code into the SparkLayer Core Script */
translations: {
  en: {
    "cart.checkout.shipping-method.custom-method.message": "Set a custom shipping rate for this order to replace default shipping methods.",
  }
},
/* End of code *
Please note When setting up a custom shipping price, it will be labeled as "Custom Shipping" in your store's admin (e.g. Shopify). If you have backend integrations in place, this label might impact how order data is processed. To ensure smooth operation, we recommend testing this feature beforehand to identify and address any potential issues.
Overwriting product settings
For Sales Agents with the "Sales Administrator" customer role (see above), it's possible to edit the product settings of items within an order.
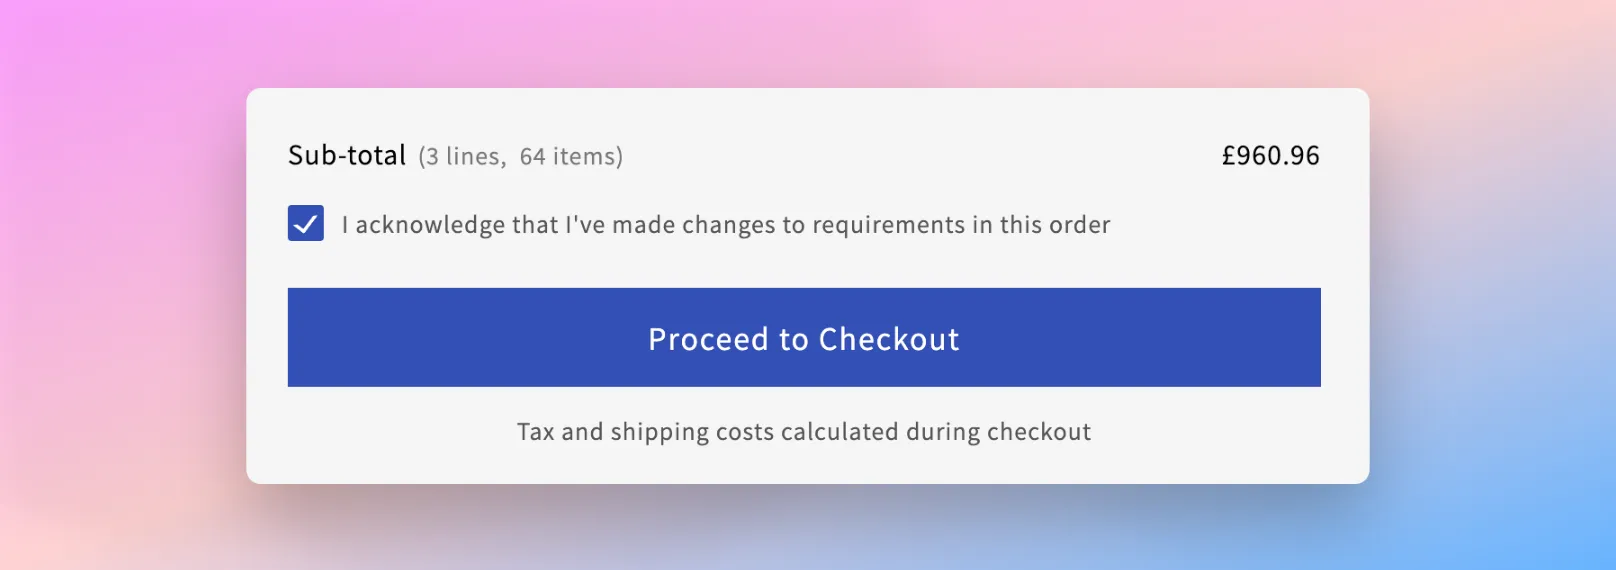
For any products that have pack size or min/max product rules, the Sales Agent can enter "freeform" quantities and increment/decrement the line item quantities as required.
If changes are made to the default settings, the Sales Agent will be prompted to confirm their changes before proceeding to complete the order.
Placing "personal" orders as a Sales Agent
Please note To use this feature, your store must be using version 1.4.0 or above in the SparkLayer Core Script
Sales Agents can access their own personal account by clicking the my account icon within the My Cart Interface.
Alongside placing orders on behalf of customers, Sales Agents can also add products to their personal orders and complete the checkout process independently. Whether it's for buying a product for an upcoming customer demonstration or making a personal purchase at a preferential rate.
When a Sales Agent places a personal order, pricing will be applied based on the price list assigned to their customer group within the SparkLayer Dashboard.
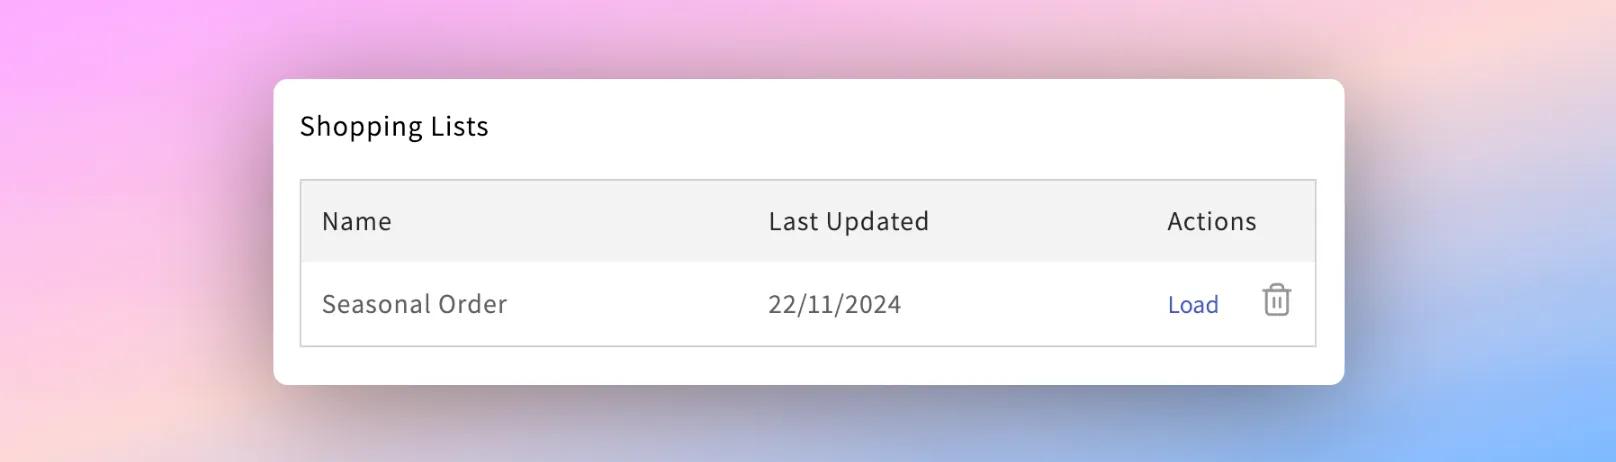
Shopping lists One great use for the the Sales Agent "personal" account is the shopping lists feature. Sales Agents can create their own shopping lists to save in their account. Once they log in as a customer, they can then access the shopping lists to populate an order. It's a great way to quickly start an order for a B2B customer!
Using Sales Agents across multiple devices
An additional feature of Sales Agents is the ability to access customer accounts across multiple devices using the same Sales Agent login. This means that you can:
- Pick up orders from where you left off
- Manage the same order in parallel across different devices
- Log in as a different customer on a different device whilst using your sales agent account
Restricting Sales Agent Access
If you want to restrict which customers a sales agent can see, you can configure this using sales agent groups. This powerful feature gives you full control over how you manage sales agent access - for example, limiting agents to specific territories, regions, or customer types.
Setting up metafields on Shopify 🤖 Automatically add this to your Shopify store by going to configure metafields. 📖 Learn more about how metafields work in our guide here
Item | Details |
|---|---|
Custom data type | |
Metafield type | This must be set as Single line text and set to List of values |
Namespace | This must be set as sparklayer |
Key | This must be set as sales_agent_groups |
Validation | Tick Limit to preset choices and then enter your values |
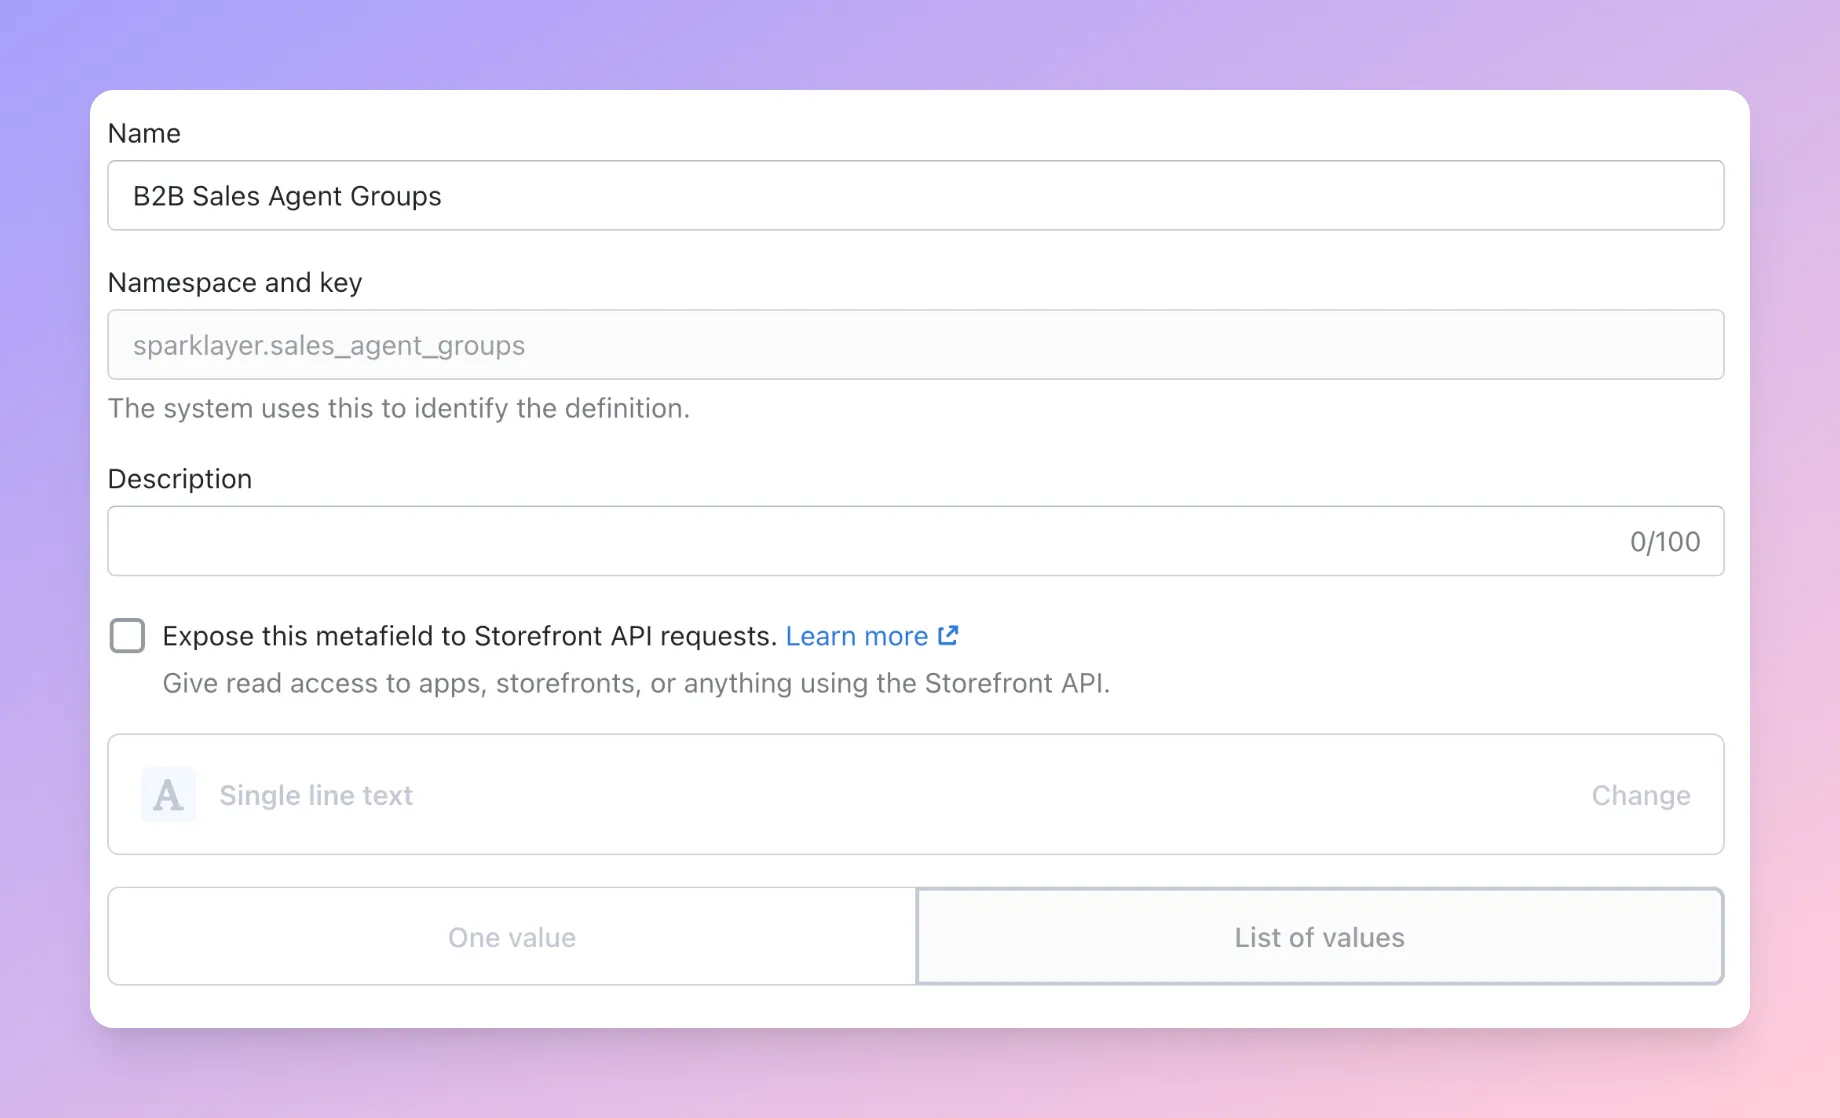
The values you enter represent how you want to categorise your Sales Agents. Common use-cases may include:
Example use-case | Example Values |
|---|---|
Limiting by a territory (e.g. Germany, France, UK). | germany, france, uk |
Limiting by a geographical region | north-east, south-west |
Limiting by a customer type | vip, new-customer |
Important: when entering values, make sure to not include spaces. Instead, you can separate using dashes (e.g. south-east)
Assigning Sales Agent Groups to a customer
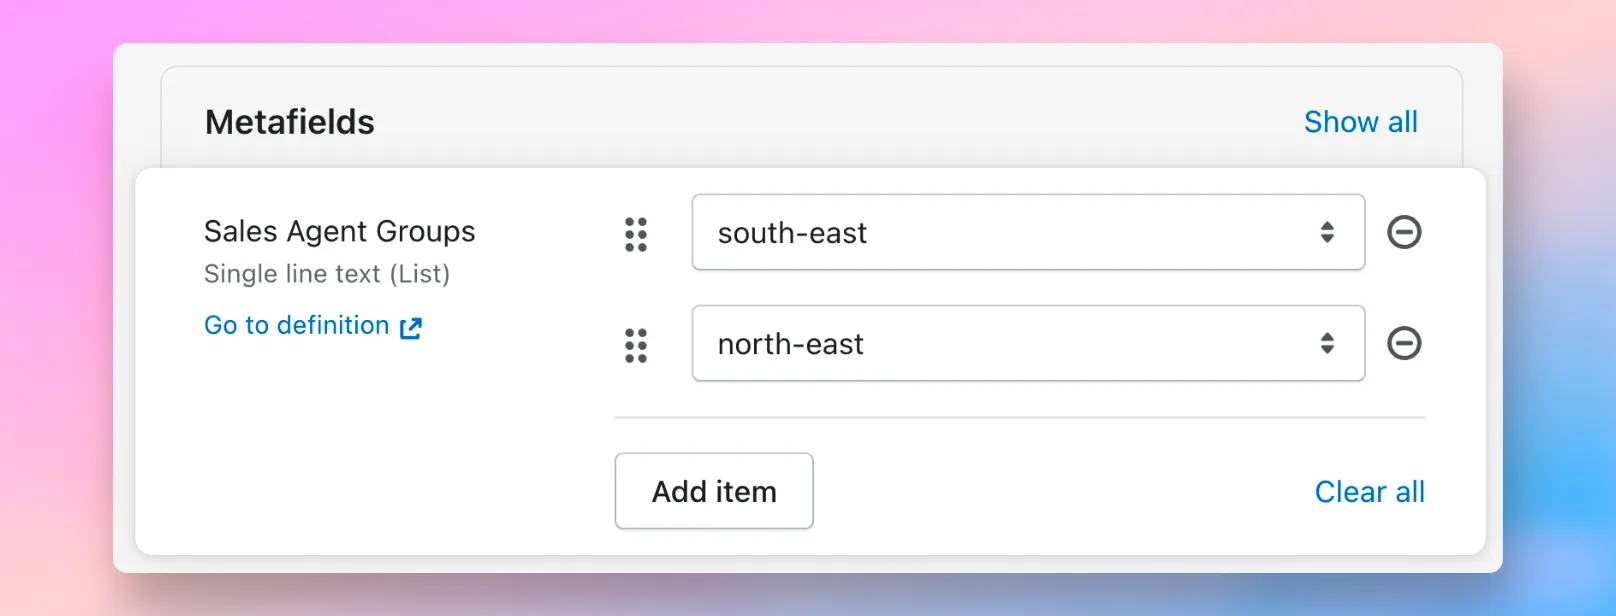
Once you've created your Sales Agent Groups, you can then easily assign these to a customer. Within Shopify, search for a customer and then scroll down to the Metafields section. From the Sales Agent Groups option, select the appropriate values and then click Save. Note, it's possible to assign more than one value to a customer.
Configuring rules for the Sales Agent
The final step is to then assign the Sales Agent Group rules to a specific sales agent. This is done through the SparkLayer dashboard. Simply head to "Customer Sync", find your sales agent, and scroll down to "Restrict sales agent access". Then, just enter the groups you would like the sales agent to be able to access. As with customers in Shopify, a Sales Agent can have access to multiple groups.
Please note If you leave the field as blank, the Sales Agent will have access to all customers.
Any modifications to sales agents/admins must be done through the dashboard. You cannot change the metafields for a sales agent/admin on Shopify. This includes changing their role or sales agent groups they are assigned to.
When the Sales Agent next signs into your Shopify store, they'll then be able to search for customers that match the Sales Agent Group rules you've set up.
Notifying sales agents of new orders
When a B2B customer places an order, it's possible to also notify the sales agent of any order activity using automations within your eCommerce platform.
Using Shopify Flow, you can set up specific triggers to send emails to specific sales agents when an order is placed.
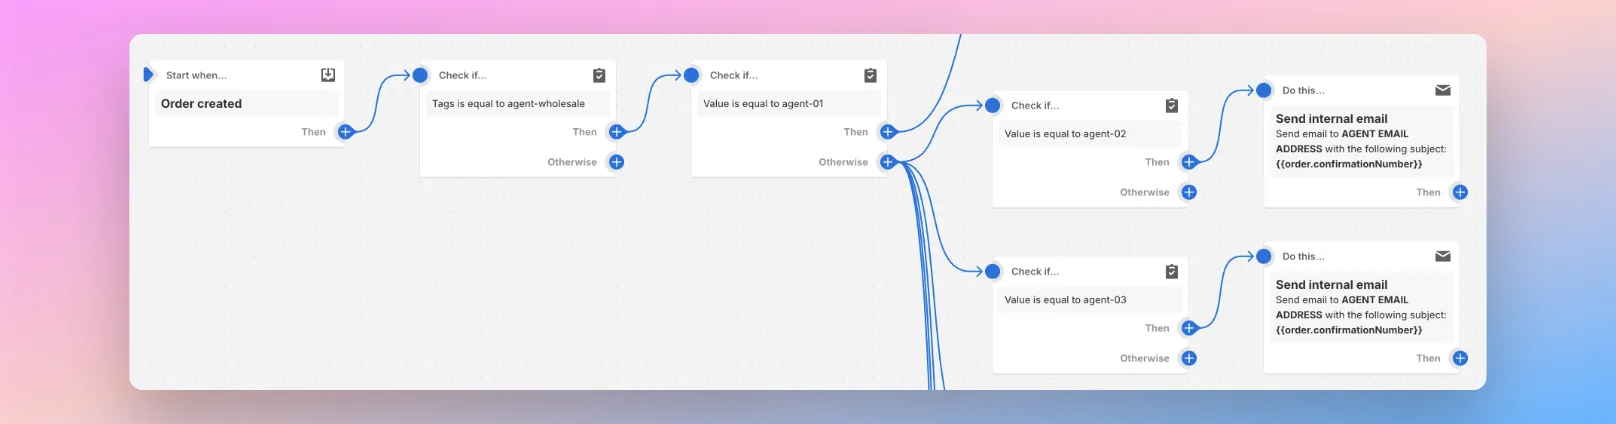
The flow works by detecting an order (or draft order) being placed, checking which sales agent has been assigned to the customer (see "Restricting Sales Agent Access" above), and then sending an internal email.
To get started, you can download a sample Shopify Flow template here.
Managing Quotes
Do you have Sales Agents who manage quotes on behalf of your B2B customers?
The SparkLayer Quoting Engine introduces a unified solution that streamlines the entire "quote-to-order" process directly from your existing online store. It allows you to handle quotes more effectively, converting them into completed orders faster than ever!
The SparkLayer Quoting Engine works by allowing your B2B customers to easily submit quotes for review, and for your sales team to then communicate with the customer until they're ready to complete their order. Learn more about how it works in our full guide.
Tracking activity
When Sales Agents place orders through your store, a range of additional data is tracked against the order, from specific tags through to additional notes. This is useful if you want to be able to filter or analyse Sales Agent activity or integrate this into your backend systems.
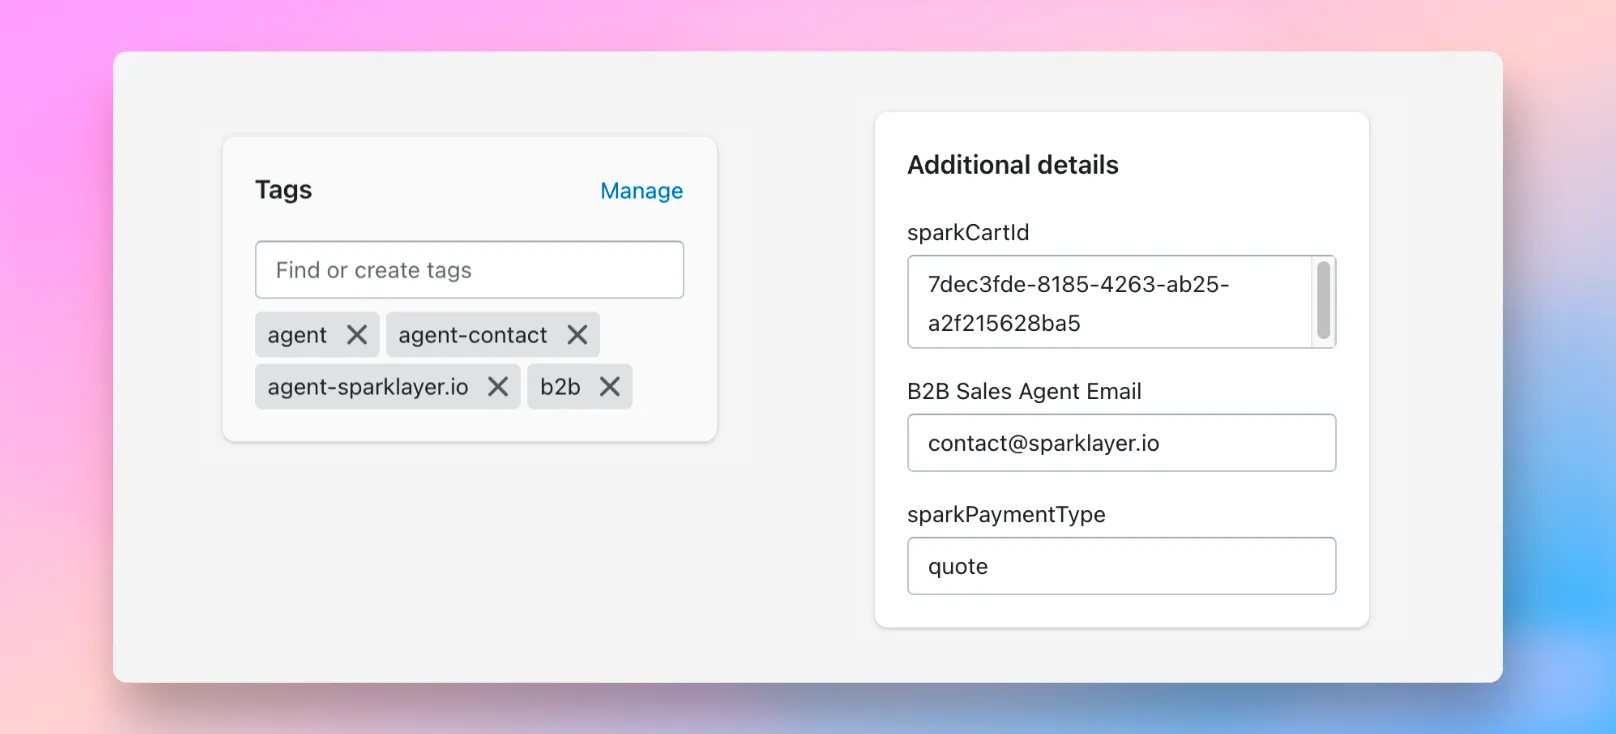
To view the available data, you can click into an open Draft order and you'll see the following information. This information will also display on any completed orders once payment has been taken.
Data field | Details |
|---|---|
Shopify tags | The following tags will be added against the order:
|
B2B Sales Agent Account ID | If the sales agent has an accounting ID assigned, this will display within the order |
B2B Sales Agent email | The email address of the Sales Agent |
sparkPaymentType | This is captured against all B2B orders, and will also include the payment type the Sales Agent has selected |
Order exporting
Sales agents can export order activity to a CSV file directly from the Activity view, making it easy to analyse customer purchasing patterns and report on sales performance across their customers. Use the Download dropdown in the top right of the Activity view to export, with the same "Activity" and "Activity with line items" options available to customers.
For full details on the export options and the fields included, see our My Account InterfaceOrder exporting guide.
Barcode scanning
Built into SparkLayer is the ability for Sales Agents to easily build orders simply by scanning barcodes via their mobile device. It's a great way to allow sales teams to easily order when they're in-store, at trade shows, or any other location where they have access to product barcodes. You can learn more about this and other time-saving tools in our Intelligent Cart (AI) guide.