Pricing Display
Displaying a RRP price (MSRP price)
Within the SparkLayer Frontend, it's possible to show RRP prices (or "MSRP prices") alongside your specific B2B pricing. For example, you may want logged in users to see what non-B2B customers pay for a specific item, allowing them to easily see their pricing savings.
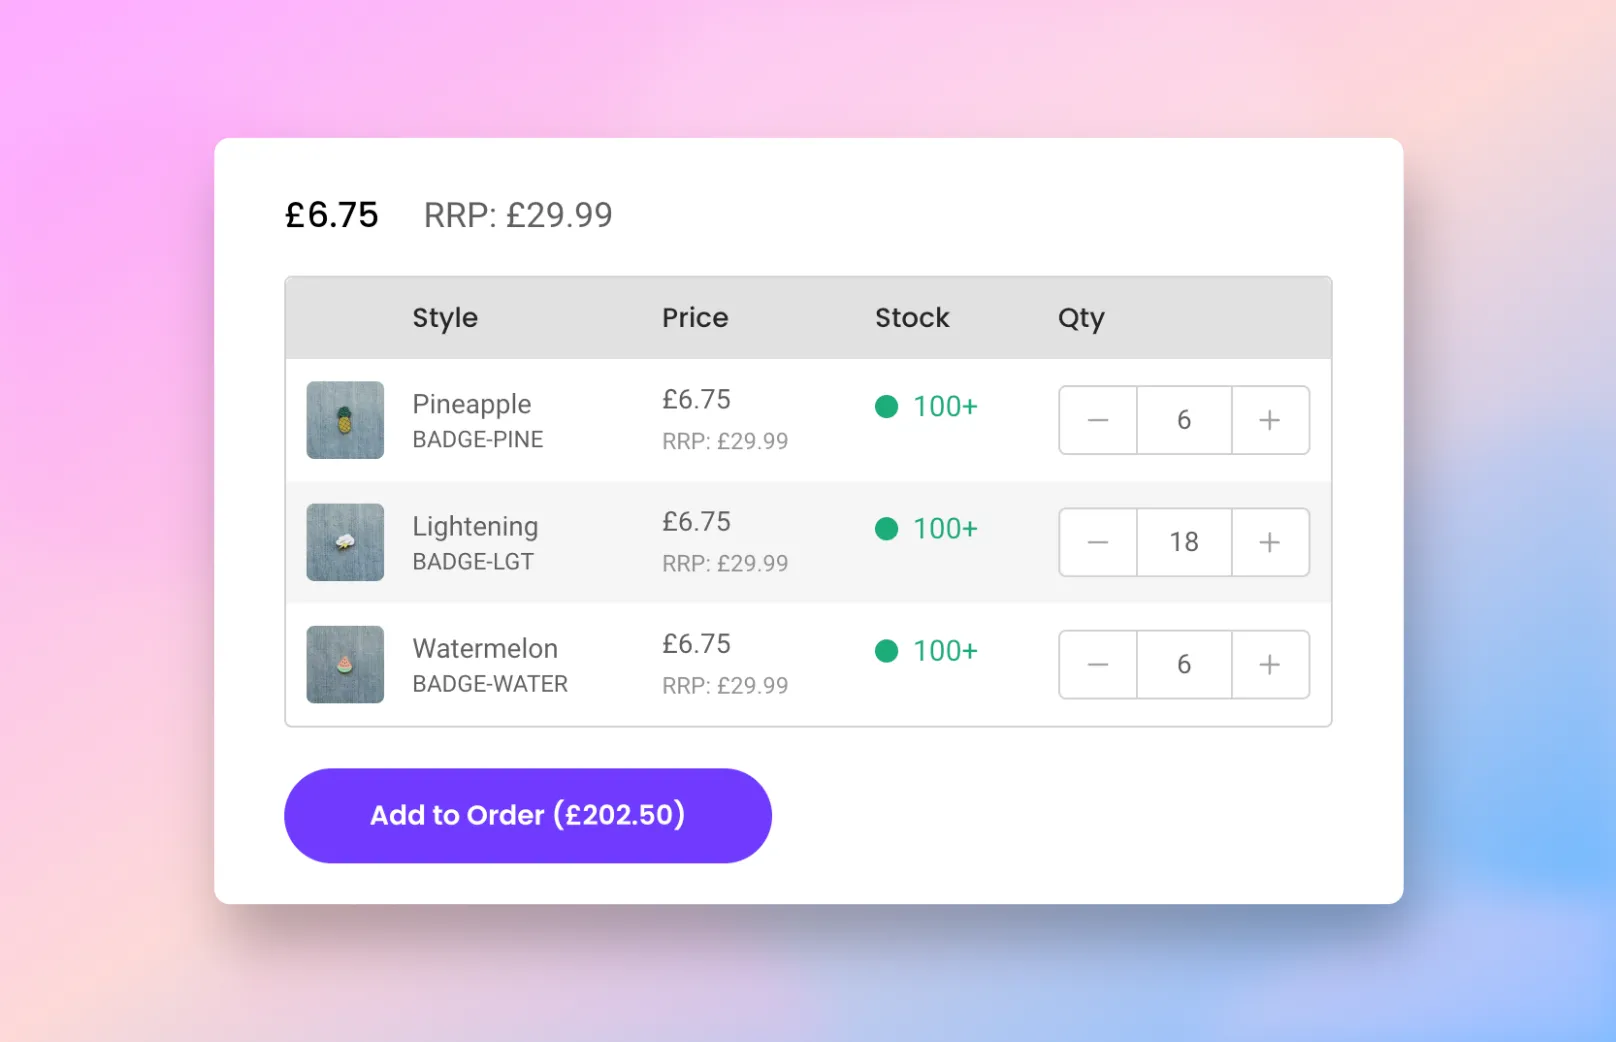
To enable this, SparkLayer uses special settings (sometimes referred to as metafields or attributes) that allow additional data to be stored against products.
Setting up metafields on Shopify To learn more about how to configure metafields on Shopify for SparkLayer, please refer to our guide here
Setting up metafields on Shopify 🤖 Automatically add this to your Shopify store by going to configure metafields. 📖 Learn more about how metafields work in our guide here
Item | Details |
|---|---|
Custom data type | Variants |
Metafield type | This must be set as an JSON string |
Namespace | This must be set as sparklayer |
Key | This must be set as rrp |
Value | This must be set up in the following format [{"value":15.99,"currency_code":"usd"}] Where value is the retail price and currency_code is the currency code (e.g. usd, gbp, eur). You can define prices for additional currencies by using this example format [{"value":15.99,"currency_code":"usd"},{"value":10.99,"currency_code":"gbp"}] |
Automate the RRP pricing You can automatically populate the SparkLayer RRP metafield from your live Shopify prices using Shopify Flow. See our guide for ready-made templates.
You can also watch our video tutorial on how to set this up.
Updating language and text You can update the default text by adding code to your Core Script. Learn more about how to update text on SparkLayer.
/* Add the below code into the SparkLayer Core Script */
/* Please refer to our help guide on how to do this */
translations: {
  en: {
    "pdp.price.rrp": "MSRP: ",
    "product-card.price.rrp": "MSRP: ",
    "cart.price.rrp": "MSRP: ",
  }
},
/* End of code */
If you'd like to adjust the appearance of the RRP pricing, you can do so via adding special CSS overwrites to apply formatting.
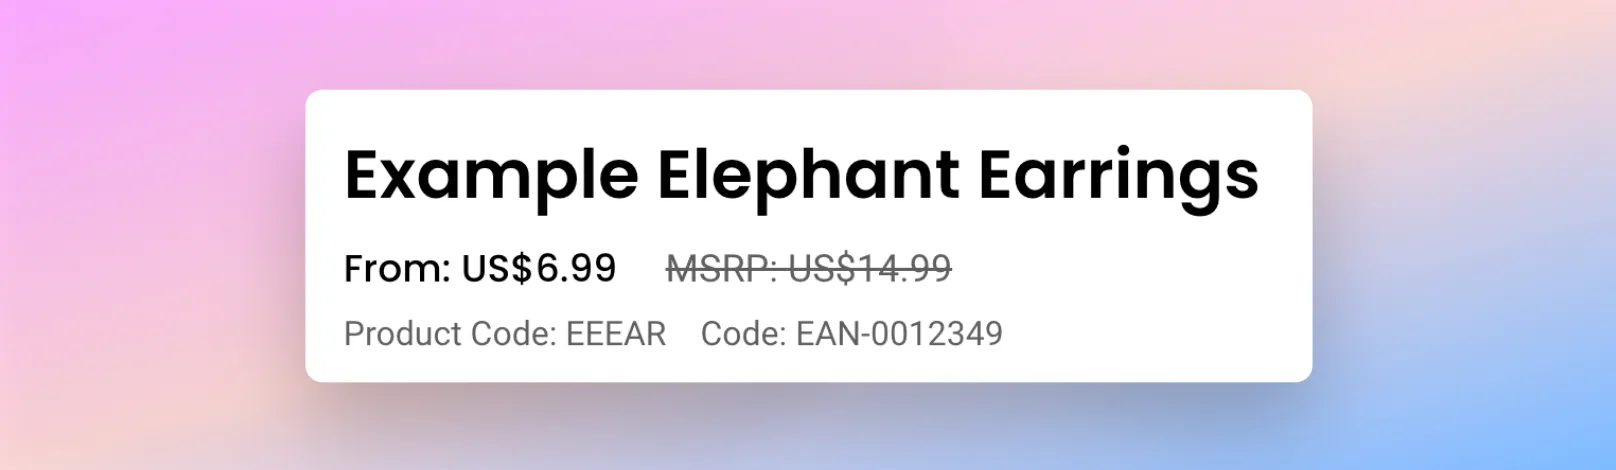
Simply add the below CSS to your CSS overwrites and adjust accordingly.
<style>
:root {
   --spark-pricing-rrp-decoration: line-through;
   --spark-pricing-rrp-color: red;
}
</style>
Quantity pricing
Learn more For our full guide on quantity pricing and available configurations, please see our Quantity Rules guide.
Quantity pricing table
If you've set up Quantity Pricing & Settings for your products, SparkLayer will by default show this to your customers within the Product Detail Interface.
This will also show to customers when they add items to the My Cart Interface.
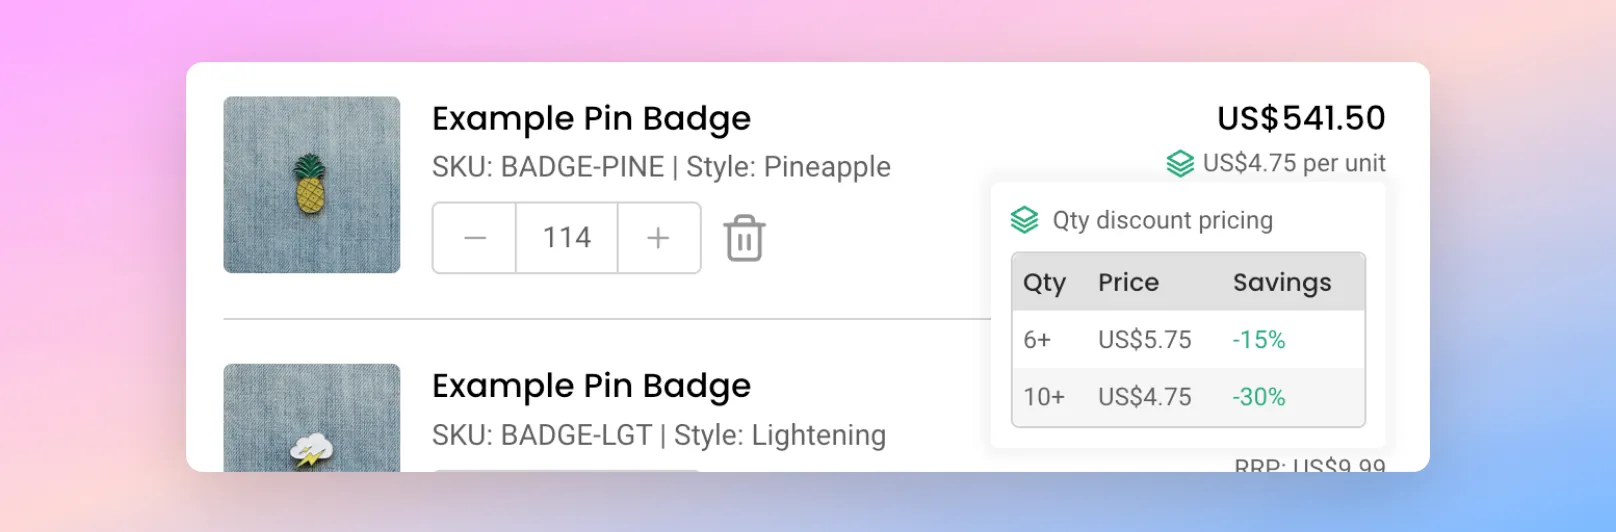
It's also possible to display the tiered pricing breaks table anywhere on your product detail page by adding a special code snippet to your website.
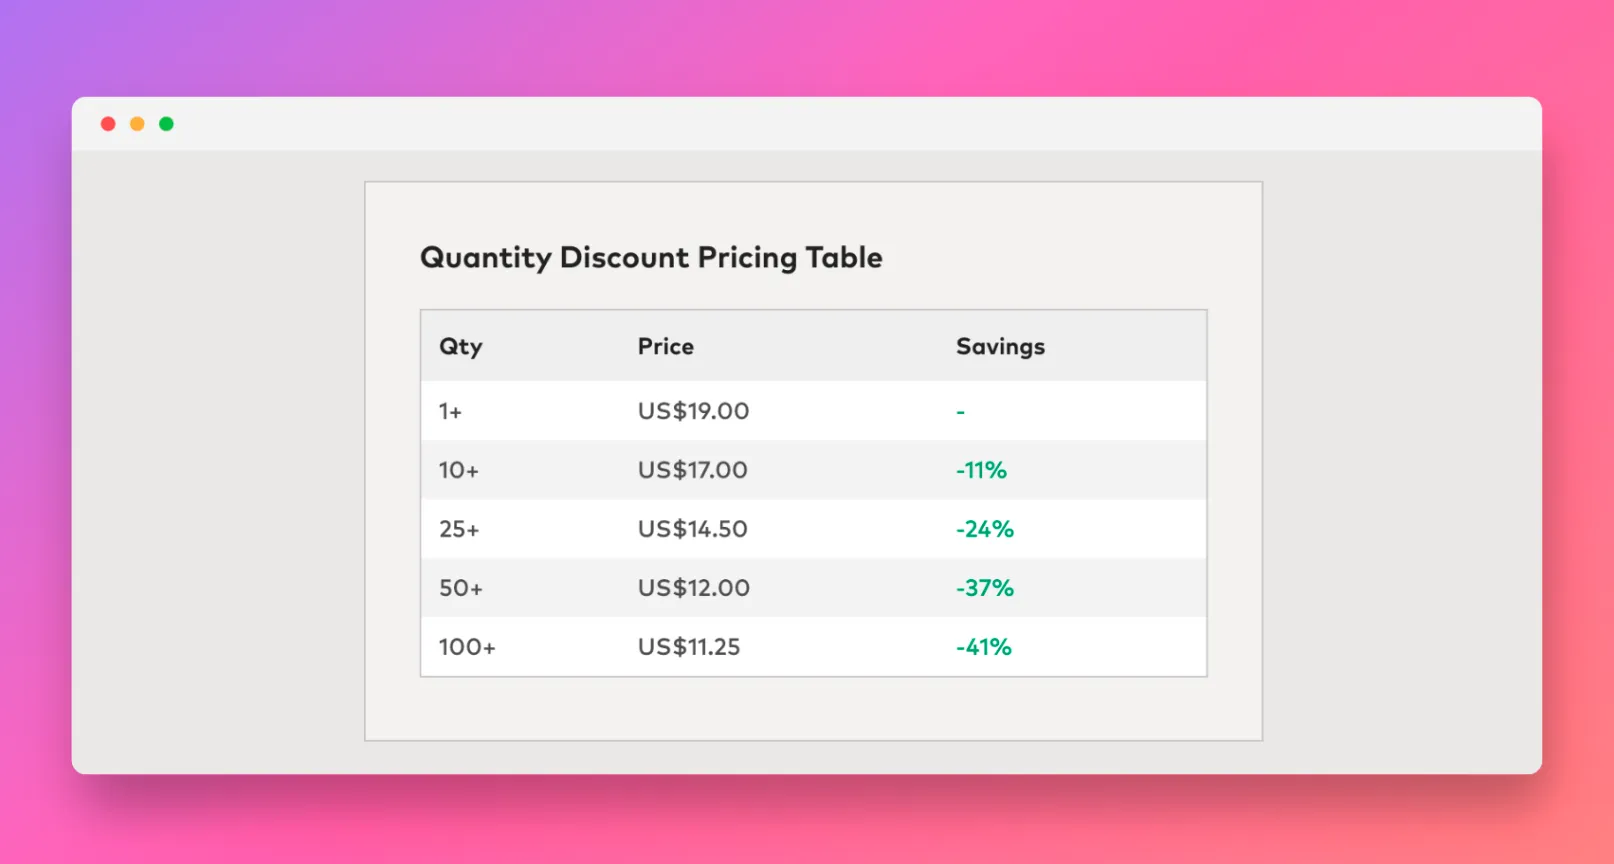
Simply add the below in the source code of your product pages to display an additional quantity breaks table.
<spark-variant-price-breaks
  variant-sku="{{ product.selected_or_first_available_variant.sku }}"
  parent-id="{{ product.id }}"
>
</spark-variant-price-breaks>
Quantity pricing savings
You can also customise how the "savings" column displays to customers.
Area | Details |
|---|---|
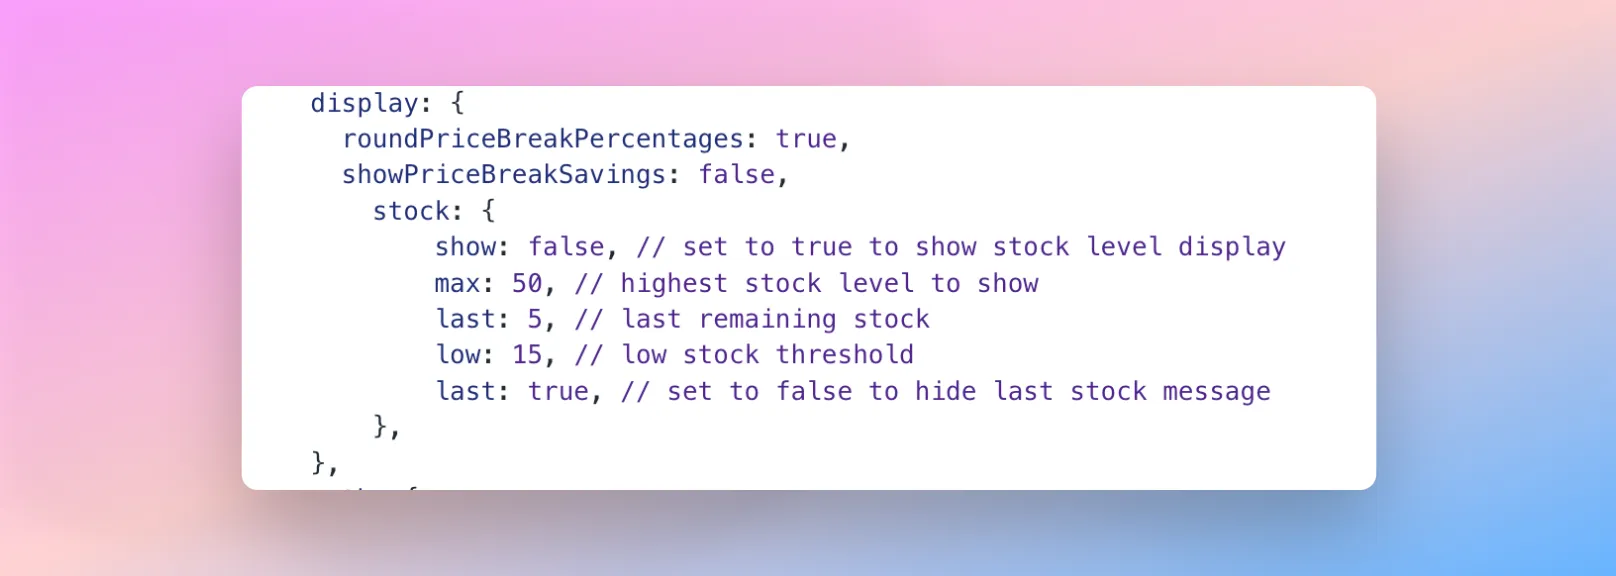
Decimal places | If you'd prefer to show two decimal places in the savings percentage (e.g. 9.45% off instead of 9% off), you can add the following setting to your SparkLayer Core Script (within the display settings). roundPriceBreakPercentages: true, |
Hiding savings | You can optionally hide the savings percentage from showing by adding the following setting to your SparkLayer Core Script (within the display settings). showPriceBreakSavings: false, |
Quantity pricing discount percentage based off RRP
If you're using Quantity Pricing & Settings in your price lists, this will display additional information to make it clear to the customer how much they are saving based on how many units they purchase.
By default, the 'Savings' will be calculated based on the single unit price of the particular product (or variant). For example, if the single unit price is $2.00 and if you purchase 5 or more the price reduces to $1.00, the savings will display as -50%
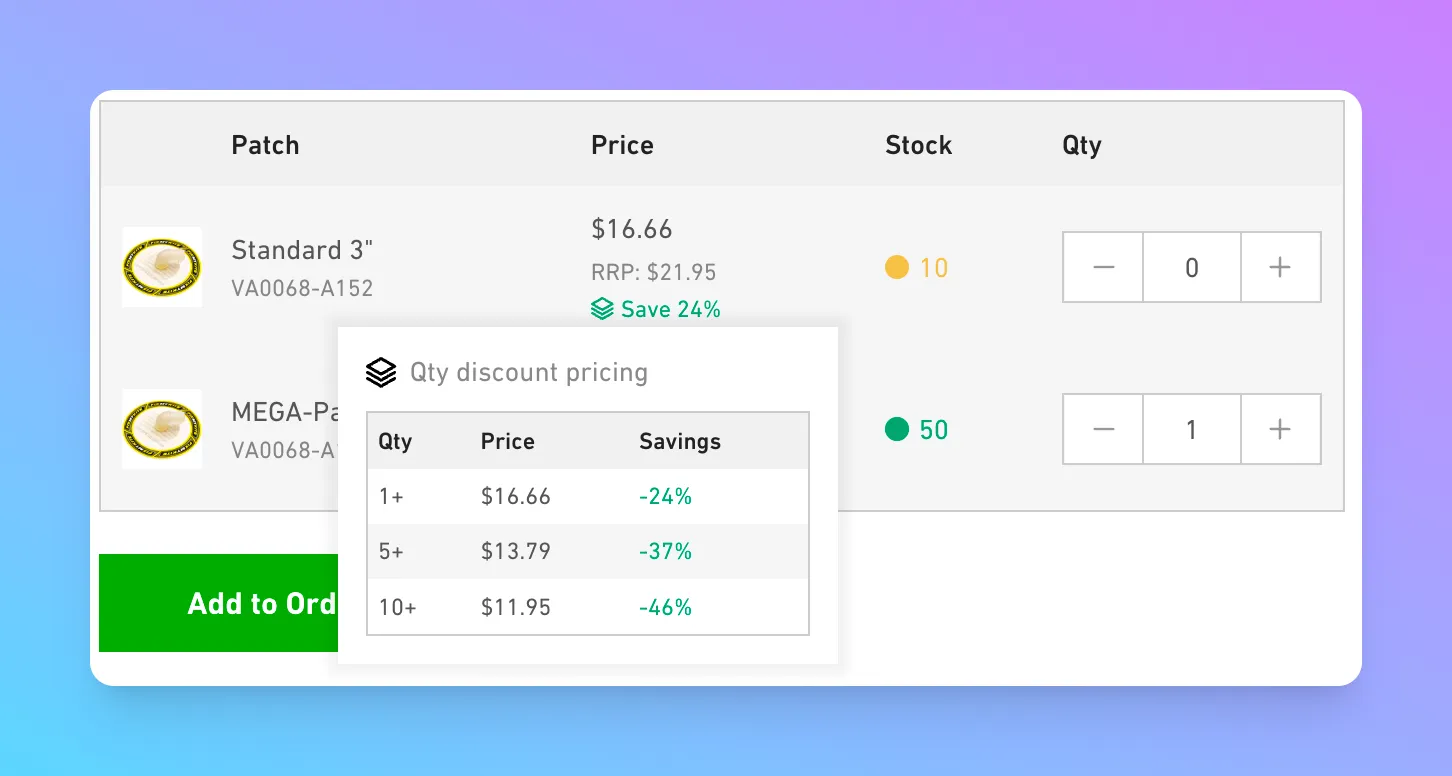
If you'd prefer for the savings to instead be calculated off the RRP (i.e. retail price) of a product, you can enable this by adding a special setting.
Updating the display You can update the default display by adding code to your Core Script. Learn more about how to update display settings on SparkLayer
/* Add the below code into the SparkLayer Core Script */
/* Please refer to our help guide on how to do this */
  display: {
    savingsUseRrp: true,
    /* Other settings should show below */
  }
/* End of code */
Unit of measure pricing
Are you looking to set up pricing based on "units of measure" such as boxes, cartons, or pallets? Please refer to our Quantity Pricing & Settings guide to learn more.
Customising the pricing text
It's possible to prefix the pricing display on a product detail page with custom language such as 'Your price'.

Updating language and text You can update the default text by adding code to your Core Script. Learn more about how to update text on SparkLayer.
/* Add the below code into the SparkLayer Core Script */
/* Please refer to our help guide on how to do this */
translations: {
  en: {
    "pdp.price.from-prefix": "Your Price:"
  }
},
/* End of code */
In addition to this, you can also adjust any of the default language used for pricing using the below language strings.
/* Add the below code into the SparkLayer Core Script */
/* Please refer to our help guide on how to do this */
translations: {
  en: {
    "pdp.price.from": "From:",
    "pdp.price.rrp": "RRP:",
    "pdp.price.pack-size": "Pack ({packSize}): {price}",
    "product-card.price.from": "From:",
    "product-card.price.rrp": "RRP:"
  }
},
/* End of code */
Display a 'unit cost' price
If you sell products that comprise 'multiple units', it's possible to display an automatically calculated "Unit Price" on your product pages. For example, you may sell a product that comes in packs of 10, but you want to make it clear to your customers how much a "single unit" costs. Or you may sell products that come in specific weights (e.g. kg) and you want to show a "price per kg".
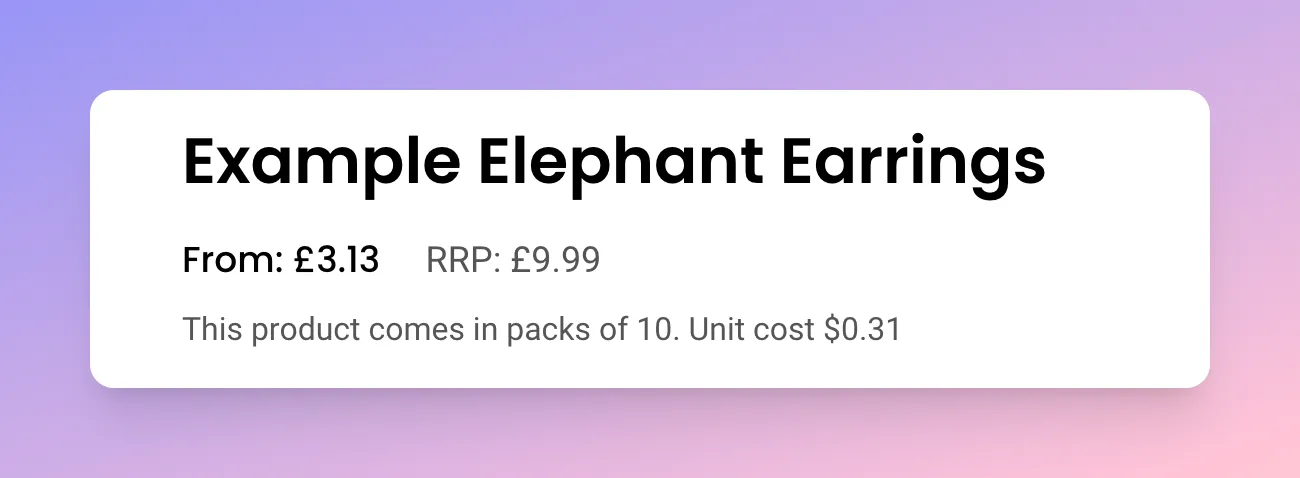
To enable this, SparkLayer uses special settings (sometimes referred to as metafields or attributes) that allow additional data to be stored against products.
Setting up metafields on Shopify To learn more about how to configure metafields on Shopify for SparkLayer, please refer to our guide here
Item | Details |
|---|---|
Custom data type | Variants |
Metafield type | This must be set as an integer string |
Namespace | This must be set as sparklayer |
Key | This must be set as case_size |
Value | This must be set up in the following format 1, 2, 3, etc |
Once the setting has been set up, you can then use and modify the below code sample to display on your product pages.
Combining with Shopify's unit price feature
If you're using Shopify's built-in unit price feature, you can also dynamically display the 'reference unit' e.g. kg, lb, ml.
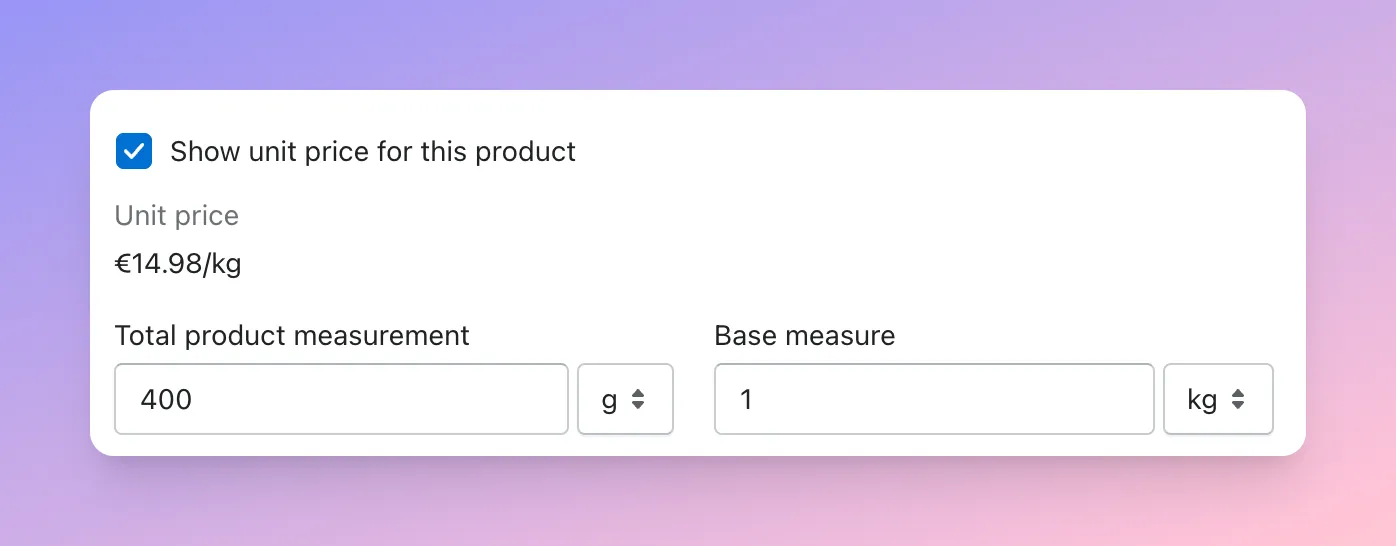
Within the code sample above, simple change el.textContent to the below:
el.textContent = `Unit price per {{ item.unit_price_measurement.reference_unit }}: ${formatter.format(priceData.fromPrice / Number(caseSize))}`;Important to note If you are looking to customise the behaviour of how this works, we recommend engaging a Shopify expert to assist.
Adjusting the "Unavailable" message
When a product has no B2B pricing set against it, the Product Card Interface and Product Detail Interface will display a message that shows "Unavailable". This indicates to the B2B customer that the product cannot be purchased.

If you'd prefer, you can adjust this to display a different message by updating the language settings on your store.
Updating language and text You can update the default text by adding code to your Core Script. Learn more about how to update text on SparkLayer.
/* Add the below code into the SparkLayer Core Script */
/* Please refer to our help guide on how to do this */
translations: {
  en: {
    "pdp.messaging.un-sellable": "Unavailable",
    "product-card.messaging.un-sellable": "Unavailable",
    "product-card.messaging.select-option": "Unavailable, please select another option"
  }
},
/* End of code */
Discounts & promotions
SparkLayer supports the ability to have discounts and promotions applied during the checkout and these can either be redeemed via discount codes, or applied "automatically" to the customer's order.
The SparkLayer Discount Engine unlocks a range of discount rules including:
- Order-level discounts: eg, spend $1,000 and get 10% off, spend $2,000 and get 15% off
- Percentage and fixed discounts: eg, 20% off an order total, $100 off an order total
- Coupon codes: eg, enter code NEWCUSTOMER and get 5% off
- Scheduled discounts: eg, start discount today and end it on a specific date and time
- Customer-specific discounts: eg, only allow customer group ‘b2b-vip’ to qualify for the discount
- And more
Learn more about discounts You can see a full overview of what’s possible with discounts in our guide here.
Show RRP prices only (for in-store shopping)
If you manage orders in physical locations with customers (e.g. in store), it's possible to enable a setting that sets the SparkLayer Frontend Interfaces to only show the RRP (or "MSRP) prices when browsing and adding items to an order.
This is especially useful if you need to "obscure" your B2B prices from view and you only want to show the full retail prices.
Use-cases could include:
- In-store customer visits where an order needs to be placed and the customer must only be able to see the retail (RRP) prices
- Sales teams who are placing orders on behalf of customers (e.g. on the road) and only the retail (RRP) prices must be seen
Please note Behind the scenes, the B2B prices associated with the logged in B2B customer will still be used to create the order. This feature is solely for display purposes.
To enable this feature, you'll just need to update the SparkLayer Core Script. This will then apply to all B2B customers that log in.
Updating the display You can update the default display by adding code to your Core Script. Learn more about how to update display settings on SparkLayer
/* Add the below code into the SparkLayer Core Script */
/* Please refer to our help guide on how to do this */
  display: {
    showRrpToggle: true,
    /* Other settings should show below */
  }
/* End of code */
If you'd prefer to make this display for specific customers, you can configure the code as shown below:
/* Add the below code into the SparkLayer Core Script */
/* Please refer to our help guide on how to do this */
  display: {
  {% for tag in customer.tags %}
   {% if tag == "b2b-group-1" %}
    showRrpToggle: true,
   {% elsif tag == "b2b-group-2" %}
    showRrpToggle: true,
   {% endif %}
  {% endfor %}

    /* Other settings should show below */
  }
/* End of code */
Tax-Inclusive Price Display
Tax-inclusive price display lets you show your B2B prices with tax included, labelled clearly as "inc. tax" so buyers know exactly what they're looking at. It's designed for markets where buyers expect to see gross prices - common in Australia as well as in trade sectors selling to smaller businesses.
Please note - this changes presentation only. Your prices are still stored, uploaded, and transacted net, and the tax your buyer actually pays is still calculated by your store's checkout at the point of purchase using any rules or 3rd party integration as set up in the eCommerce platform.
Tax-inclusive price display is enabled for your store by the SparkLayer team. If you'd like it turned on, please get in touch with our support team.
Key features
- Show the price your buyers expect - display gross prices to buyers who think in tax-inclusive terms, without changing how you upload or transact your pricing.
- Control it per price list - turn it on for the price lists that need it and leave the rest showing net, so you can serve different markets from one store.
- Set your own rate per product - supply a display tax rate per SKU, so reduced-rate and zero-rated products show correctly alongside standard-rate ones.
- Clearly labelled - key pricing areas will add an extra "inc. tax" label, so there's no ambiguity about which basis a buyer is seeing.
How to enable
There are three parts to the setup, and all three need to be in place before buyers see gross prices.
- Ask us to enable the feature Tax-inclusive display is controlled by a store-level switch that only the SparkLayer team can change. Contact support to have it enabled on your account. You'll be able to see it as enabled in your settings once it's on.
- Turn it on for a price list Each price list has its own Tax Inclusive Display setting. Turn it on for the price lists whose customers should see gross prices, and leave it off elsewhere. Price lists with the setting off continue to show net prices exactly as before.
- Add a display tax rate to your products Add a display_tax_rate column to your price CSV. This is the percentage used to work out the gross price from your net price, given as a number between 0 and 100.
Column | Value | Required |
|---|---|---|
sku | Your product SKU | Yes |
price | Your net price | Yes |
quantity | Quantity break | No - leave the column out and every price applies from quantity 1 |
display_tax_rate | Display tax percentage, 0 to 100 | No |
An example with quantity breaks:
And the same product without them:
Please note If you include the quantity column, every row needs a value in it. An empty cell in a quantity column will fail the import - to price from quantity 1, leave the column out altogether.
The rate applies to the whole SKU on that price list, so it must be the same on every row for a given SKU. Rows may leave the column blank, but conflicting rates for the same SKU will cause the import to fail.
A product on a tax-inclusive price list with no rate supplied, or a rate of 0, still shows the "inc. tax" label - at 0%. This is deliberate, so a genuinely zero-rated product isn't indistinguishable from one where the rate simply hasn't been uploaded yet.
How it works
Once enabled, gross prices and the "inc. tax" label appear throughout the buying journey.
- Product pages and product cards The price shown on product detail pages and product cards is the gross price, with the label alongside key pricing info (the label is not repeated for every price in pricing tables for UX purposes). Where a product has several prices, the "from" price follows whichever price wins.
- Cart Each cart line shows its gross line total, and the cart subtotal and total show gross with the label. The cart's shipping message also changes to make the basis clear, reading "Prices include tax. Shipping costs calculated during checkout" instead of the standard net wording.
- Checkout The order total on the checkout review step shows gross with the label. Minimum and maximum order value rules are also assessed on the gross figure, so a buyer seeing gross prices is measured against the total they can actually see.
- Order history In the customer's account area, order line items and the order total display on the same basis, so a buyer looking back at a past order sees it presented the way they bought it.
Notes and limitations
This is the part worth reading closely before you enable it - this feature is only suitable for stores with simple tax configurations where you can consistently provide a tax percentage rate for each SKU in price lists that you want to show tax-inclusive pricing.
- Your store's checkout is the authority on tax charged. The display tax rate is the figure you upload, used for presentation. The actual tax your buyer pays is calculated by your store's checkout. If the two disagree, your buyer will see one figure in the cart and pay another. It's critical to keep your uploaded rates aligned with your store's tax configuration.
- Tax-exempt customers always see net prices. If a customer is marked as tax exempt, SparkLayer shows them net prices with no label, regardless of the price list setting. This is intentional, since a gross price would be wrong for them.
- Mixed carts fall back to net totals. If a cart contains a mixture of tax-inclusive and tax-exclusive products, the cart totals show net and drop the label. Individual lines still show on their own basis. A single gross total spanning both would understate the tax on the exclusive lines, so we show net instead.
- Custom items and unpriced products affect cart totals. Custom line items added to a cart carry no display tax rate. A cart containing a product with no price but a manually quoted price will show net totals.
- Quoted prices are always net. When a sales agent edits a quoted unit price, that price is entered and stored net. The editor is labelled "(excluding tax)" when surrounding prices are shown gross, so there's no confusion.
- RRP prices are never tax-adjusted. RRP values display exactly as you upload them. On a tax-inclusive price list this means a gross B2B price sits next to a net RRP, and any savings percentage calculated from RRP compares the two different bases. We recommend uploading RRP values on the same basis as your display prices if you show both.
- Display mode can vary within a product. Variants of the same product can resolve to different price lists, so one variant may be tax inclusive while another is not. This is a configuration issue - please ensure customers are only offered either tax inclusive or exclusive prices though careful price list and customer group configuration.