Customers
Introduction
The Customers area is where you manage everything related to your B2B customer base and sales team. From here, you can:
- Groups - configure customer groups with specific ordering rules - such as price lists, payment methods, order limits, and additional settings. Learn more
- Customers - view and manage your B2B customer records, including their assigned groups, price lists, and account details. Learn more
- Agents - set up and manage your sales agents, including assigning roles and controlling which customers they can access. Learn more
- Roles - create and manage roles that control what each sales agent can see and do in SparkLayer. Learn more
Groups
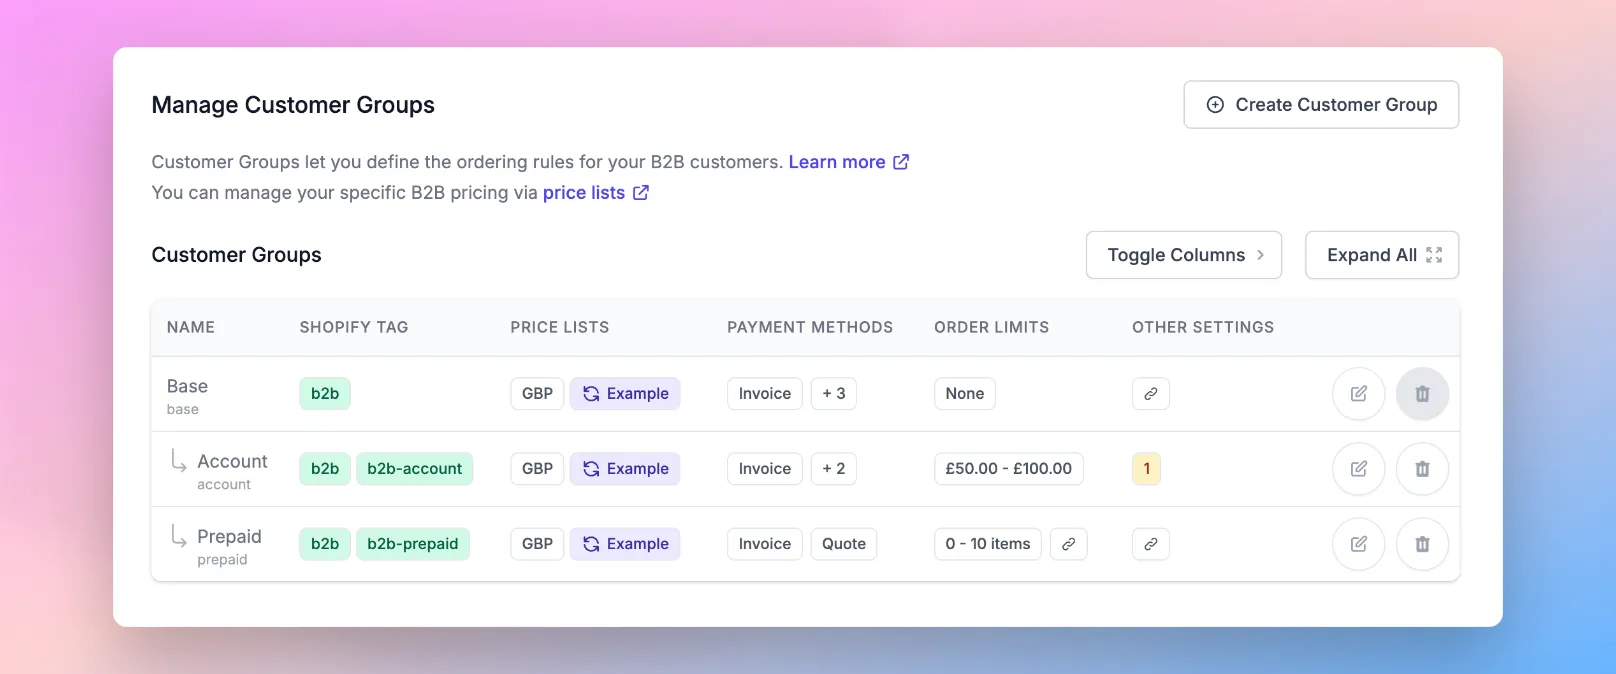
The Customers Groups section is the heartbeat of your SparkLayer integration and allows you to manage the ordering rules for your customers.
It's common for B2B customers to have terms agreed when they place orders with you. For example, brand new customers may only be allowed to pay via credit/debit card, whereas long-term customers may have more favourable payment terms.
The Customer Groups section lets you define specific rules for specific customer groups, giving you flexibility in how your B2B customers order online. This includes:
- Setting which price lists they use
- Setting which payment methods they can use
- Setting order limit rules (e.g. minimum and maximum order totals)
- Setting additional settings (such as blocking the ability to edit an address)
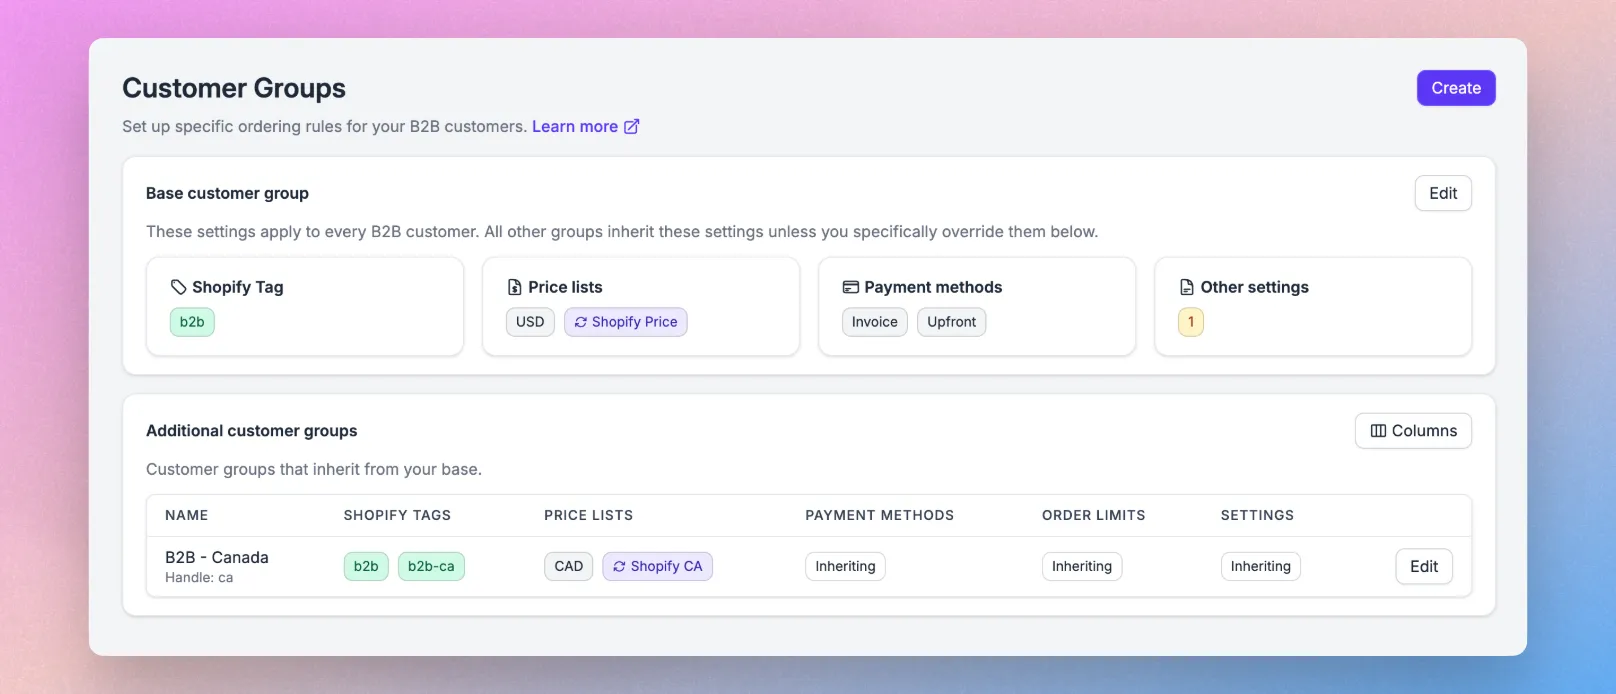
The default customer group
By default, SparkLayer has a Base customer group that is a catch-all for all your B2B customers. If you're looking to have just a single B2B customer group then the Base customer group will be sufficient. Any changes you make will automatically apply to all your B2B customers unless you create new customer groups.
Understanding 'Inheriting' When you see Inheriting in a customer group, it means it will inherit settings from another customer group, by default the "Base". For example, if your Base customer group is set to a specific price list or has specific payment methods, any new customer groups you create will start off by using these same settings. You can easily modify this by simply clicking the Edit icon and changing them as you need.
What can be configured
It's possible to configure the following rules
Rule type | Description |
|---|---|
Order Limits | You can set order limit rules for your customers, such as the minimum order total or minimum quantity of items they must reach before being able to place an order (and conversely, the maximum of these) |
Payment Methods | The payment methods that the customer will see when they checkout. For example, "Payment on Account" and "Payment by Invoice". See also Payment Methods |
Price Lists | The Pricing that are assigned to that customer group. For example, you may have different price lists per customer group |
Address Management | If activated, your customers will be able to edit and add addresses via the My Account Interface and the My Cart Interface. |
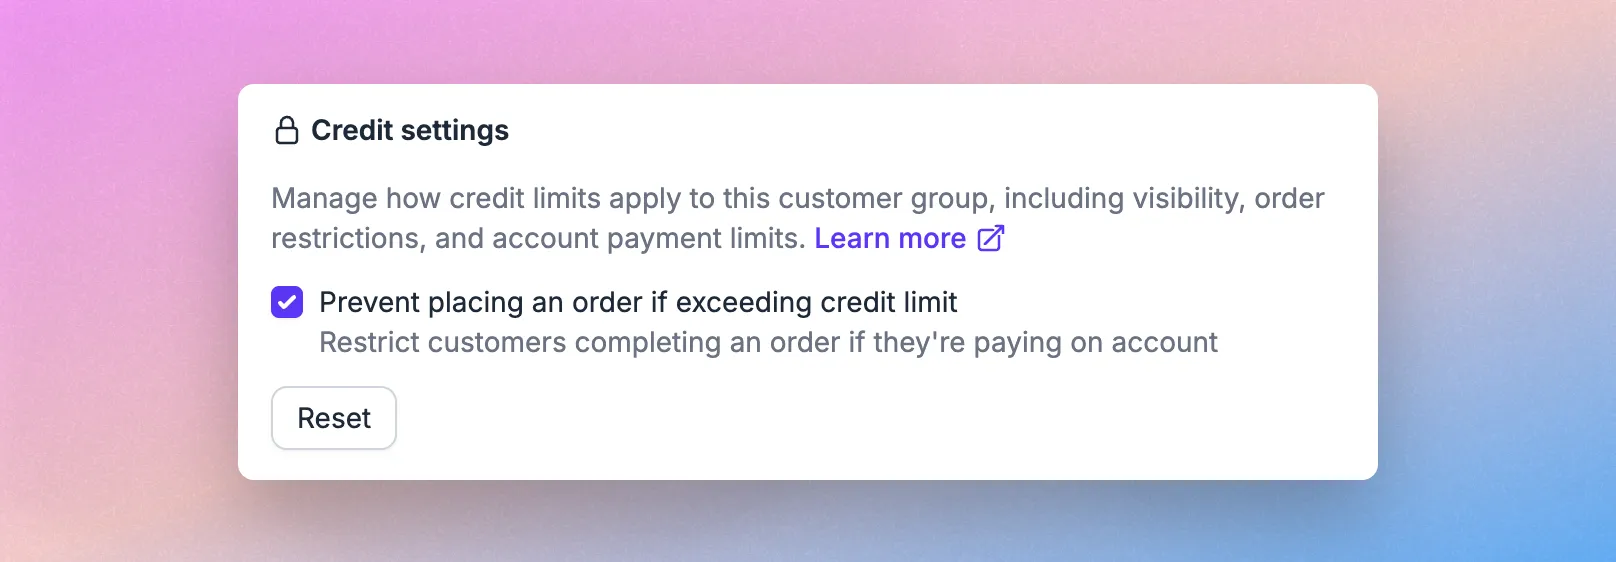
Credit Settings | If you have credit limits set up, you can optionally choose to prevent customers from being able to checkout if they exceed their credit limit. |
Stock Display Settings | Configure if stock levels and units are displayes ans your max, low and last stock values. |
Stock locations | If you're store is set up with multiple stock locations ("inventory locations"), you can specific which location the B2B customer orders from. |
Quoting engine | If you have the SparkLayer Quoting Engine activated, you can specify which customers can submit quotes. |
Order Limits
There are two types of order limits you can set for your B2B customers:
Order Limit Type | Details |
|---|---|
Order limits by order total | Set rules based on the customers order total, e.g. the customer must spend more than $100 |
Order limits by order quantity | Set rules based on the number of items in the customers order, e.g. the customer must have at least 50 items. |
Combination | Set rules based on both an order total AND the order quantity |
Order limits by order total
To configure order limits by order total, click the Edit icon next to a customer group and under the Inherited rules section, click Order total limits.
If the customer group doesn't already have an order limit set, click the plus icon and then the order limit values you want.
Limit type | Details | Example |
|---|---|---|
Minimum | This is the minimum order total the customer must have before being able to checkout | The customer must have an order total of at least $200.00 |
Maximum | This is the maximum order total the customer must have before being able to checkout | The customer must have an order total of no more than $400.00 |
Please note All order values are in net pricing (i.e. excluding tax calculations)
Once you've set this, when you access the Quick Order on the frontend, you'll then see corresponding messaging show on the My Cart Interface.
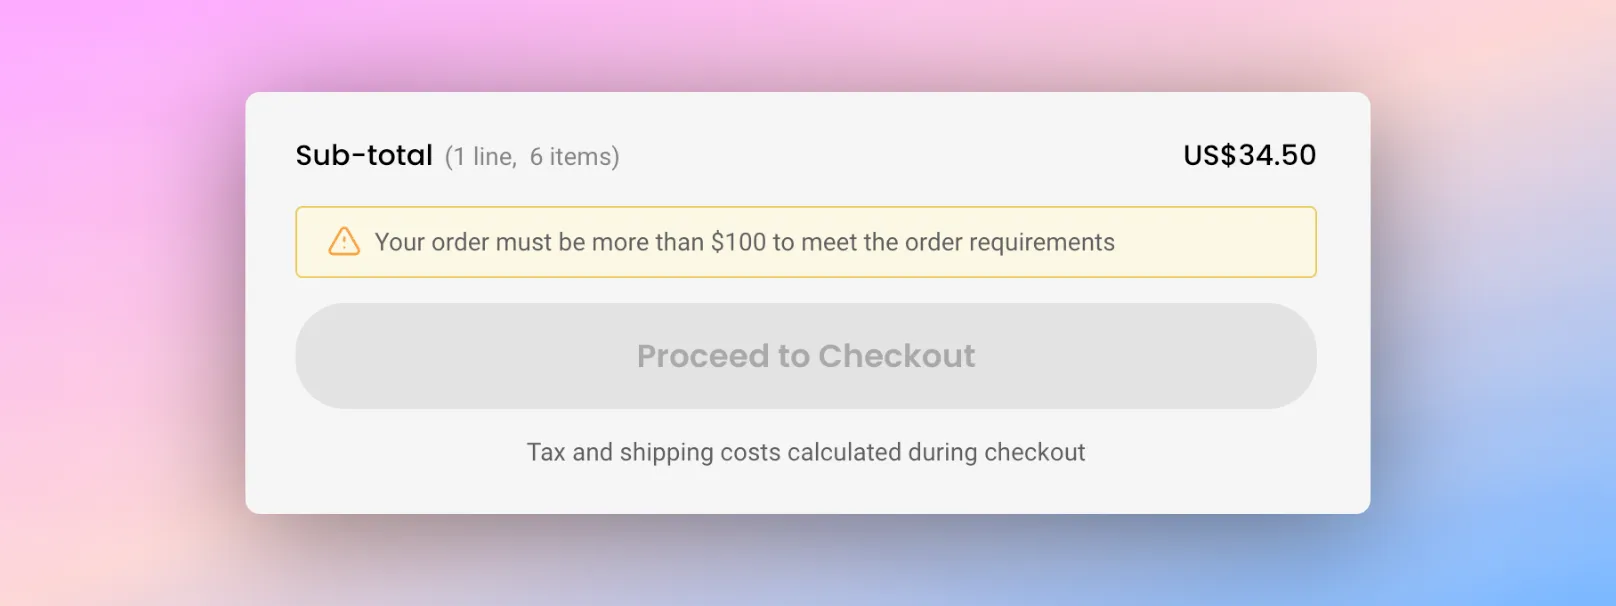
If you'd prefer to change the default language that is shown, you can use the below language strings.
Updating language and text You can update the default text by adding code to your Core Script. Learn more about how to update text on SparkLayer.
/* Add the below code into the SparkLayer Core Script */
/* Please refer to our help guide on how to do this */
translations: {
  en: {
    "cart.validation-message.minimum-order-totals": "Your order must be more than {amount} to meet the order requirements.",
    "cart.validation-message.maximum-order-totals": "Your order must be less than {amount} to meet the order requirements.",
  }
},
/* End of code */
Order limits by order quantity
To configure order limits by order quantity, click the Edit icon next to a customer group and under the Inherited rules section, click Order quantity limits. If the customer group doesn't already have an order limit set, click the plus icon and then the order limit values you want.
Limit type | Details | Example |
|---|---|---|
Minimum | This is the minimum order quantity the customer must have before being able to checkout | The customer must have an order quantity of at least 12 items |
Maximum | This is the maximum order quantity the customer must have before being able to checkout | The customer must have an order quantity of no more than 40 items |
Once you've set this, when you access the Quick Order on the frontend, you'll then see corresponding messaging show on the My Cart Interface.
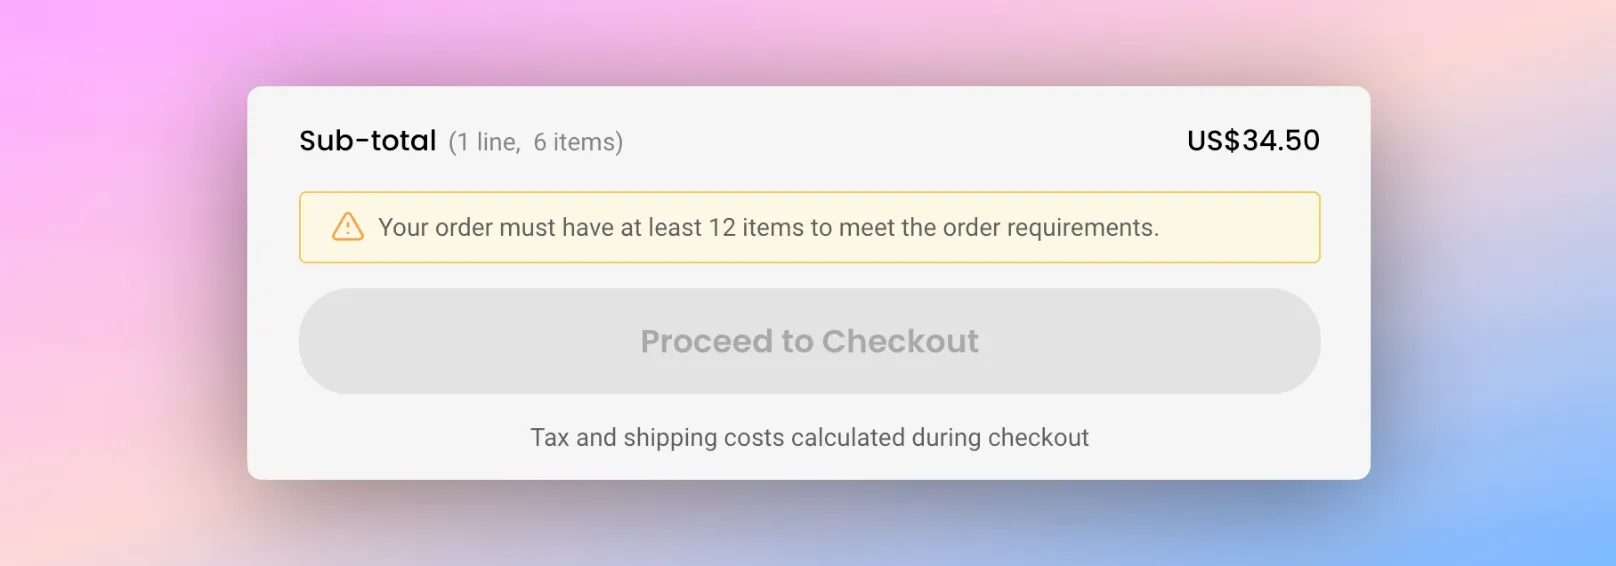
If you'd prefer to change the default language that is shown, you can use the below language strings.
Updating language and text You can update the default text by adding code to your Core Script. Learn more about how to update text on SparkLayer.
/* Add the below code into the SparkLayer Core Script */
/* Please refer to our help guide on how to do this */
translations: {
  en: {
    "cart.validation-message.minimum-order-item-quantity": "Your order must have at least {minimum} items to meet the order requirements.",
    "cart.validation-message.maximum-order-item-quantity": "Your order must not exceed {maximum} items to meet the order requirements.",
  }
},
/* End of code */
Payment Methods
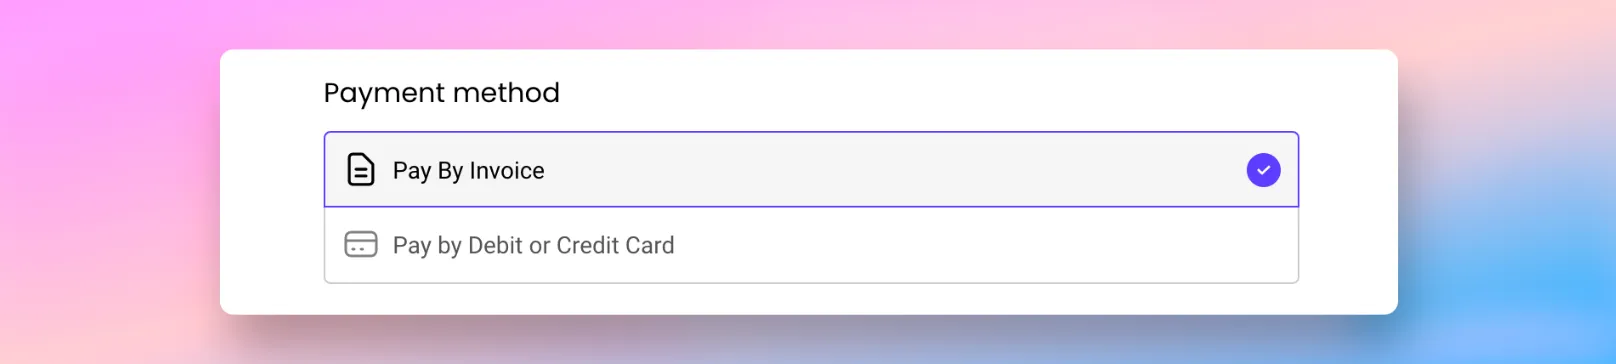
You can specify what payment methods are shown for each customer group by clicking the Edit icon next to a customer group and under the Inherited rules section, click Payment methods. You'll then see the following options:
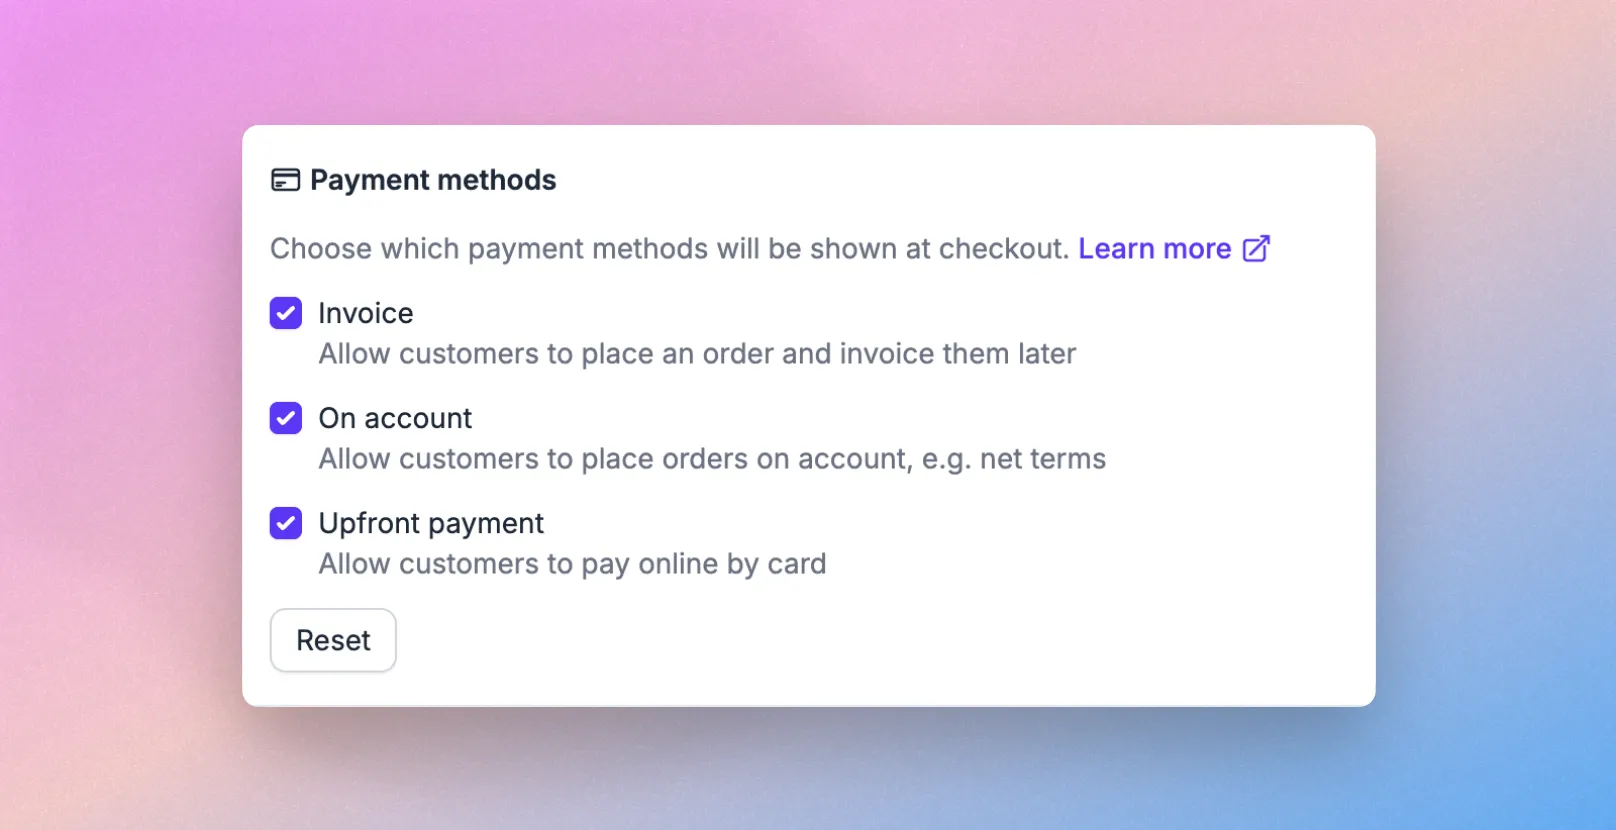
Payment methods in Shopify
By default, when you set up SparkLayer on your Shopify store, unless you're using 'Upfront Payment', all orders created by customers will be generated as Draft orders within Shopify (learn about Shopify Draft Orders). One of the big benefits of using Draft orders is the ability to make changes before you then take payment and fulfil.
Payment method | Description |
|---|---|
Payment by invoice | The order will be submitted as a "Draft" order which can subsequently be edited. Orders can automatically be converted into "Completed" orders if required. See Settings |
Payment on Account | The order will be submitted as a "Draft" order which can subsequently be edited. Orders can automatically be converted into "Completed" orders if required. See Settings |
Upfront Payment | Customers will be taken through the Shopify checkout. |
Request for quote | The order will be submitted as a "Draft" order which can subsequently be edited. Please note: as of June 2025, this has been replaced with the SparkLayer Quoting Engine and can no longer be selected within a Customer Group. |
When the customer activates the Quick Order InterfaceQuick Order, they'll see whichever payment methods are allowed and can then select as appropriate. You can also edit how these are named in Quick Order Interfaceour guide here.
Price Lists
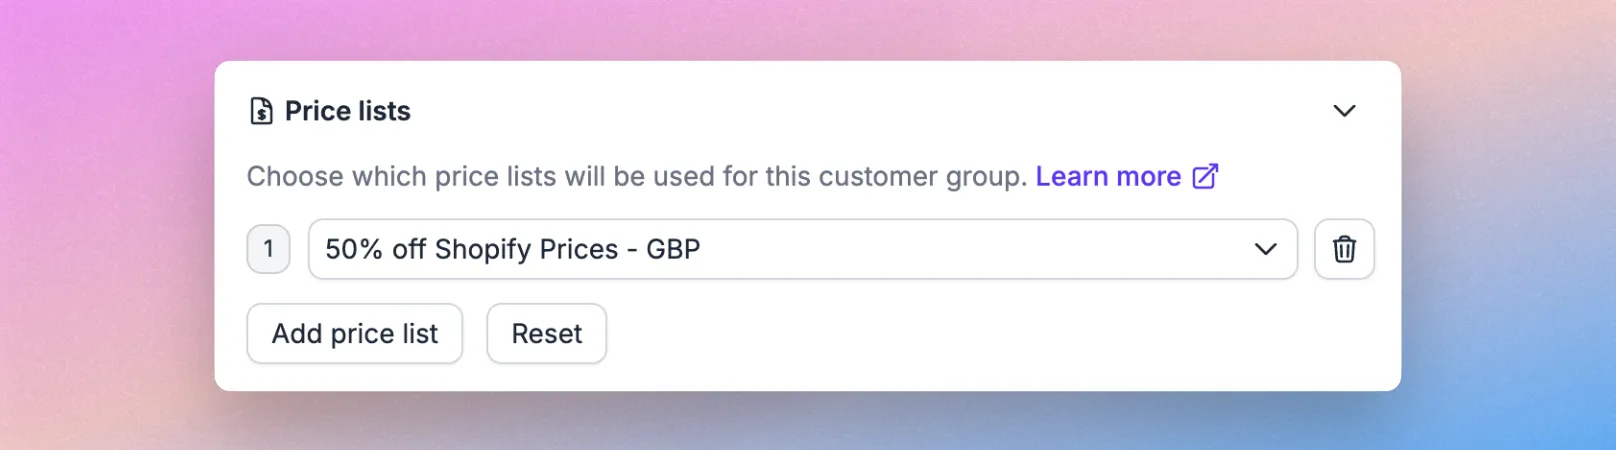
Depending on which price lists you have set up in the Price ListsPrice Lists section, you can assign specific price lists to customer groups. Click the Edit icon next to a customer group and under Inherited rules, click Price lists. If the customer group doesn't already have a price list set, click the plus icon and then choose the available Price List from those shown.
You can also assign multiple price lists to a customer group if you want to set up more sophisticated pricing. Simply click Add price list to select a price list.
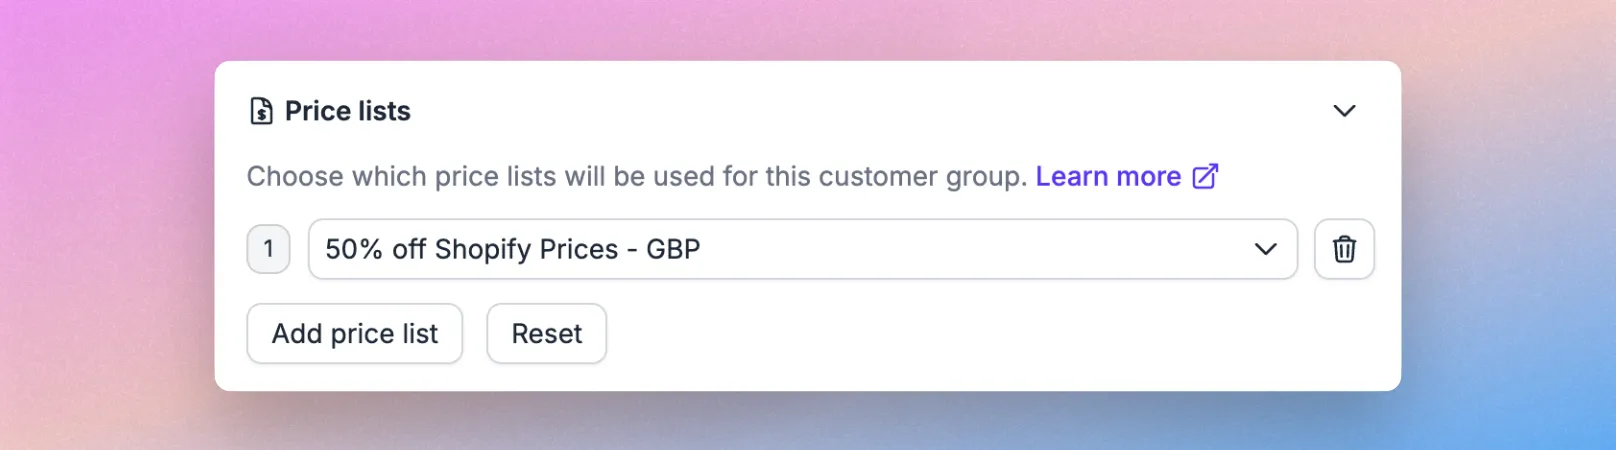
Please note In terms of pricing, if a product SKU exists in multiple price lists, SparkLayer will search through all available price lists and use the first one it finds. For example:
- Product ABC-123exists in 3 price lists
- In Price List 1, it is $10
- In Price List 2, it is $8
- In Price List 3, it is $12
SparkLayer will select the first price it finds. In this case, product ABC-123 will be shown to the customer at a price of $10, using Price List 1
Address Management
If activated, your customers will be able to edit and add addresses via the My Account Interface and the My Cart Interface.
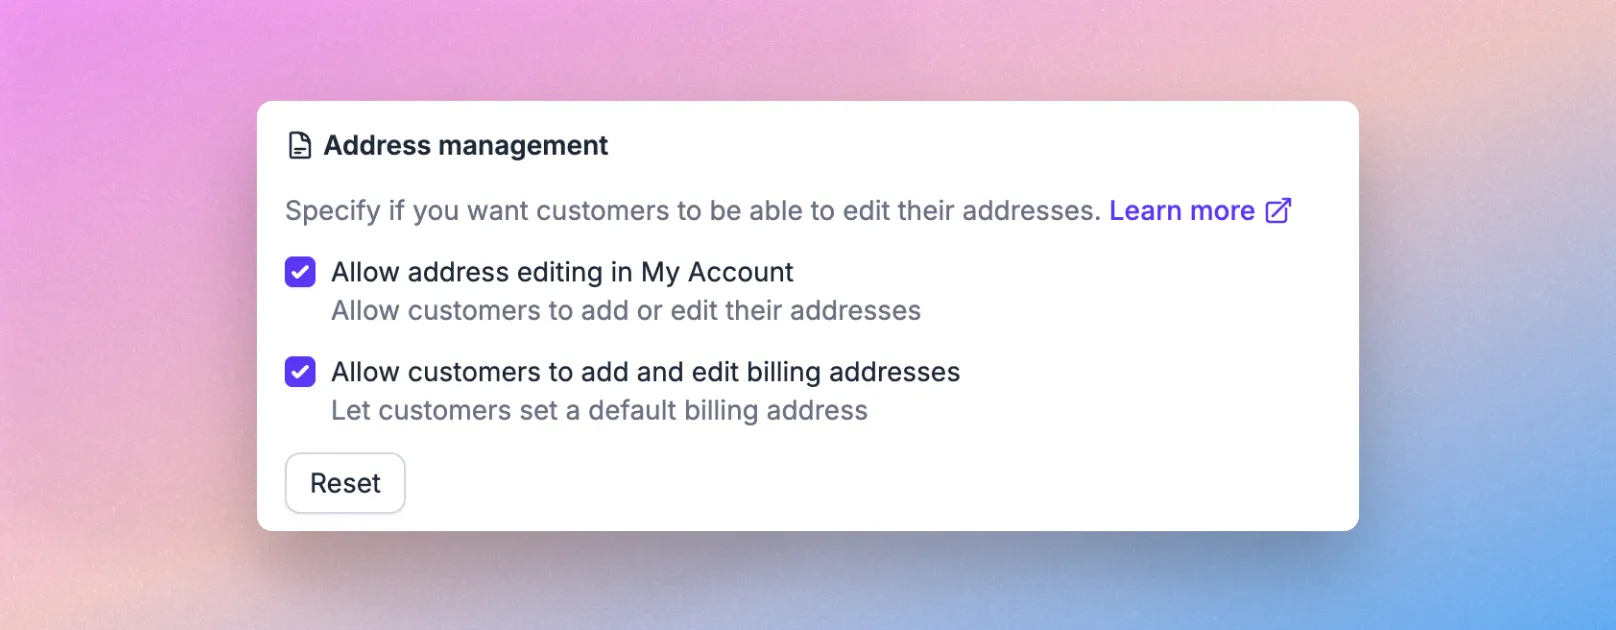
You can also optionally choose to prevent billing address editing by unticking "Allow customers to add and edit billing addresses".
Please note If you've set up SparkLayer to automatically synchronise addresses from another system (e.g. an ERP), these may override updates your customers make. Please contact us if you're unsure.
Credit Settings
If you have credit limits set up, you can optionally choose to prevent customers from being able to checkout if they exceed their credit limit.
Stock Display Settings
Please note This feature requires upgrading your store to the latest version of the the Sparklayer Core Script.
If you'd like to display stock levels to your B2B customers, you can activate the Stock display and customise how this works. When a customer visits a product page on your store, they'll then see their specific stock display settings as detailed in our guide here.
To get started, edit a customer group and under Inherit rules, click Stock display.
Applying this to all customers If you want to apply this to all customer groups, simply apply the setting to the Base customer group and all others will 'inherit' the settings.
Once activated, you can then configure how the stock display works:
Configuration | Details |
|---|---|
Show stock availability to customers | When enabled, customers can see the stock status of the product (and individual SKU) |
Hide pre-order | When enabled, this will hide any pre-order messaging shown to customers in the Frontend Interfaces. You can learn more about how pre-order works in our guide here. |
Show number of units of stock | When enabled, customers can see the availability of the product (e.g. 50 in stock) |
Max | When Show number of units of stock is enabled, this will show to the customer in green. Anything above will show as 50+ |
Low | When Show number of units of stock is enabled, this will show to the customer in amber and denotes low levels of stock |
Last | When Show number of units of stock is enabled, this will show to the customer in red and denotes the last remaining stock |
Looking to enable pre-ordering? You can enable pre-orders and back orders in our guide here
Stock locations ("inventory locations")
Please note The stock locations feature is only available on the SparkLayer Growth, Pro, and Enterprise plan. You can change your plan here or learn more about our how pricing works.
Stock locations allow you to specify which stock (or "inventory") locations you want specific customer groups to see stock display settings from. If your B2B store is set up with multiple stock locations (e.g. by geography), it's a great way to ensure your B2B customers are viewing stock dispaly settings from the relevant location.
For example, your store may be set up with 4 stock locations across the world. Using this feature, you can easily assign B2B customers to a specific geographic location, so that they can only see stock display from their specific region.
To begin using stock locations, click the Edit button next to a customer group and you'll see the option under the Inherit rules section.
Default stock location Please note, if stock locations are not specifically set, SparkLayer will assume that stock will be taken across all locations setup within your store.
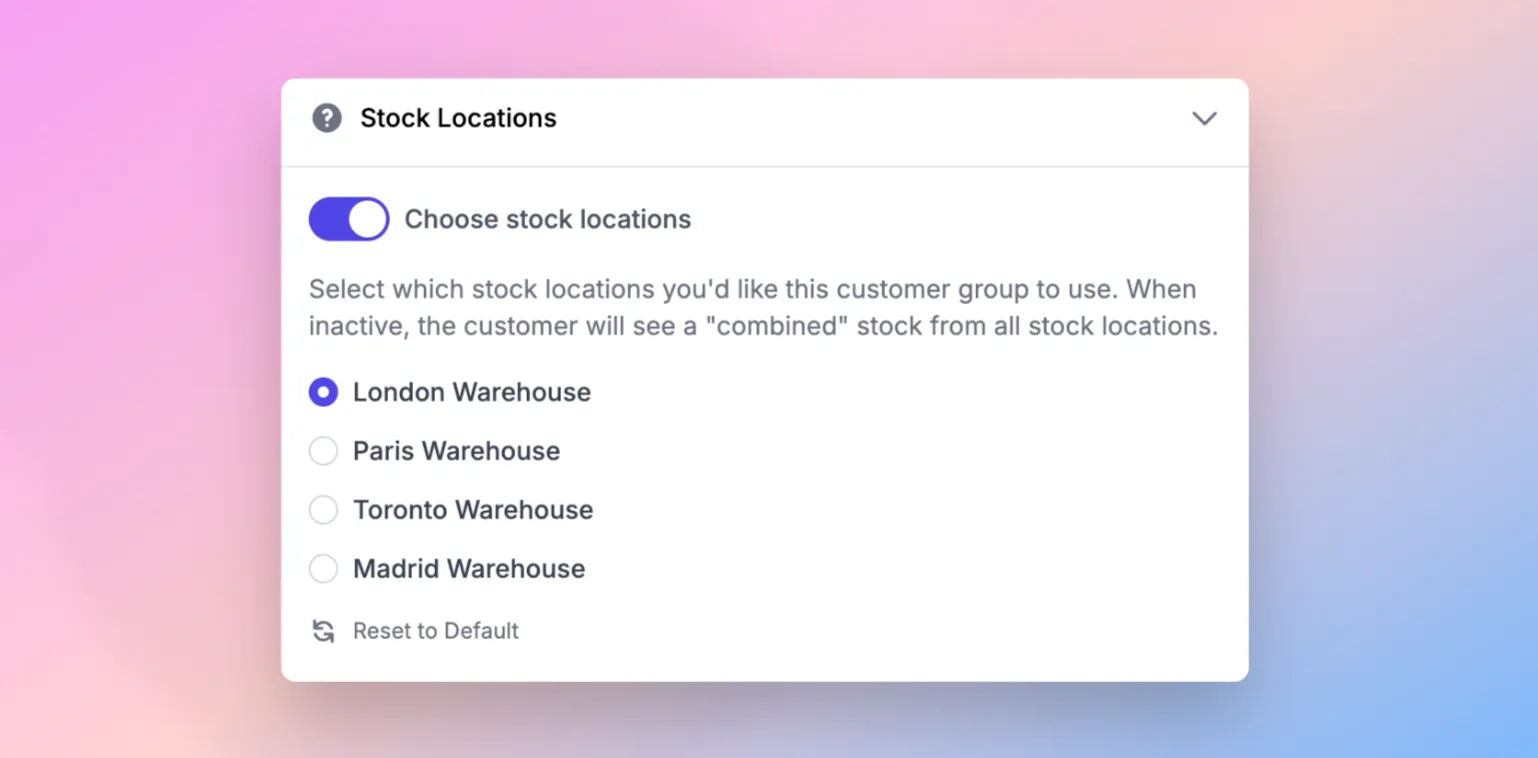
Please note Currently, it's only possible to select one stock location per customer group.
Please note SparkLayer's Stock Location feature is for stock display purposes only and will not affect which stock location is used to fulfill orders in your eCommerce platform.
Using stock locations requires configuration within your specific eCommerce platform and we've detailed how it works below.
To get started, you'll nee to ensure that Locations are enabled within your Shopify store. You can learn more about how locations work in this Shopify guide. Any active locations will then be automatically synchronised to SparkLayer.
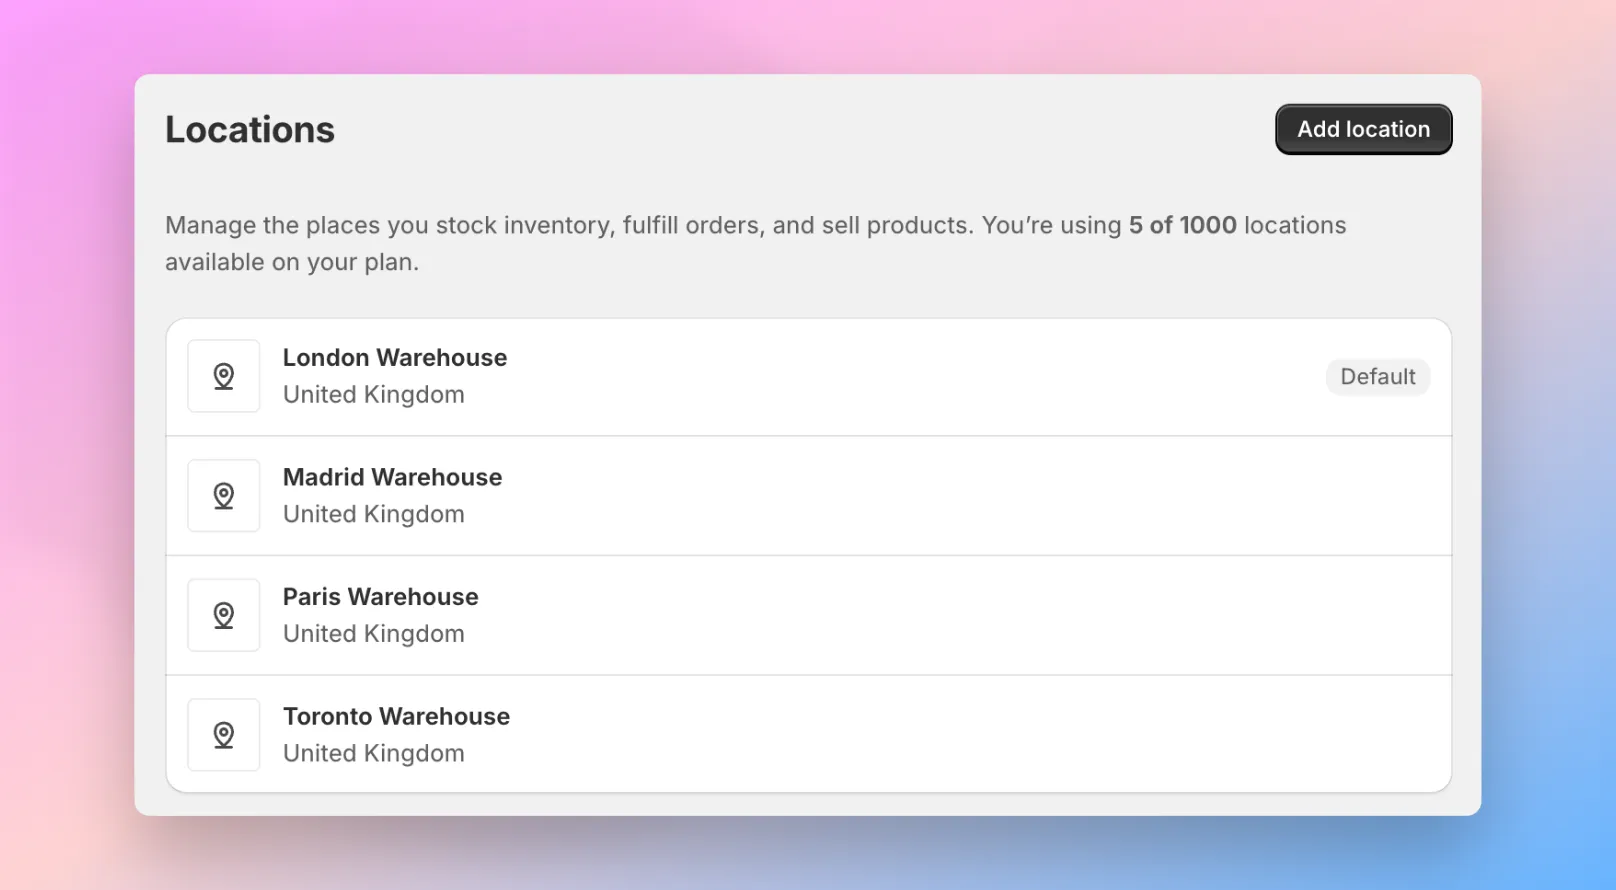
There are a number of configurations that need to be reviewed when setting up your locations in the context of your B2B customers.
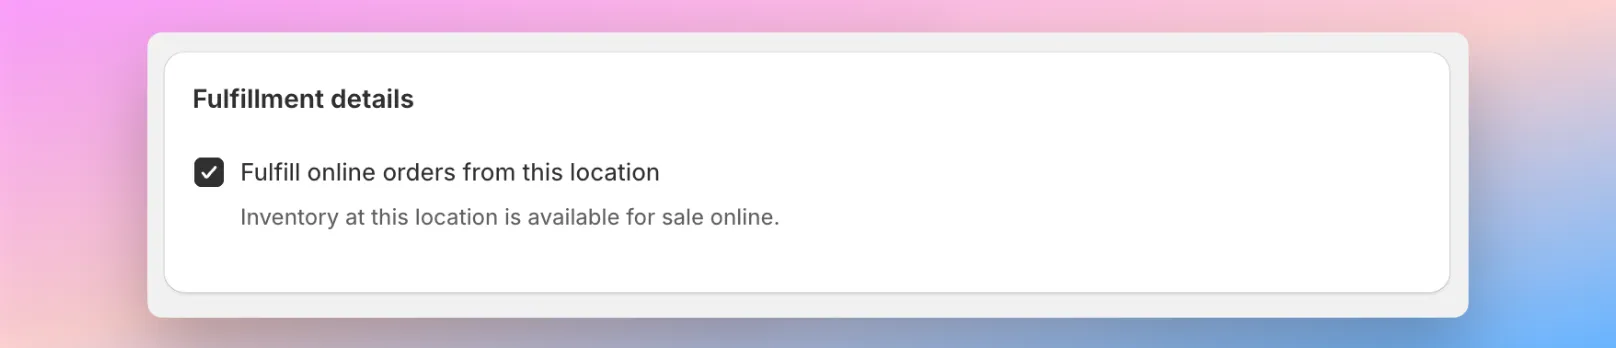
Fulfilment details You'll need to ensure any locations that you want to use for your B2B customers have the "Fulfill online orders from this location" checkbox ticked.
Order routing You may also want to review how Shopify prioritises your stock locations using order routing, allowing you to customise the workflow rules for your stock control.
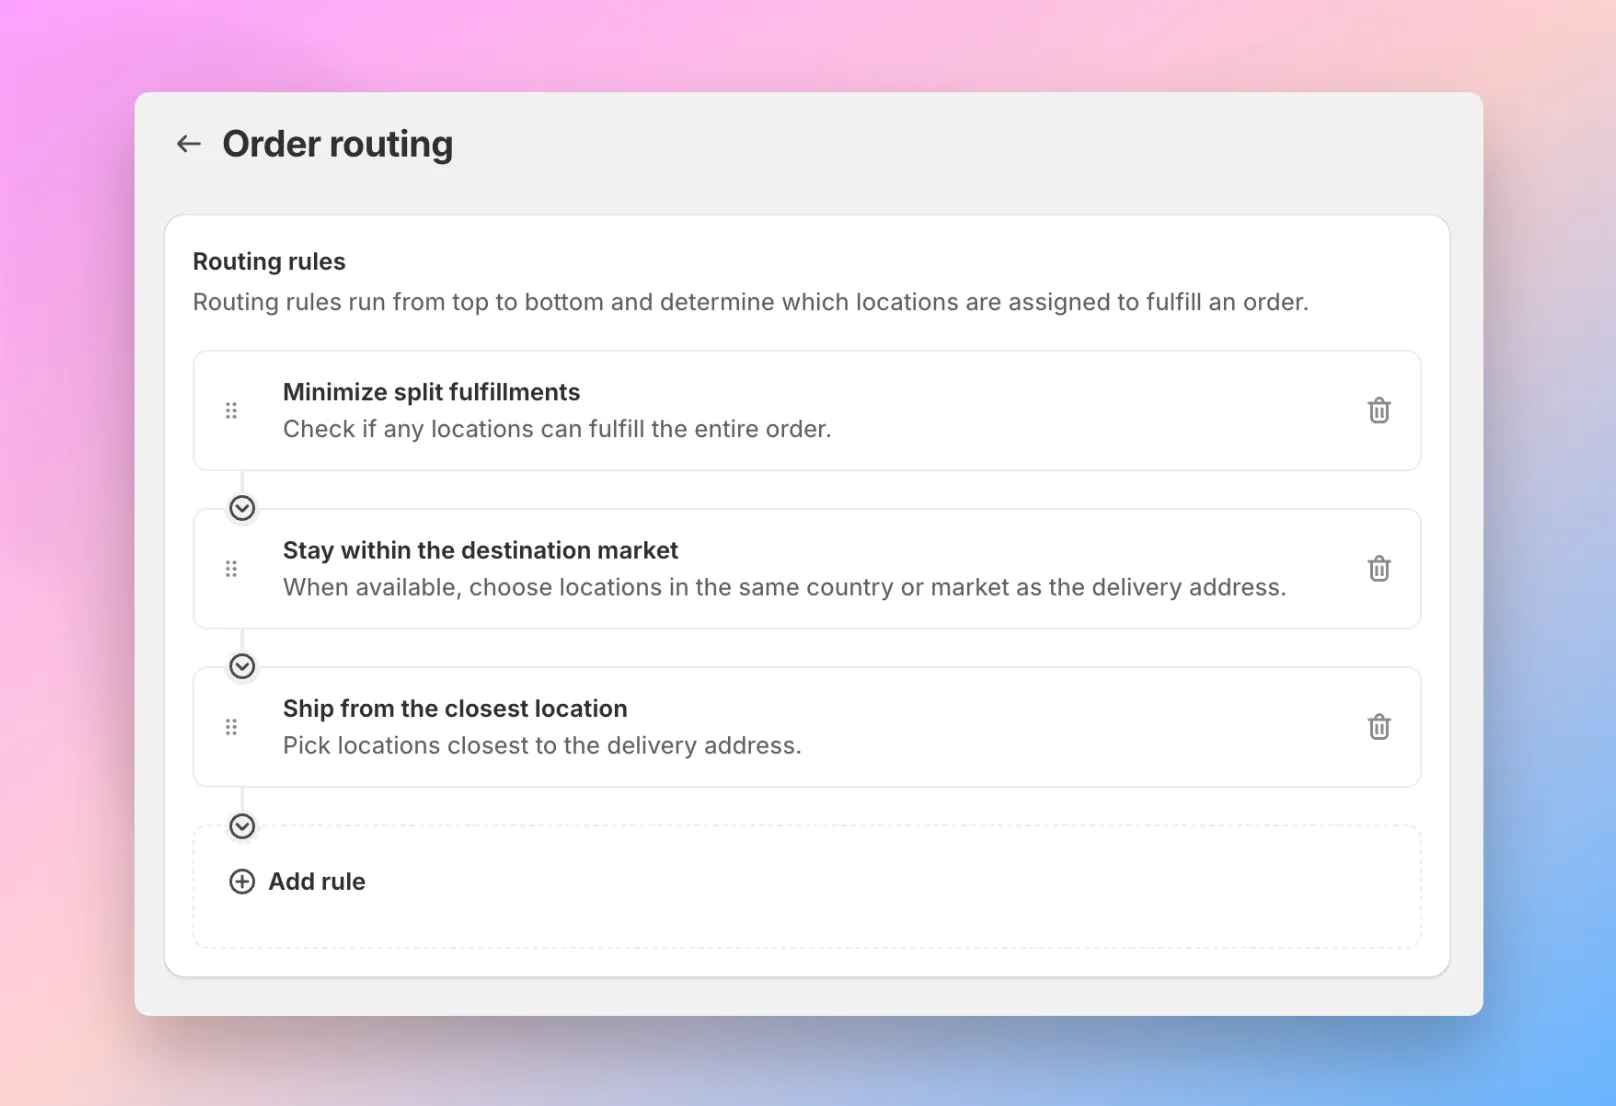
Store setup (hybrid B2B and DTC) If you're store is set up to "share" B2B and DTC on the same store, it's important to note the following if you're using Stock locations:
- Logged in B2B customers will be able to purchase products from the stock locations you've assigned to them. For example, if a customer has the "London Warehouse" assigned to their customer group and Product A has 100 available from this warehouse, they can order a maximum of 100.
- Setting up stock locations for your B2B customers will not prevent your regular (DTC) customers from purchasing the same stock. Depending on how your Shopify store is configured, regular customers can still access the same stock and place orders. SparkLayer does support the ability to reserve stock and set minimum stock levels and you can learn more here.
Disable checkout
By default, all customer groups are configured to allow customers to proceed through the checkout (providing they meet the order requirements). There may be some scenarios where you want to prevent a customer from being able to checkout and you can deactivate this within the "Disable checkout" setting. If you're using the Quoting Engine, one use-case would be to deactivate this setting and only allowing the customer to "Submit a quote".
Creating new customer groups
New customer groups allow you to create different rules for different customers. When you create a new customer group, you'll see the following screen where you can enter a Display Name and a Handle. The Handle is a unique identifier that you can then use in your eCommerce platform (e.g. Shopify) to match with (see below for more details).
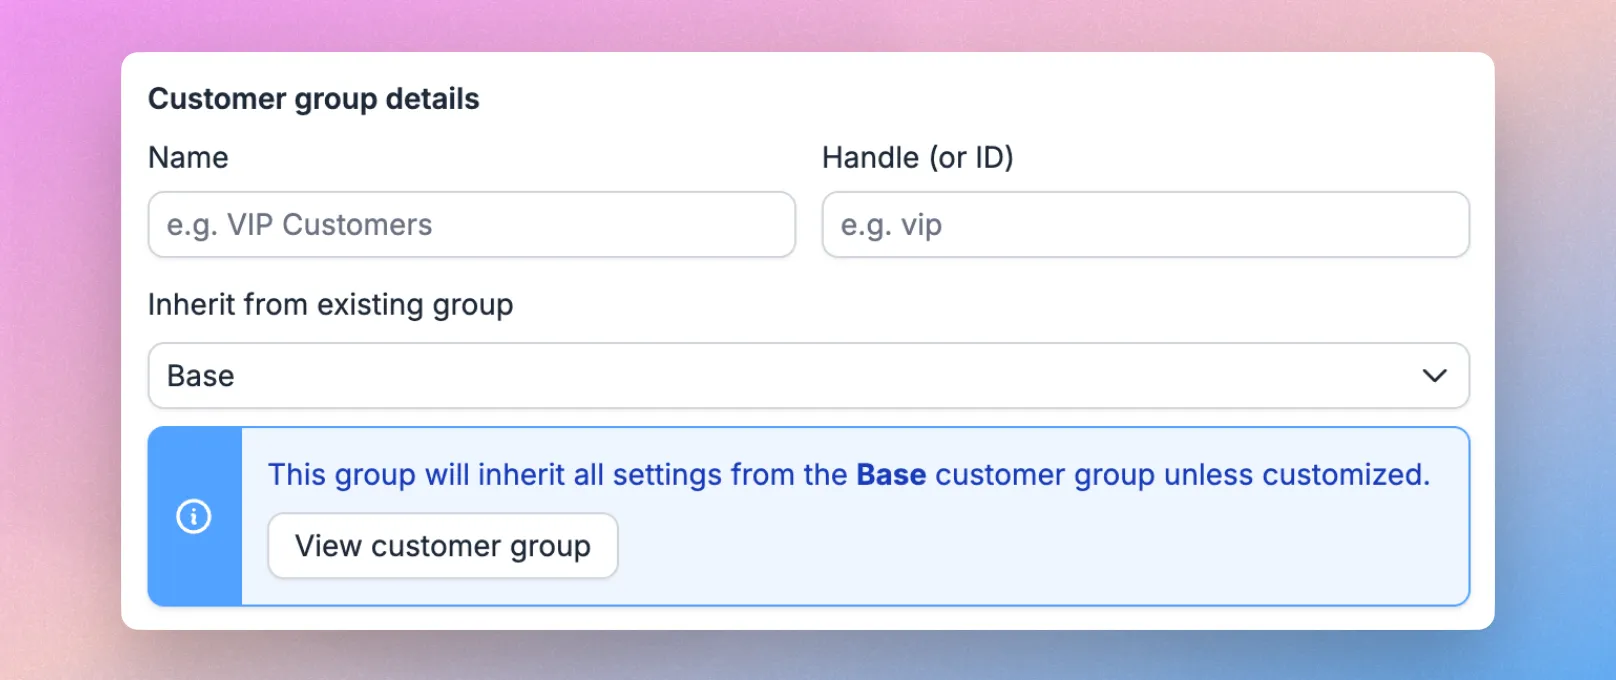
Synchronising customer data
Please note:
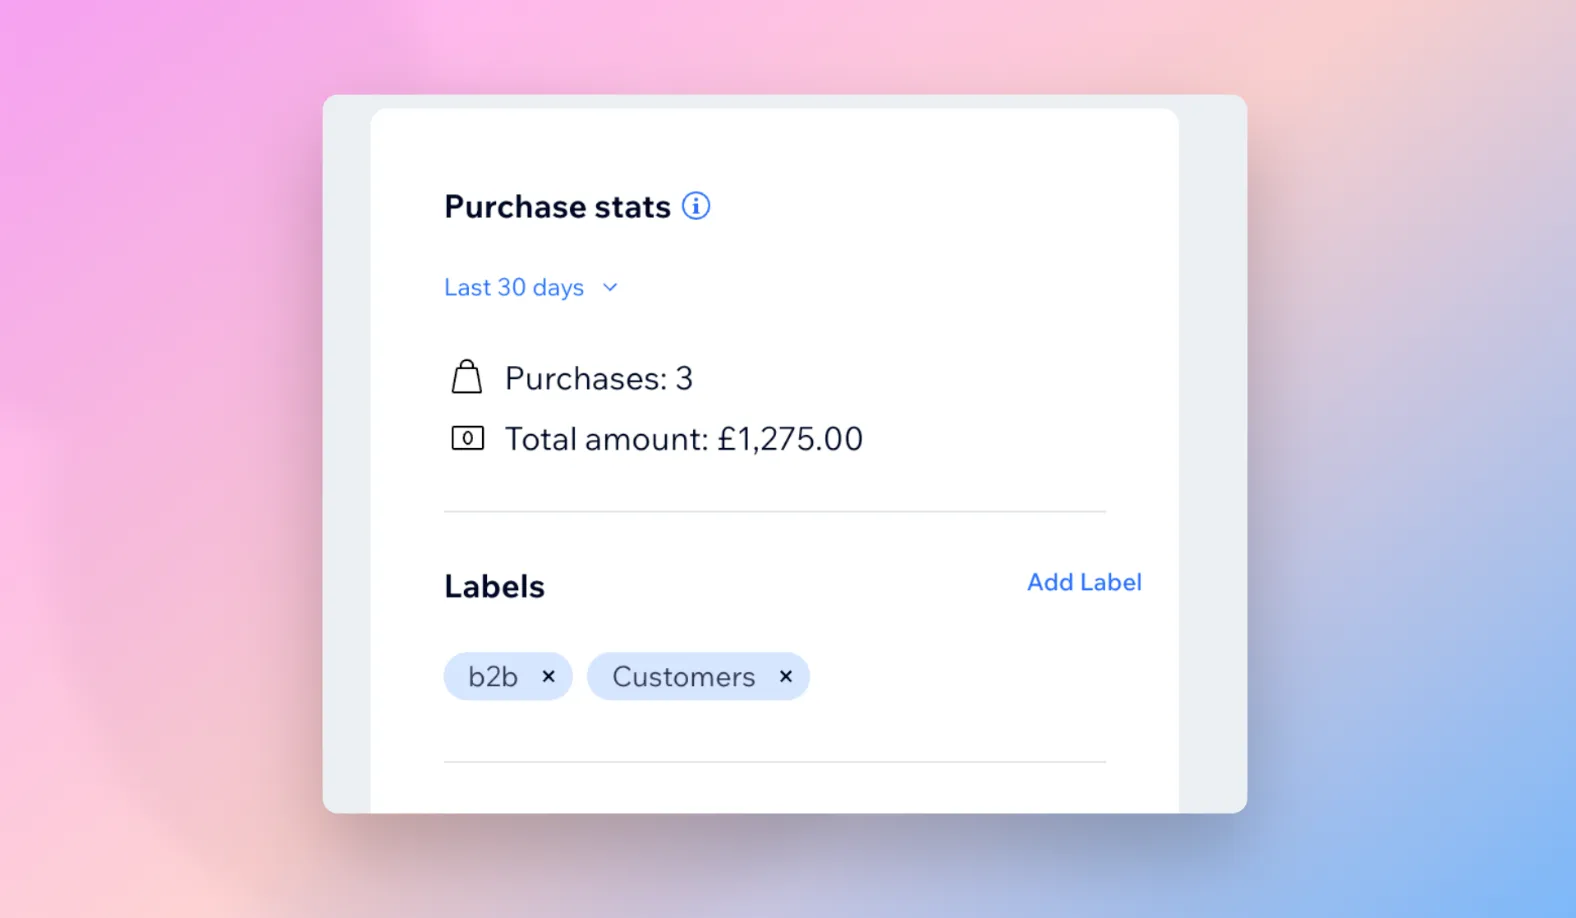
- You need to always tag a customer with b2b even if you are assigning them to an additional customer group
- Customers cannot have more than two b2b related tags assigned to their customer record in Shopify. For example: ✅ This is correct b2b b2b-vip ❌ This is incorrect b2b b2b-vip b2b-user
For your Shopify store to recognise the customer rules you set up in SparkLayer, it uses the customer tag feature within Shopify. Once a customer in Shopify is tagged, when they sign into your Shopify store they will see their unique B2B ordering rules such as pricing and payment methods.
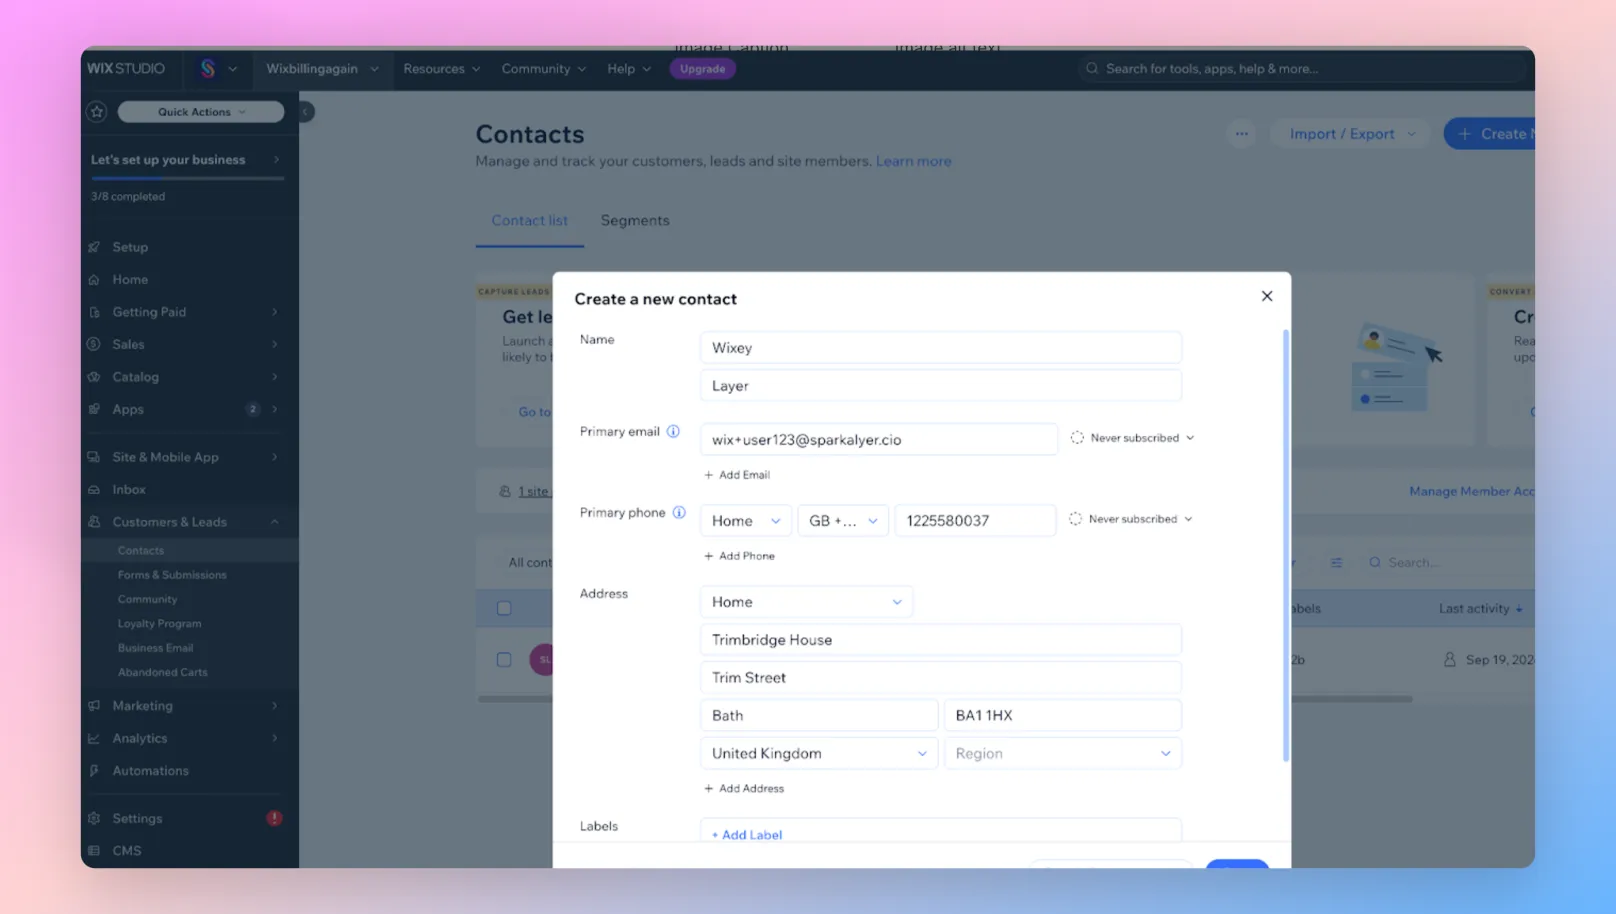
For the most simple set up, if you're using just the Base customer group, you can synchronise your customer rules with Shopify by simply tagging customers with b2b as shown below.

If you've set up additional customer groups, the process works as follows:
First, within SparkLayer create your customer group and give it a unique Handle, e.g. vip
Under the Shopify Tag column, make a note of tags that are shown. You'll note there is an additional tag to b2b, so in our example, the tags we want to note are b2b and b2b-vip
Find the customer record in Shopify and assign it the tags shown. So for our example below, if you wanted to assign them to the VIP group, you would tag them in Shopify with b2b and b2b-vip. If the tag doesn't already exist in Shopify, you can simply create is as a new tag which can then be assigned to other customers.

Assigning customer groups Please note, a customer can only be assigned to one B2B customer group. If you're looking to assign multiple price lists to a customer, you can do so by configuring price lists.

Testing a customer
🚀 See our full launch check list You can see our full launch checklist guide here which covers the key steps to testing and then launching SparkLayer to your B2B customers.
To simulate a B2B customer on your store, you can configure a sample customer within your eCommerce store.
Ensure customer accounts are enabled You’ll need to make sure that customer accounts are enabled on your storefront so that customers can sign in. Within your Shopify admin, go to Customer Accounts and select either "Customer Accounts" or "Legacy Accounts" (both are compatible with SparkLayer).
Edit or create a customer record Within your Shopify Customers admin, find an existing customer record or add a new one.

Fill in all the form fields, including the address. It's important that an address is specified otherwise SparkLayer won't find the customer record.
Tag the customer Next, tag the customer with b2b
From within the customer record in Shopify, go to the Tags section and type b2b into the field. You can either choose from an existing tag, or add it as a new tag
Invite the customer If you're using Shopify "Customer Accounts", you can simply direct your customers to the login page and they can then enter their email to receive a 6-digit access code. You can access this by going to www.yourstore.com/account.
If you're using "Legacy accounts" and you're creating a brand new customer record, you'll need to click "Send account invite" and then confirm the account once you've received the activation email (learn more here).

The customer will then receive an email asking them to confirm your account by setting a password. Should you require, you can also edit the contents of this email here.

Login as a customer Finally, return to your website and visit the login page (e.g. www.yourstore.com/account) and enter your details. If you're using Shopify "Customer Accounts", you'll be prompted to enter a 6-digit code that will be sent to your email.
You'll then see SparkLayer load and you can browse your store as a B2B customer!
Please note If you can't access this page, make sure you have customer accounts enabled.
Inviting customers To learn more, please see our full guide here.
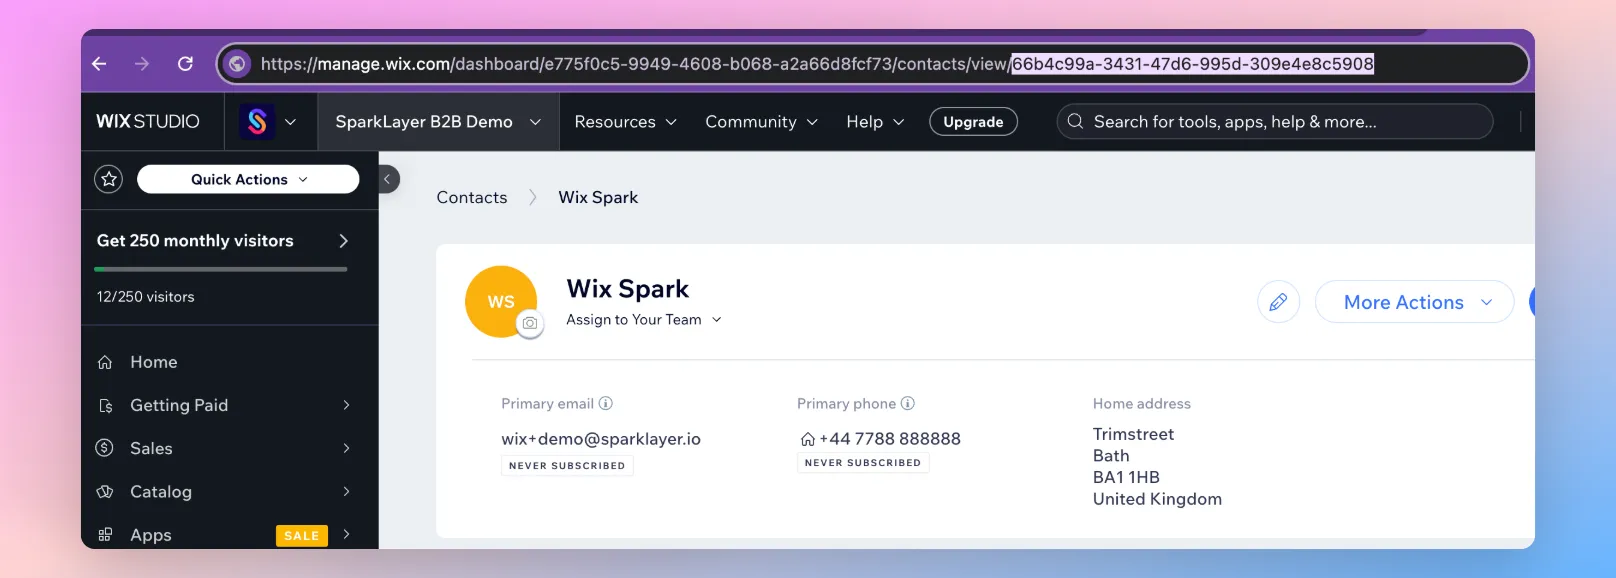
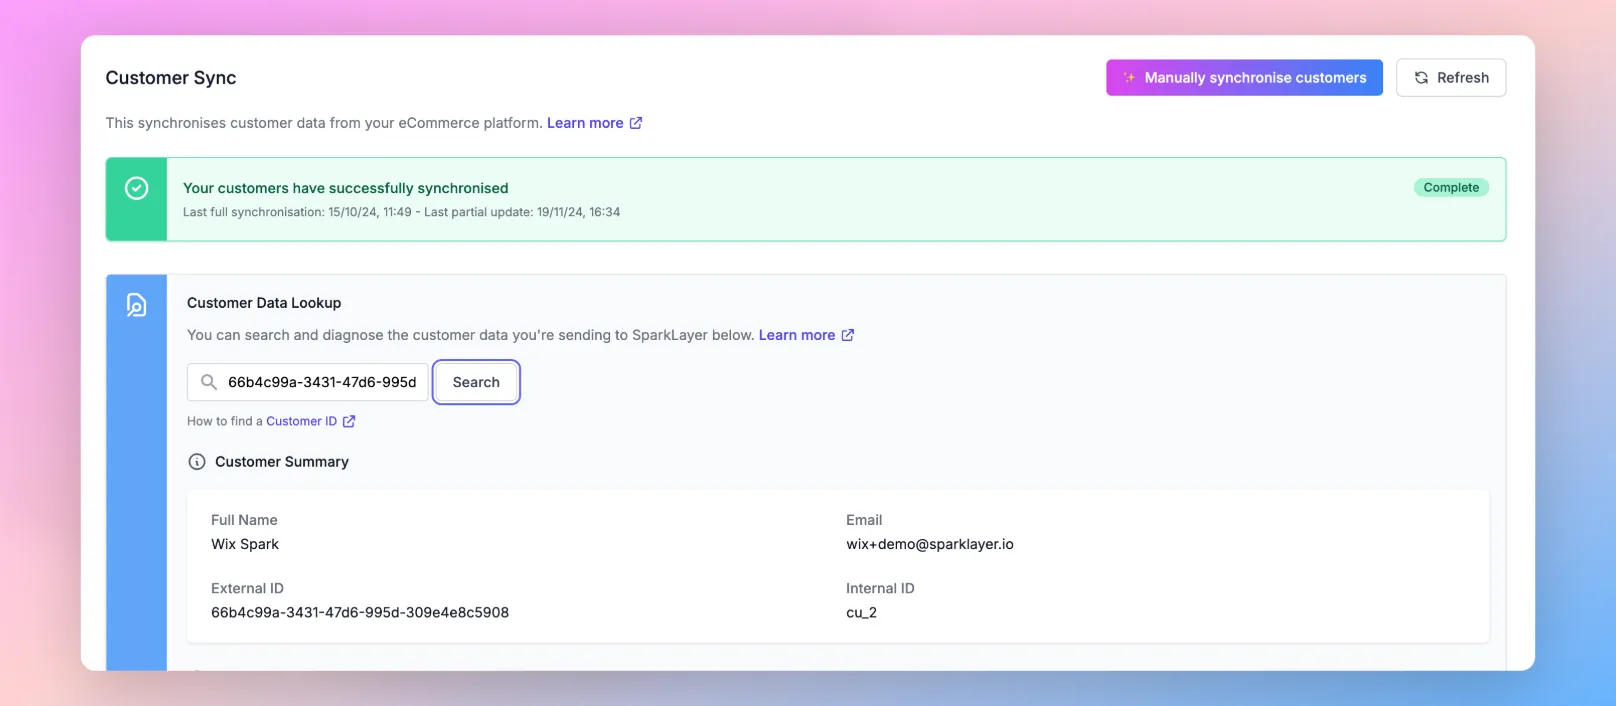
Checking a B2B customer You can also check that a B2B customer has successfully synchronised to SparkLayer in the Customer Sync tool within the SparkLayer Dashboard.
Customers
The Customers page shows a list of all B2B customers that can place orders on your store. Each row displays the customer's name, email, assigned role, and customer group - giving you a quick overview of your entire B2B customer base.
Use the search bar at the top to find a specific customer by name or email.
Please note Customer data is synced from your connected platform (e.g. Shopify). If the sync encounters any issues, you'll see a notification at the top of the page with the option to view errors and resolve them.
Viewing a customer
Click View on any customer to open their detail page. From here, you can see:
- Basic information - email, company name, customer group, price list overwrites, and sales agent group
- Financial details - discount percentage and accounting ID
- Payment on account - balance, credit limit, net terms, and currency
- Role - assign the customer as a standard customer, sales agent, or sales administrator
- Company users - view all users associated with this customer and their roles
- Addresses - default shipping and billing addresses
Please note Customer information is pulled from your connected platform. To update fields like email or company name, make changes in your Shopify admin and they'll sync across to SparkLayer.
Agents
The Agents page shows all sales agents that have been set up to place orders and manage accounts on behalf of your B2B customers. Each row displays the agent's name, email, role (Sales Agent or Sales Administrator), and their assigned group.
Use the search bar to find a specific agent by name or email. You'll also see a summary at the top showing how many sales agents you've assigned out of your total allowance.
Viewing an agent
Click View on any agent to open their detail page. From here, you can see their basic information, financial details, and payment on account settings - just as with a standard customer record.
Assigning a role
The Role section lets you control the level of access for each agent. Select one of the following options and click Save role:
- Customer - can log in and place orders (removes sales agent access)
- Sales agent - can place orders and manage addresses, shopping lists, and company access on behalf of customers
- Sales administrator - all sales agent permissions, plus the ability to edit order prices and create new customers
If you want agents to only see specific customers, you can restrict their access using groups. Select one or more groups from the dropdown beneath the role options - or leave it empty to allow access to all customers.
You can learn more about how sales agents work, including the ordering experience, payment flows, and advanced features, in our Sales Agent Ordering guide.
Roles
The Roles page lets you manage permissions and access levels for your sales team. Instead of managing permissions individually per agent, you can create reusable roles and assign them across your team - keeping things organised as you grow.
The list view shows each role's name, type (system role or custom), and how many agents are currently assigned to it.
System roles
SparkLayer includes two built-in system roles that cover the most common setups:
Role | Description |
|---|---|
Sales Agent | Standard access for day-to-day selling |
Sales Admin | Full access across the SparkLayer app |
Please note System roles cannot be edited or deleted.
Creating a custom role
Click Create role to build a role with specific permissions tailored to your team. Enter a role name, check or edit the handle (auto-generated), and then select the permissions you want to allow.
Permissions are organised into two categories:
Orders
- Edit quoted prices - change the price of items that have been quoted to a customer
- Edit custom items - add or modify custom line items on an order
- Edit custom shipping - override the shipping method or cost on an order
- Override product settings - bypass product-level rules like minimum order quantities or increments
- Complete Checkout - place orders via the normal checkout process
- Create Quotes - create quotes via the checkout
- Edit Quotes - edit quotes once created
- Complete Quotes - finalise quotes once approved
- Archive Quotes - archive quotes when no longer required
- Edit Quote Assignee - manage the sales agent assigned to quotes
Customers
- Create new customers - add new customer records to the platform
- Edit addresses - update shipping and billing addresses on a customer's account
- Edit address defaults - change which address is set as the default for shipping or billing
Click Save when you're done. To edit an existing custom role, find it in the list and click Edit - any changes will apply immediately to all agents assigned to that role.
You can learn more about how sales agents work, including the ordering experience, payment flows, and advanced features, in our Sales Agent Ordering guide.